前言
在上一篇文章《部署文心4.5开源模型给Android设备调用》,博主介绍了如何在自己的服务器部署文心4.5开源大语言模型,但对于没有GPU服务器的同学来说,可望而不可即。所以本篇文章就介绍如何白嫖AiStudio上面的算力来部署文心4.5开源大模型给自己使用。
部署文心4.5模型
- 注册AiStudio,关于如何注册这里就不再介绍,可以在这个链接https://aistudio.baidu.com/overview进行注册。
-
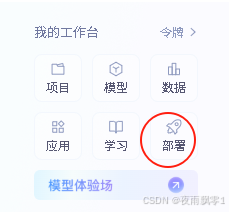
然后来到AiStudio的主页,可以看到左下方一个
部署入口,如下截图。
-
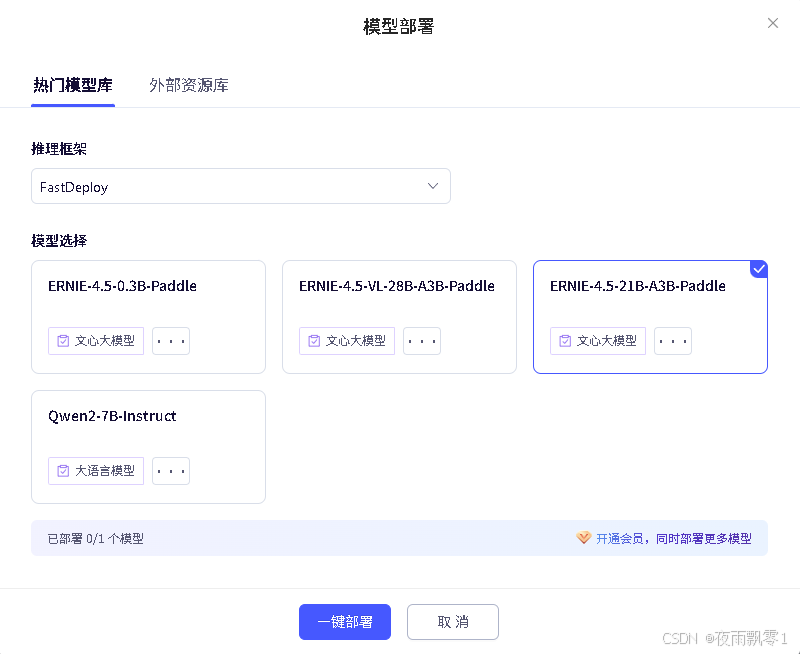
点击新建部署,使用FastDeploy进行部署,可以看到有几个可以选的模型,博主就选择跟上一篇文件一样的模型
ERNIE-4.5-21B-A3B-Paddle。
-
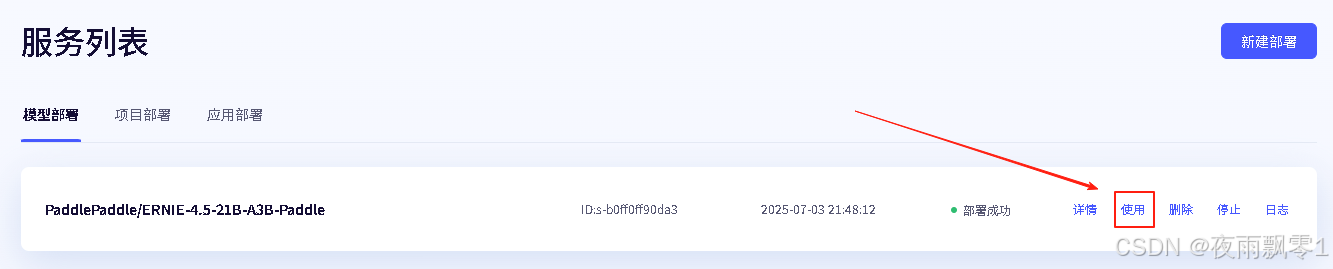
部署完成之后,点击使用可以查看使用示例。
-
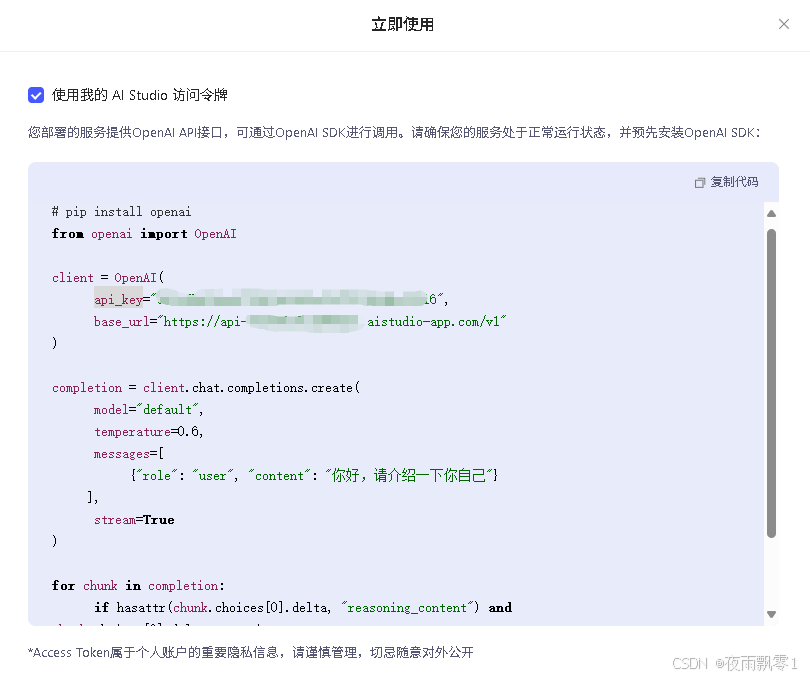
使用示例如下,其中最关键的是获取
api_key和base_url,从示例中可以看出是支持OpenAI API格式的,这样就好办了。
到这里就部署完成文心4.5模型,接下来就是部署自己的服务了。
部署自己的中转服务
更上一篇文章相比,只需要修改openai.Client中的base_url和api_key,修改成上一步获取的值。其他的不用修改。
class LLM:
    def __init__(self, host, port):
        self.client = openai.Client(base_url=f"https://api-******************.aistudio-app.com/v1",
                                    api_key="*************************16")
        self.system_prompt = {"role": "system", "content": "You are a helpful assistant."}
        self.histories: Dict[str, list] = {}
        self.base_prompt = {"role": "user", "content": "请扮演一个AI助手角色,你的名字文心4.5。"}
        self.base_prompt_res = {"role": "assistant", "content": "好的,我已经记住了。您有什么问题想要问我吗?"}

    # 流式回复
    def generate_stream(self, prompt, max_length=8192, top_p=0.8, temperature=0.95, session_id=None):
        # 如果session_id存在之前的历史,则获取history
        if session_id and session_id in self.histories.keys():
            history = self.histories[session_id]
        else:
            # 否则创建新的session_id
            session_id = str(uuid.uuid4()).replace('-', '')
            history = [self.system_prompt, self.base_prompt, self.base_prompt_res]
        history.append({"role": "user", "content": prompt})
        print(f"历史纪录:{history}")
        print("=" * 70)
        print(f"【用户提问】:{prompt}")
        all_output = ""
        response = self.client.chat.completions.create(model="null",
                                                       messages=history,
                                                       max_tokens=max_length,
                                                       temperature=temperature,
                                                       top_p=top_p,
                                                       stream=True)
        for chunk in response:
            if chunk.choices[0].delta:
                output = chunk.choices[0].delta.content
                if output == "": continue
                ret = {"response": output, "code": 0, "session_id": session_id}
                all_output += output
                # 更新history
                history[-1] = {"role": "assistant", "content": all_output}
                self.histories[session_id] = history
                # 返回json格式的字节
                yield json.dumps(ret).encode() + b"\0"
Android调用
Android中的代码跟上一篇文章一样,不需要任何的修改。在Android中,核心代码如下,其中CHAT_HOST的值为http://192.168.1.100:8000,其中IP是部署自己的中转服务的服务器IP,端口是port指定的端口号。
// 发送文本结果到大语言模型接口
private void sendChat(String text) {
    if (text.isEmpty()) {
        return;
    }
    runOnUiThread(() -> sendBtn.setEnabled(false));
    // 请求的参数
    Map<String, String> map = new HashMap<>();
    map.put("prompt", text);
    if (session_id != null) {
        map.put("session_id", session_id);
    }
    JSONObject jsonObject = new JSONObject(map);
    try {
        jsonObject.put("top_p", 0.8);
        jsonObject.put("temperature", 0.95);
    } catch (JSONException e) {
        throw new RuntimeException(e);
    }
    RequestBody requestBodyJson = RequestBody.create(jsonObject.toString(),
            MediaType.parse("application/json; charset=utf-8"));
    Request request = new Request.Builder()
            .url(CHAT_HOST + "/llm")
            .post(requestBodyJson)
            .build();
    OkHttpClient client = new OkHttpClient.Builder()
            .connectTimeout(30, TimeUnit.SECONDS)//设置连接超时时间
            .readTimeout(30, TimeUnit.SECONDS)//设置读取超时时间
            .build();
    try {
        Response response = client.newCall(request).execute();
        ResponseBody responseBody = response.body();
        // 接收流式结果
        InputStream inputStream = responseBody.byteStream();
        byte[] buffer = new byte[2048];
        int len;
        StringBuilder all_response = new StringBuilder();
        StringBuilder sb = new StringBuilder();
        while ((len = inputStream.read(buffer)) != -1) {
            try {
                // 处理读取到的数据
                String data = new String(buffer, 0, len - 1, StandardCharsets.UTF_8);
                sb.append(data);
                byte lastBuffer = buffer[len - 2];
                buffer = new byte[2048];
                if (lastBuffer != 0x7d) {
                    continue;
                }
                data = sb.toString();
                sb = new StringBuilder();
                Log.d(TAG, data);
                JSONObject resultJson = new JSONObject(data);
                int code = resultJson.getInt("code");
                String resp = resultJson.getString("response");
                all_response.append(resp);
                session_id = resultJson.getString("session_id");
                runOnUiThread(() -> {
                    Msg lastMsg = mMsgList.get(mMsgList.size() - 1);
                    if (lastMsg.getType() == Msg.TYPE_RECEIVED) {
                        mMsgList.get(mMsgList.size() - 1).setContent(all_response.toString());
                        // 有新消息时,刷新RecyclerView中的显示
                        mAdapter.notifyItemChanged(mMsgList.size() - 1);
                    } else {
                        mMsgList.add(new Msg(resp, Msg.TYPE_RECEIVED));
                        // 有新消息时,刷新RecyclerView中的显示
                        mAdapter.notifyItemInserted(mMsgList.size() - 1);
                    }
                    // 将RecyclerView定位到最后一行
                    mRecyclerView.scrollToPosition(mMsgList.size() - 1);
                });
            } catch (JSONException e) {
                e.printStackTrace();
            }
        }
        inputStream.close();
        response.close();
    } catch (IOException e) {
        e.printStackTrace();
    }
    runOnUiThread(() -> sendBtn.setEnabled(true));
}
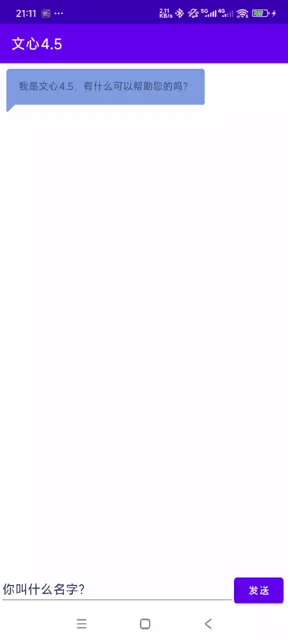
效果图如下:
获取源码
在公众号中回复【部署文心4.5开源模型给Android设备调用】即可获取源码。