Introduction
MNN is a lightweight deep neural network inference engine that loads deep neural network models on the end side for inference and prediction. Currently, MNN has been used in more than 20 apps of Alibaba, such as mobile Taobao, mobile Tmall, and Youku, covering scenarios like live streaming, short videos, search recommendations, product image search, interactive marketing, benefit distribution, and security risk control. Additionally, there are several applications in IoT and other scenarios.
This tutorial will introduce how to use MNN to implement image classification on Android devices.
Tutorial Source Code Address: https://github.com/yeyupiaoling/ClassificationForAndroid/blob/master/MNNClassification
Compile the Library and Convert the Model
Compile MNN’s Android Dynamic Library
- Download and install the NDK from
https://developer.android.com/ndk/downloads/, and it is recommended to use the latest stable version. - Set the NDK environment variable in
.bashrcor.bash_profile, for example:export ANDROID_NDK=/Users/username/path/to/android-ndk-r14b cd /path/to/MNN./schema/generate.shcd project/android- Compile the armv7 dynamic library:
mkdir build_32 && cd build_32 && ../build_32.sh - Compile the armv8 dynamic library:
mkdir build_64 && cd build_64 && ../build_64.sh
Model Conversion
Execute the following command to obtain the model conversion tool MNNConvert:
cd MNN/
./schema/generate.sh
mkdir build
cd build
cmake .. -DMNN_BUILD_CONVERTER=true && make -j4
The following commands can convert models from other frameworks to MNN models:
TensorFlow -> MNN
Convert a TensorFlow frozen graph model to an MNN model. The bizCode specifies a marker code, which can be arbitrary. If the frozen graph conversion fails, you can use the TensorFlow Lite model, which usually succeeds.
./MNNConvert -f TF --modelFile XXX.pb --MNNModel XXX.mnn --bizCode biz
TensorFlow Lite -> MNN
Convert a TensorFlow Lite model to an MNN model. The bizCode specifies a marker code.
./MNNConvert -f TFLITE --modelFile XXX.tflite --MNNModel XXX.mnn --bizCode biz
Caffe -> MNN
Convert a Caffe model to an MNN model. The bizCode specifies a marker code.
./MNNConvert -f CAFFE --modelFile XXX.caffemodel --prototxt XXX.prototxt --MNNModel XXX.mnn --bizCode biz
ONNX -> MNN
Convert an ONNX model to an MNN model. The bizCode specifies a marker code.
./MNNConvert -f ONNX --modelFile XXX.onnx --MNNModel XXX.mnn --bizCode biz
Android Application Development
Place the generated C++ header files in the app/include/MNN/ directory, the generated dynamic library files in the app/src/main/jniLibs/ directory, write JNI C++ code in the app/src/main/cpp/ directory, place JNI Java code and MNN-related utility classes in the com.yeyupiaoling.mnnclassification.mnn package, and place the converted model in the assets directory.
MNN Utility Class
Create an MNNClassification.java utility class to handle all MNN operations, such as loading the model and making predictions. In the constructor, load the model through the provided model path, configure prediction parameters during model loading (e.g., whether to use CPU or GPU), and obtain the input and output layers of the network. MNN also provides many image preprocessing tools, making image preprocessing very straightforward. Note the image mean dataConfig.mean, standard deviation dataConfig.normal, and input channel order dataConfig.dest; since image preprocessing during training may vary, if you encounter high accuracy on the computer but low accuracy on the phone, it is likely due to incorrect image preprocessing.
public MNNClassification(String modelPath) throws Exception {
    dataConfig = new MNNImageProcess.Config();
    dataConfig.mean = new float[]{128.0f, 128.0f, 128.0f};
    dataConfig.normal = new float[]{0.0078125f, 0.0078125f, 0.0078125f};
    dataConfig.dest = MNNImageProcess.Format.RGB;
    imgData = new Matrix();

    File file = new File(modelPath);
    if (!file.exists()) {
        throw new Exception("model file is not exists!");
    }
    try {
        mNetInstance = MNNNetInstance.createFromFile(modelPath);
        MNNNetInstance.Config config = new MNNNetInstance.Config();
        config.numThread = NUM_THREADS;
        config.forwardType = MNNForwardType.FORWARD_CPU.type;
        mSession = mNetInstance.createSession(config);
        mInputTensor = mSession.getInput(null);
    } catch (Exception e) {
        e.printStackTrace();
        throw new Exception("load model fail!");
    }
}
To support both image path and Bitmap format image prediction, two overloaded methods are created, both calling predict():
public int predictImage(String image_path) throws Exception {
    if (!new File(image_path).exists()) {
        throw new Exception("image file is not exists!");
    }
    FileInputStream fis = new FileInputStream(image_path);
    Bitmap bitmap = BitmapFactory.decodeStream(fis);
    int result = predictImage(bitmap);
    if (bitmap.isRecycled()) {
        bitmap.recycle();
    }
    return result;
}

public int predictImage(Bitmap bitmap) throws Exception {
    return predict(bitmap);
}
A method to get the maximum probability value and return the index (i.e., the predicted label with the highest probability) is created:
public static int getMaxResult(float[] result) {
    float probability = 0;
    int r = 0;
    for (int i = 0; i < result.length; i++) {
        if (probability < result[i]) {
            probability = result[i];
            r = i;
        }
    }
    return r;
}
This method is the final step of MNN prediction. It executes mSession.run() to predict the input data and get the result, then parses the maximum probability prediction label and returns it. Here is the complete prediction method:
private float[] predict(Bitmap bmp) throws Exception {
    imgData.reset();
    imgData.postScale(inputWidth / (float) bmp.getWidth(), inputHeight / (float) bmp.getHeight());
    imgData.invert(imgData);
    MNNImageProcess.convertBitmap(bmp, mInputTensor, dataConfig, imgData);

    try {
        mSession.run();
    } catch (Exception e) {
        throw new Exception("predict image fail! log:" + e);
    }
    MNNNetInstance.Session.Tensor output = mSession.getOutput(null);
    float[] result = output.getFloatData();
    Log.d(TAG, Arrays.toString(result));
    int l = getMaxResult(result);
    return new float[]{l, result[l]};
}
Select Image for Prediction
This tutorial includes two pages: one for selecting an image for prediction and another for real-time prediction using the camera. The following is the code for activity_main.xml, which uses buttons to select images and displays the image and prediction results on the page:
<?xml version="1.0" encoding="utf-8"?>
<RelativeLayout xmlns:android="http://schemas.android.com/apk/res/android"
    xmlns:app="http://schemas.android.com/apk/res-auto"
    xmlns:tools="http://schemas.android.com/tools"
    android:layout_width="match_parent"
    android:layout_height="match_parent"
    android:orientation="vertical"
    tools:context=".MainActivity">

    <ImageView
        android:id="@+id/image_view"
        android:layout_width="match_parent"
        android:layout_height="400dp" />

    <TextView
        android:id="@+id/result_text"
        android:layout_width="match_parent"
        android:layout_height="wrap_content"
        android:layout_below="@id/image_view"
        android:text="识别结果"
        android:textSize="16sp" />


    <LinearLayout
        android:layout_width="match_parent"
        android:layout_height="wrap_content"
        android:layout_alignParentBottom="true"
        android:orientation="horizontal">

        <Button
            android:id="@+id/select_img_btn"
            android:layout_width="0dp"
            android:layout_height="wrap_content"
            android:layout_weight="1"
            android:text="选择照片" />


        <Button
            android:id="@+id/open_camera"
            android:layout_width="0dp"
            android:layout_height="wrap_content"
            android:layout_weight="1"
            android:text="实时预测" />

    </LinearLayout>

</RelativeLayout>
In MainActivity.java, the model needs to be loaded when the page is entered. Since the model is placed in the Android project’s assets directory, we need to copy it to a cache directory and then load it from there. Additionally, we need to read the label names, which are stored in the label_list.txt file in the assets directory in the order of training labels. The implementation code is as follows:
classNames = Utils.ReadListFromFile(getAssets(), "label_list.txt");
String classificationModelPath = getCacheDir().getAbsolutePath() + File.separator + "mobilenet_v2.mnn";
Utils.copyFileFromAsset(MainActivity.this, "mobilenet_v2.mnn", classificationModelPath);
try {
    mnnClassification = new MNNClassification(classificationModelPath);
    Toast.makeText(MainActivity.this, "模型加载成功!", Toast.LENGTH_SHORT).show();
} catch (Exception e) {
    Toast.makeText(MainActivity.this, "模型加载失败!", Toast.LENGTH_SHORT).show();
    e.printStackTrace();
    finish();
}
Add click events for the two buttons to either open the album to read images for prediction or open another Activity to call the camera for real-time recognition:
Button selectImgBtn = findViewById(R.id.select_img_btn);
Button openCamera = findViewById(R.id.open_camera);
imageView = findViewById(R.id.image_view);
textView = findViewById(R.id.result_text);
selectImgBtn.setOnClickListener(new View.OnClickListener() {
    @Override
    public void onClick(View v) {
        // Open the album
        Intent intent = new Intent(Intent.ACTION_PICK);
        intent.setType("image/*");
        startActivityForResult(intent, 1);
    }
});
openCamera.setOnClickListener(new View.OnClickListener() {
    @Override
    public void onClick(View v) {
        // Open the real-time recognition page
        Intent intent = new Intent(MainActivity.this, CameraActivity.class);
        startActivity(intent);
    }
});
When an image is selected from the album, the following callback method is used to obtain the image path and perform prediction:
@Override
protected void onActivityResult(int requestCode, int resultCode, @Nullable Intent data) {
    super.onActivityResult(requestCode, resultCode, data);
    String image_path;
    if (resultCode == Activity.RESULT_OK) {
        if (requestCode == 1) {
            if (data == null) {
                Log.w("onActivityResult", "user photo data is null");
                return;
            }
            Uri image_uri = data.getData();
            image_path = getPathFromURI(MainActivity.this, image_uri);
            try {
                // Predict the image
                FileInputStream fis = new FileInputStream(image_path);
                imageView.setImageBitmap(BitmapFactory.decodeStream(fis));
                long start = System.currentTimeMillis();
                float[] result = mnnClassification.predictImage(image_path);
                long end = System.currentTimeMillis();
                String show_text = "预测结果标签:" + (int) result[0] +
                        "\n名称:" +  classNames[(int) result[0]] +
                        "\n概率:" + result[1] +
                        "\n时间:" + (end - start) + "ms";
                textView.setText(show_text);
            } catch (Exception e) {
                e.printStackTrace();
            }
        }
    }
}
The following method converts the obtained Uri to an absolute path:
// Get photo path from Uri
public static String getPathFromURI(Context context, Uri uri) {
    String result;
    Cursor cursor = context.getContentResolver().query(uri, null, null, null, null);
    if (cursor == null) {
        result = uri.getPath();
    } else {
        cursor.moveToFirst();
        int idx = cursor.getColumnIndex(MediaStore.Images.ImageColumns.DATA);
        result = cursor.getString(idx);
        cursor.close();
    }
    return result;
}
Real-time Camera Prediction
The real-time camera prediction implementation is similar in principle. For detailed code, please refer to the source code at https://github.com/yeyupiaoling/ClassificationForAndroid/tree/master/TFLiteClassification. The core code is as follows:
private Runnable periodicClassify =
        new Runnable() {
            @Override
            public void run() {
                synchronized (lock) {
                    if (runClassifier) {
                        // Check if the camera is ready before starting prediction
                        if (getApplicationContext() != null && mCameraDevice != null && mnnClassification != null) {
                            predict();
                        }
                    }
                }
                if (mInferThread != null && mInferHandler != null && mCaptureHandler != null && mCaptureThread != null) {
                    mInferHandler.post(periodicClassify);
                }
            }
        };

// Predict the image captured by the camera
private void predict() {
    // Get the image captured by the camera
    Bitmap bitmap = mTextureView.getBitmap();
    try {
        // Predict the image
        long start = System.currentTimeMillis();
        float[] result = mnnClassification.predictImage(bitmap);
        long end = System.currentTimeMillis();
        String show_text = "预测结果标签:" + (int) result[0] +
                "\n名称:" +  classNames[(int) result[0]] +
                "\n概率:" + result[1] +
                "\n时间:" + (end - start) + "ms";
        textView.setText(show_text);
    } catch (Exception e) {
        e.printStackTrace();
    }
}
This project uses permissions to read images and access the camera. Do not forget to add the following permission declarations in AndroidManifest.xml:
<uses-permission android:name="android.permission.CAMERA"/>
<uses-permission android:name="android.permission.READ_EXTERNAL_STORAGE"/>
<uses-permission android:name="android.permission.WRITE_EXTERNAL_STORAGE"/>
For Android 6.0 and above, dynamic permission requests are required:
// Check if permissions are granted
private boolean hasPermission() {
    if (Build.VERSION.SDK_INT >= Build.VERSION_CODES.M) {
        return checkSelfPermission(Manifest.permission.CAMERA) == PackageManager.PERMISSION_GRANTED &&
                checkSelfPermission(Manifest.permission.READ_EXTERNAL_STORAGE) == PackageManager.PERMISSION_GRANTED &&
                checkSelfPermission(Manifest.permission.WRITE_EXTERNAL_STORAGE) == PackageManager.PERMISSION_GRANTED;
    } else {
        return true;
    }
}

// Request permissions
private void requestPermission() {
    if (Build.VERSION.SDK_INT >= Build.VERSION_CODES.M) {
        requestPermissions(new String[]{Manifest.permission.CAMERA,
                Manifest.permission.READ_EXTERNAL_STORAGE,
                Manifest.permission.WRITE_EXTERNAL_STORAGE}, 1);
    }
}
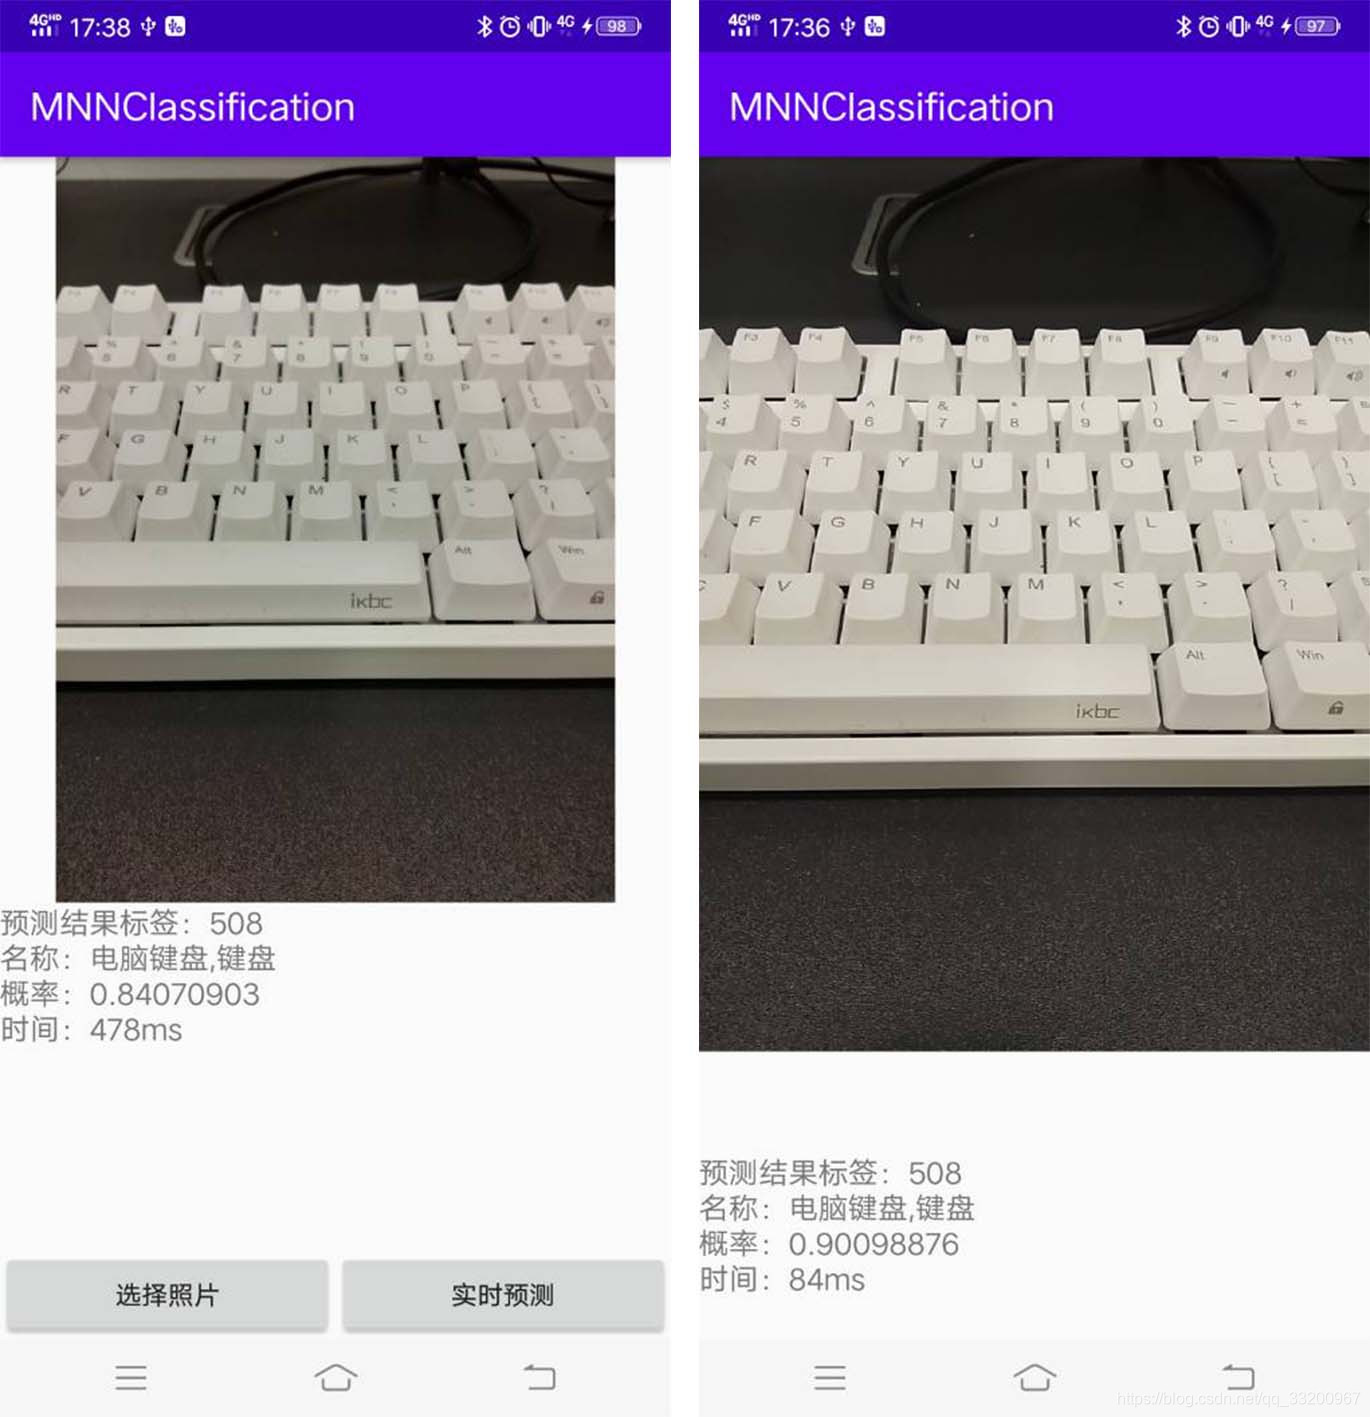
Effect Diagram: