前言
MNN是一個輕量級的深度神經網絡推理引擎,在端側加載深度神經網絡模型進行推理預測。目前,MNN已經在阿里巴巴的手機淘寶、手機天貓、優酷等20多個App中使用,覆蓋直播、短視頻、搜索推薦、商品圖像搜索、互動營銷、權益發放、安全風控等場景。此外,IoT等場景下也有若干應用。
下面就介紹如何使用MNN在Android設備上實現圖像分類。
教程源碼地址:https://github.com/yeyupiaoling/ClassificationForAndroid/blob/master/MNNClassification
編譯庫和轉換模型
編譯MNN的Android動態庫
- 在
https://developer.android.com/ndk/downloads/下載安裝NDK,建議使用最新穩定版本 - 在 .bashrc 或者 .bash_profile 中設置 NDK 環境變量,例如:
export ANDROID_NDK=/Users/username/path/to/android-ndk-r14b cd /path/to/MNN./schema/generate.shcd project/android- 編譯armv7動態庫:
mkdir build_32 && cd build_32 && ../build_32.sh - 編譯armv8動態庫:
mkdir build_64 && cd build_64 && ../build_64.sh
模型轉換
執行下面命令,得到模型轉換工具MNNConvert。
cd MNN/
./schema/generate.sh
mkdir build
cd build
cmake .. -DMNN_BUILD_CONVERTER=true && make -j4
通過以下命令可以把其他框架的模型轉換爲MNN模型。
TensorFlow -> MNN
把Tensorflow的凍結圖模型轉換爲MNN模型,bizCode指定標記碼,這個隨便吧。如果凍結圖轉換不成功,可以使用下面的Tensorflow Lite模型,這個通常會成功。
./MNNConvert -f TF --modelFile XXX.pb --MNNModel XXX.mnn --bizCode biz
TensorFlow Lite -> MNN
把Tensorflow Lite的模型轉換爲MNN模型,bizCode指定標記碼。
./MNNConvert -f TFLITE --modelFile XXX.tflite --MNNModel XXX.mnn --bizCode biz
Caffe -> MNN
把Caffe的模型轉換爲MNN模型,bizCode指定標記碼。
./MNNConvert -f CAFFE --modelFile XXX.caffemodel --prototxt XXX.prototxt --MNNModel XXX.mnn --bizCode biz
ONNX -> MNN
把ONNX 的模型轉換爲MNN模型,bizCode指定標記碼。
./MNNConvert -f ONNX --modelFile XXX.onnx --MNNModel XXX.mnn --bizCode biz
Android應用開發
把生成的C++的頭文件放在app/include/MNN/目錄下,把生成的動態庫文件放在app/src/main/jniLibs/目錄下,在app/src/main/cpp/目錄下編寫JNI的C++代碼,com.yeyupiaoling.mnnclassification.mnn包下放JNI的java代碼和MNN的相關工具類,將轉換的模型放在assets目錄下。
MNN工具
編寫一個MNNClassification.java工具類,關於MNN的操作都在這裏完成,如加載模型、預測。在構造方法中,通過參數傳遞的模型路徑加載模型,在加載模型的時候配置預測信息,例如是否使用CPU或者GPU,同時獲取網絡的輸入輸出層。同時MNN還提供了很多的圖像預處理工具,對圖像的預處理非常簡單。要注意的是圖像的均值dataConfig.mean和標準差dataConfig.normal,還有圖片的輸入通道順序dataConfig.dest,因爲在訓練的時候圖像預處理可能不一樣的,有些讀者出現在電腦上準確率很高,但在手機上準確率很低,多數情況下就是這個圖像預處理做得不對。
public MNNClassification(String modelPath) throws Exception {
    dataConfig = new MNNImageProcess.Config();
    dataConfig.mean = new float[]{128.0f, 128.0f, 128.0f};
    dataConfig.normal = new float[]{0.0078125f, 0.0078125f, 0.0078125f};
    dataConfig.dest = MNNImageProcess.Format.RGB;
    imgData = new Matrix();

    File file = new File(modelPath);
    if (!file.exists()) {
        throw new Exception("model file is not exists!");
    }
    try {
        mNetInstance = MNNNetInstance.createFromFile(modelPath);
        MNNNetInstance.Config config = new MNNNetInstance.Config();
        config.numThread = NUM_THREADS;
        config.forwardType = MNNForwardType.FORWARD_CPU.type;
        mSession = mNetInstance.createSession(config);
        mInputTensor = mSession.getInput(null);
    } catch (Exception e) {
        e.printStackTrace();
        throw new Exception("load model fail!");
    }
}
爲了兼容圖片路徑和Bitmap格式的圖片預測,這裏創建了兩個重載方法,它們都是通過調用predict()
public int predictImage(String image_path) throws Exception {
    if (!new File(image_path).exists()) {
        throw new Exception("image file is not exists!");
    }
    FileInputStream fis = new FileInputStream(image_path);
    Bitmap bitmap = BitmapFactory.decodeStream(fis);
    int result = predictImage(bitmap);
    if (bitmap.isRecycled()) {
        bitmap.recycle();
    }
    return result;
}

public int predictImage(Bitmap bitmap) throws Exception {
    return predict(bitmap);
}
這裏創建一個獲取最大概率值,並把下標返回的方法,其實就是獲取概率最大的預測標籤。
public static int getMaxResult(float[] result) {
    float probability = 0;
    int r = 0;
    for (int i = 0; i < result.length; i++) {
        if (probability < result[i]) {
            probability = result[i];
            r = i;
        }
    }
    return r;
}
這個方法就是MNN執行預測的最後一步,通過執行mSession.run()對輸入的數據進行預測並得到預測結果,通過解析獲取到最大的概率的預測標籤,並返回。到這裏MNN的工具就完成了。
private float[] predict(Bitmap bmp) throws Exception {
    imgData.reset();
    imgData.postScale(inputWidth / (float) bmp.getWidth(), inputHeight / (float) bmp.getHeight());
    imgData.invert(imgData);
    MNNImageProcess.convertBitmap(bmp, mInputTensor, dataConfig, imgData);

    try {
        mSession.run();
    } catch (Exception e) {
        throw new Exception("predict image fail! log:" + e);
    }
    MNNNetInstance.Session.Tensor output = mSession.getOutput(null);
    float[] result = output.getFloatData();
    Log.d(TAG, Arrays.toString(result));
    int l = getMaxResult(result);
    return new float[]{l, result[l]};
}
選擇圖片預測
本教程會有兩個頁面,一個是選擇圖片進行預測的頁面,另一個是使用相機即時預測並顯示預測結果。以下爲activity_main.xml的代碼,通過按鈕選擇圖片,並在該頁面顯示圖片和預測結果。
<?xml version="1.0" encoding="utf-8"?>
<RelativeLayout xmlns:android="http://schemas.android.com/apk/res/android"
    xmlns:app="http://schemas.android.com/apk/res-auto"
    xmlns:tools="http://schemas.android.com/tools"
    android:layout_width="match_parent"
    android:layout_height="match_parent"
    android:orientation="vertical"
    tools:context=".MainActivity">

    <ImageView
        android:id="@+id/image_view"
        android:layout_width="match_parent"
        android:layout_height="400dp" />

    <TextView
        android:id="@+id/result_text"
        android:layout_width="match_parent"
        android:layout_height="wrap_content"
        android:layout_below="@id/image_view"
        android:text="識別結果"
        android:textSize="16sp" />


    <LinearLayout
        android:layout_width="match_parent"
        android:layout_height="wrap_content"
        android:layout_alignParentBottom="true"
        android:orientation="horizontal">

        <Button
            android:id="@+id/select_img_btn"
            android:layout_width="0dp"
            android:layout_height="wrap_content"
            android:layout_weight="1"
            android:text="選擇照片" />


        <Button
            android:id="@+id/open_camera"
            android:layout_width="0dp"
            android:layout_height="wrap_content"
            android:layout_weight="1"
            android:text="即時預測" />

    </LinearLayout>

</RelativeLayout>
在MainActivity.java中,進入到頁面我們就要先加載模型,我們是把模型放在Android項目的assets目錄的,我們需要把模型複製到一個緩存目錄,然後再從緩存目錄加載模型,同時還有讀取標籤名,標籤名稱按照訓練的label順序存放在assets的label_list.txt,以下爲實現代碼。
classNames = Utils.ReadListFromFile(getAssets(), "label_list.txt");
String classificationModelPath = getCacheDir().getAbsolutePath() + File.separator + "mobilenet_v2.mnn";
Utils.copyFileFromAsset(MainActivity.this, "mobilenet_v2.mnn", classificationModelPath);
try {
    mnnClassification = new MNNClassification(classificationModelPath);
    Toast.makeText(MainActivity.this, "模型加載成功!", Toast.LENGTH_SHORT).show();
} catch (Exception e) {
    Toast.makeText(MainActivity.this, "模型加載失敗!", Toast.LENGTH_SHORT).show();
    e.printStackTrace();
    finish();
}
添加兩個按鈕點擊事件,可以選擇打開相冊讀取圖片進行預測,或者打開另一個Activity進行調用攝像頭即時識別。
Button selectImgBtn = findViewById(R.id.select_img_btn);
Button openCamera = findViewById(R.id.open_camera);
imageView = findViewById(R.id.image_view);
textView = findViewById(R.id.result_text);
selectImgBtn.setOnClickListener(new View.OnClickListener() {
    @Override
    public void onClick(View v) {
        // 打開相冊
        Intent intent = new Intent(Intent.ACTION_PICK);
        intent.setType("image/*");
        startActivityForResult(intent, 1);
    }
});
openCamera.setOnClickListener(new View.OnClickListener() {
    @Override
    public void onClick(View v) {
        // 打開即時拍攝識別頁面
        Intent intent = new Intent(MainActivity.this, CameraActivity.class);
        startActivity(intent);
    }
});
當打開相冊選擇照片之後,回到原來的頁面,在下面這個回調方法中獲取選擇圖片的Uri,通過Uri可以獲取到圖片的絕對路徑。如果Android8以上的設備獲取不到圖片,需要在AndroidManifest.xml配置文件中的application添加android:requestLegacyExternalStorage="true"。拿到圖片路徑之後,調用TFLiteClassificationUtil類中的predictImage()方法預測並獲取預測值,在頁面上顯示預測的標籤、對應標籤的名稱、概率值和預測時間。
@Override
protected void onActivityResult(int requestCode, int resultCode, @Nullable Intent data) {
    super.onActivityResult(requestCode, resultCode, data);
    String image_path;
    if (resultCode == Activity.RESULT_OK) {
        if (requestCode == 1) {
            if (data == null) {
                Log.w("onActivityResult", "user photo data is null");
                return;
            }
            Uri image_uri = data.getData();
            image_path = getPathFromURI(MainActivity.this, image_uri);
            try {
                // 預測圖像
                FileInputStream fis = new FileInputStream(image_path);
                imageView.setImageBitmap(BitmapFactory.decodeStream(fis));
                long start = System.currentTimeMillis();
                float[] result = mnnClassification.predictImage(image_path);
                long end = System.currentTimeMillis();
                String show_text = "預測結果標籤:" + (int) result[0] +
                        "\n名稱:" +  classNames[(int) result[0]] +
                        "\n概率:" + result[1] +
                        "\n時間:" + (end - start) + "ms";
                textView.setText(show_text);
            } catch (Exception e) {
                e.printStackTrace();
            }
        }
    }
}
上面獲取的Uri可以通過下面這個方法把Url轉換成絕對路徑。
// get photo from Uri
public static String getPathFromURI(Context context, Uri uri) {
    String result;
    Cursor cursor = context.getContentResolver().query(uri, null, null, null, null);
    if (cursor == null) {
        result = uri.getPath();
    } else {
        cursor.moveToFirst();
        int idx = cursor.getColumnIndex(MediaStore.Images.ImageColumns.DATA);
        result = cursor.getString(idx);
        cursor.close();
    }
    return result;
}
攝像頭即時預測
在調用相機即時預測我就不再介紹了,原理都差不多,具體可以查看https://github.com/yeyupiaoling/ClassificationForAndroid/tree/master/TFLiteClassification中的源代碼。核心代碼如下,創建一個子線程,子線程中不斷從攝像頭預覽的AutoFitTextureView上獲取圖像,並執行預測,並在頁面上顯示預測的標籤、對應標籤的名稱、概率值和預測時間。每一次預測完成之後都立即獲取圖片繼續預測,只要預測速度夠快,就可以看成即時預測。
private Runnable periodicClassify =
        new Runnable() {
            @Override
            public void run() {
                synchronized (lock) {
                    if (runClassifier) {
                        // 開始預測前要判斷相機是否已經準備好
                        if (getApplicationContext() != null && mCameraDevice != null && mnnClassification != null) {
                            predict();
                        }
                    }
                }
                if (mInferThread != null && mInferHandler != null && mCaptureHandler != null && mCaptureThread != null) {
                    mInferHandler.post(periodicClassify);
                }
            }
        };

// 預測相機捕獲的圖像
private void predict() {
    // 獲取相機捕獲的圖像
    Bitmap bitmap = mTextureView.getBitmap();
    try {
        // 預測圖像
        long start = System.currentTimeMillis();
        float[] result = mnnClassification.predictImage(bitmap);
        long end = System.currentTimeMillis();
        String show_text = "預測結果標籤:" + (int) result[0] +
                "\n名稱:" +  classNames[(int) result[0]] +
                "\n概率:" + result[1] +
                "\n時間:" + (end - start) + "ms";
        textView.setText(show_text);
    } catch (Exception e) {
        e.printStackTrace();
    }
}
本項目中使用的了讀取圖片的權限和打開相機的權限,所以不要忘記在AndroidManifest.xml添加以下權限申請。
<uses-permission android:name="android.permission.CAMERA"/>
<uses-permission android:name="android.permission.READ_EXTERNAL_STORAGE"/>
<uses-permission android:name="android.permission.WRITE_EXTERNAL_STORAGE"/>
如果是Android 6 以上的設備還要動態申請權限。
    // check had permission
    private boolean hasPermission() {
        if (Build.VERSION.SDK_INT >= Build.VERSION_CODES.M) {
            return checkSelfPermission(Manifest.permission.CAMERA) == PackageManager.PERMISSION_GRANTED &&
                    checkSelfPermission(Manifest.permission.READ_EXTERNAL_STORAGE) == PackageManager.PERMISSION_GRANTED &&
                    checkSelfPermission(Manifest.permission.WRITE_EXTERNAL_STORAGE) == PackageManager.PERMISSION_GRANTED;
        } else {
            return true;
        }
    }

    // request permission
    private void requestPermission() {
        if (Build.VERSION.SDK_INT >= Build.VERSION_CODES.M) {
            requestPermissions(new String[]{Manifest.permission.CAMERA,
                    Manifest.permission.READ_EXTERNAL_STORAGE,
                    Manifest.permission.WRITE_EXTERNAL_STORAGE}, 1);
        }
    }
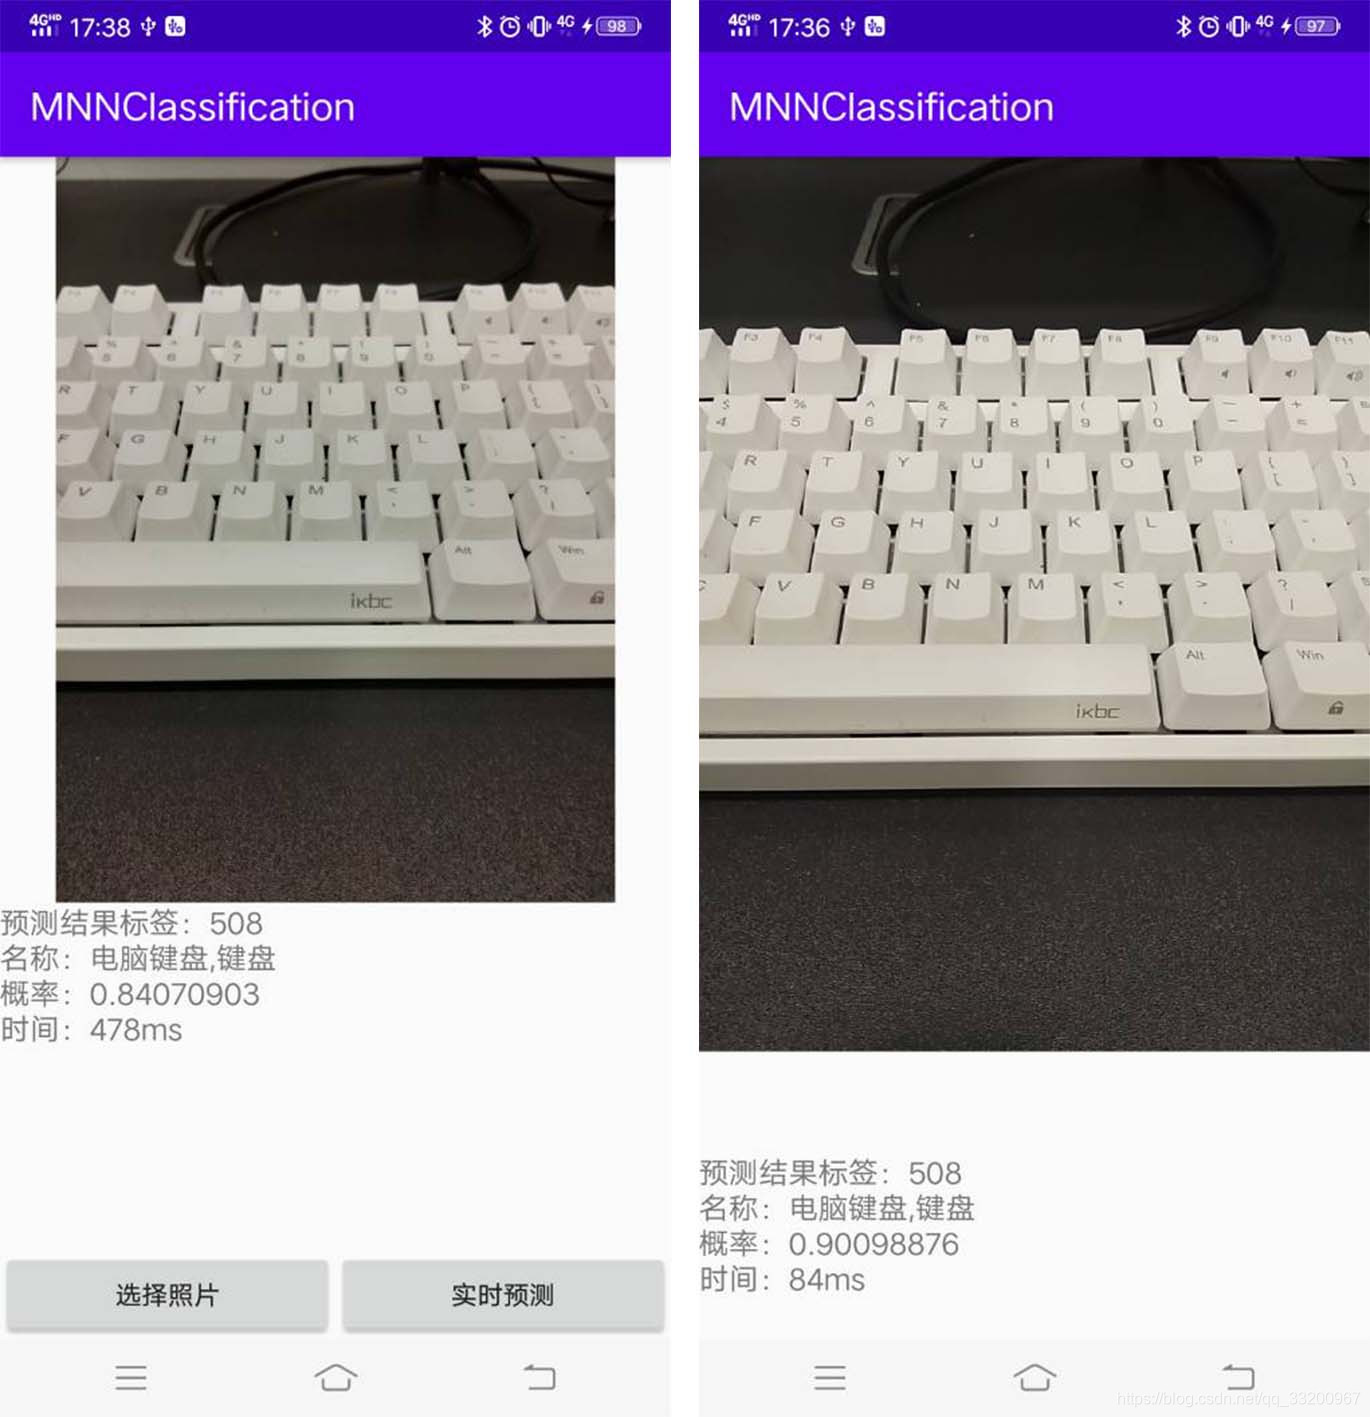
效果圖: