前言
今天來水一片文章,基於開源的Pyramidbox大規模人臉檢測編寫的PaddlePaddle教程,爲了方便訓練預測,本教程做了一定的修改。這個模型雖然大,但是符合大規模人羣中也可以準確地檢測到人臉,就是遮擋比較嚴重也能正確檢測。
本教程源碼:https://download.csdn.net/download/qq_33200967/14029049
PyramidBox 是一種基於SSD的單階段人臉檢測器,它利用上下文信息解決困難人臉的檢測問題。如下圖所示,PyramidBox在六個尺度的特徵圖上進行不同層級的預測。該工作主要包括以下模塊:LFPN、Pyramid Anchors、CPM、Data-anchor-sampling。
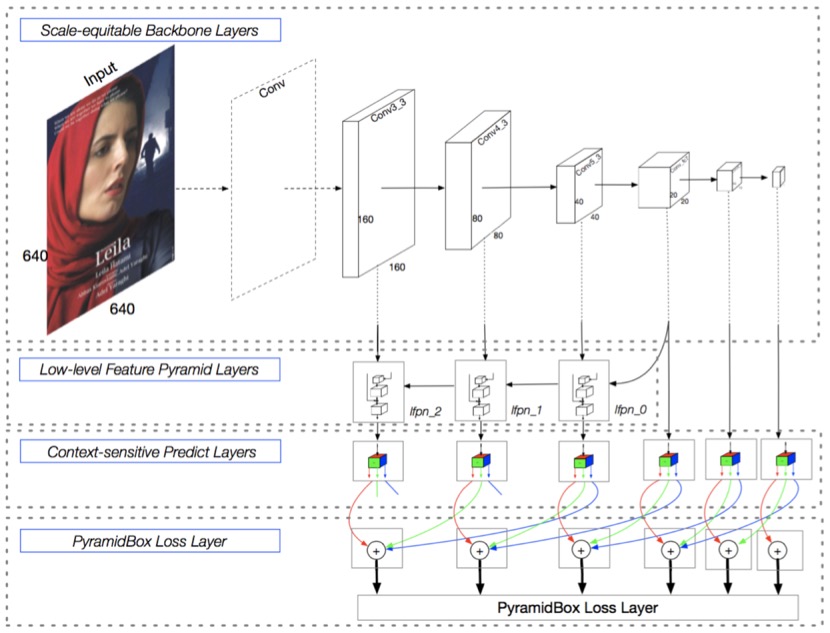
LFPN: LFPN全稱Low-level Feature Pyramid Networks, 在檢測任務中,LFPN可以充分結合高層次的包含更多上下文的特徵和低層次的包含更多紋理的特徵。高層級特徵被用於檢測尺寸較大的人臉,而低層級特徵被用於檢測尺寸較小的人臉。爲了將高層級特徵整合到高分辨率的低層級特徵上,我們從中間層開始做自上而下的融合,構建Low-level FPN。
Pyramid Anchors: 該算法使用半監督解決方案來生成與人臉檢測相關的具有語義的近似標籤,提出基於anchor的語境輔助方法,它引入有監督的信息來學習較小的、模糊的和部分遮擋的人臉的語境特徵。使用者可以根據標註的人臉標籤,按照一定的比例擴充,得到頭部的標籤(上下左右各擴充1/2)和人體的標籤(可自定義擴充比例)。
CPM: CPM全稱Context-sensitive Predict Module, 本方法設計了一種上下文敏感結構(CPM)來提高預測網絡的表達能力。
Data-anchor-sampling: 設計了一種新的採樣方法,稱作Data-anchor-sampling,該方法可以增加訓練樣本在不同尺度上的多樣性。該方法改變訓練樣本的分佈,重點關注較小的人臉。
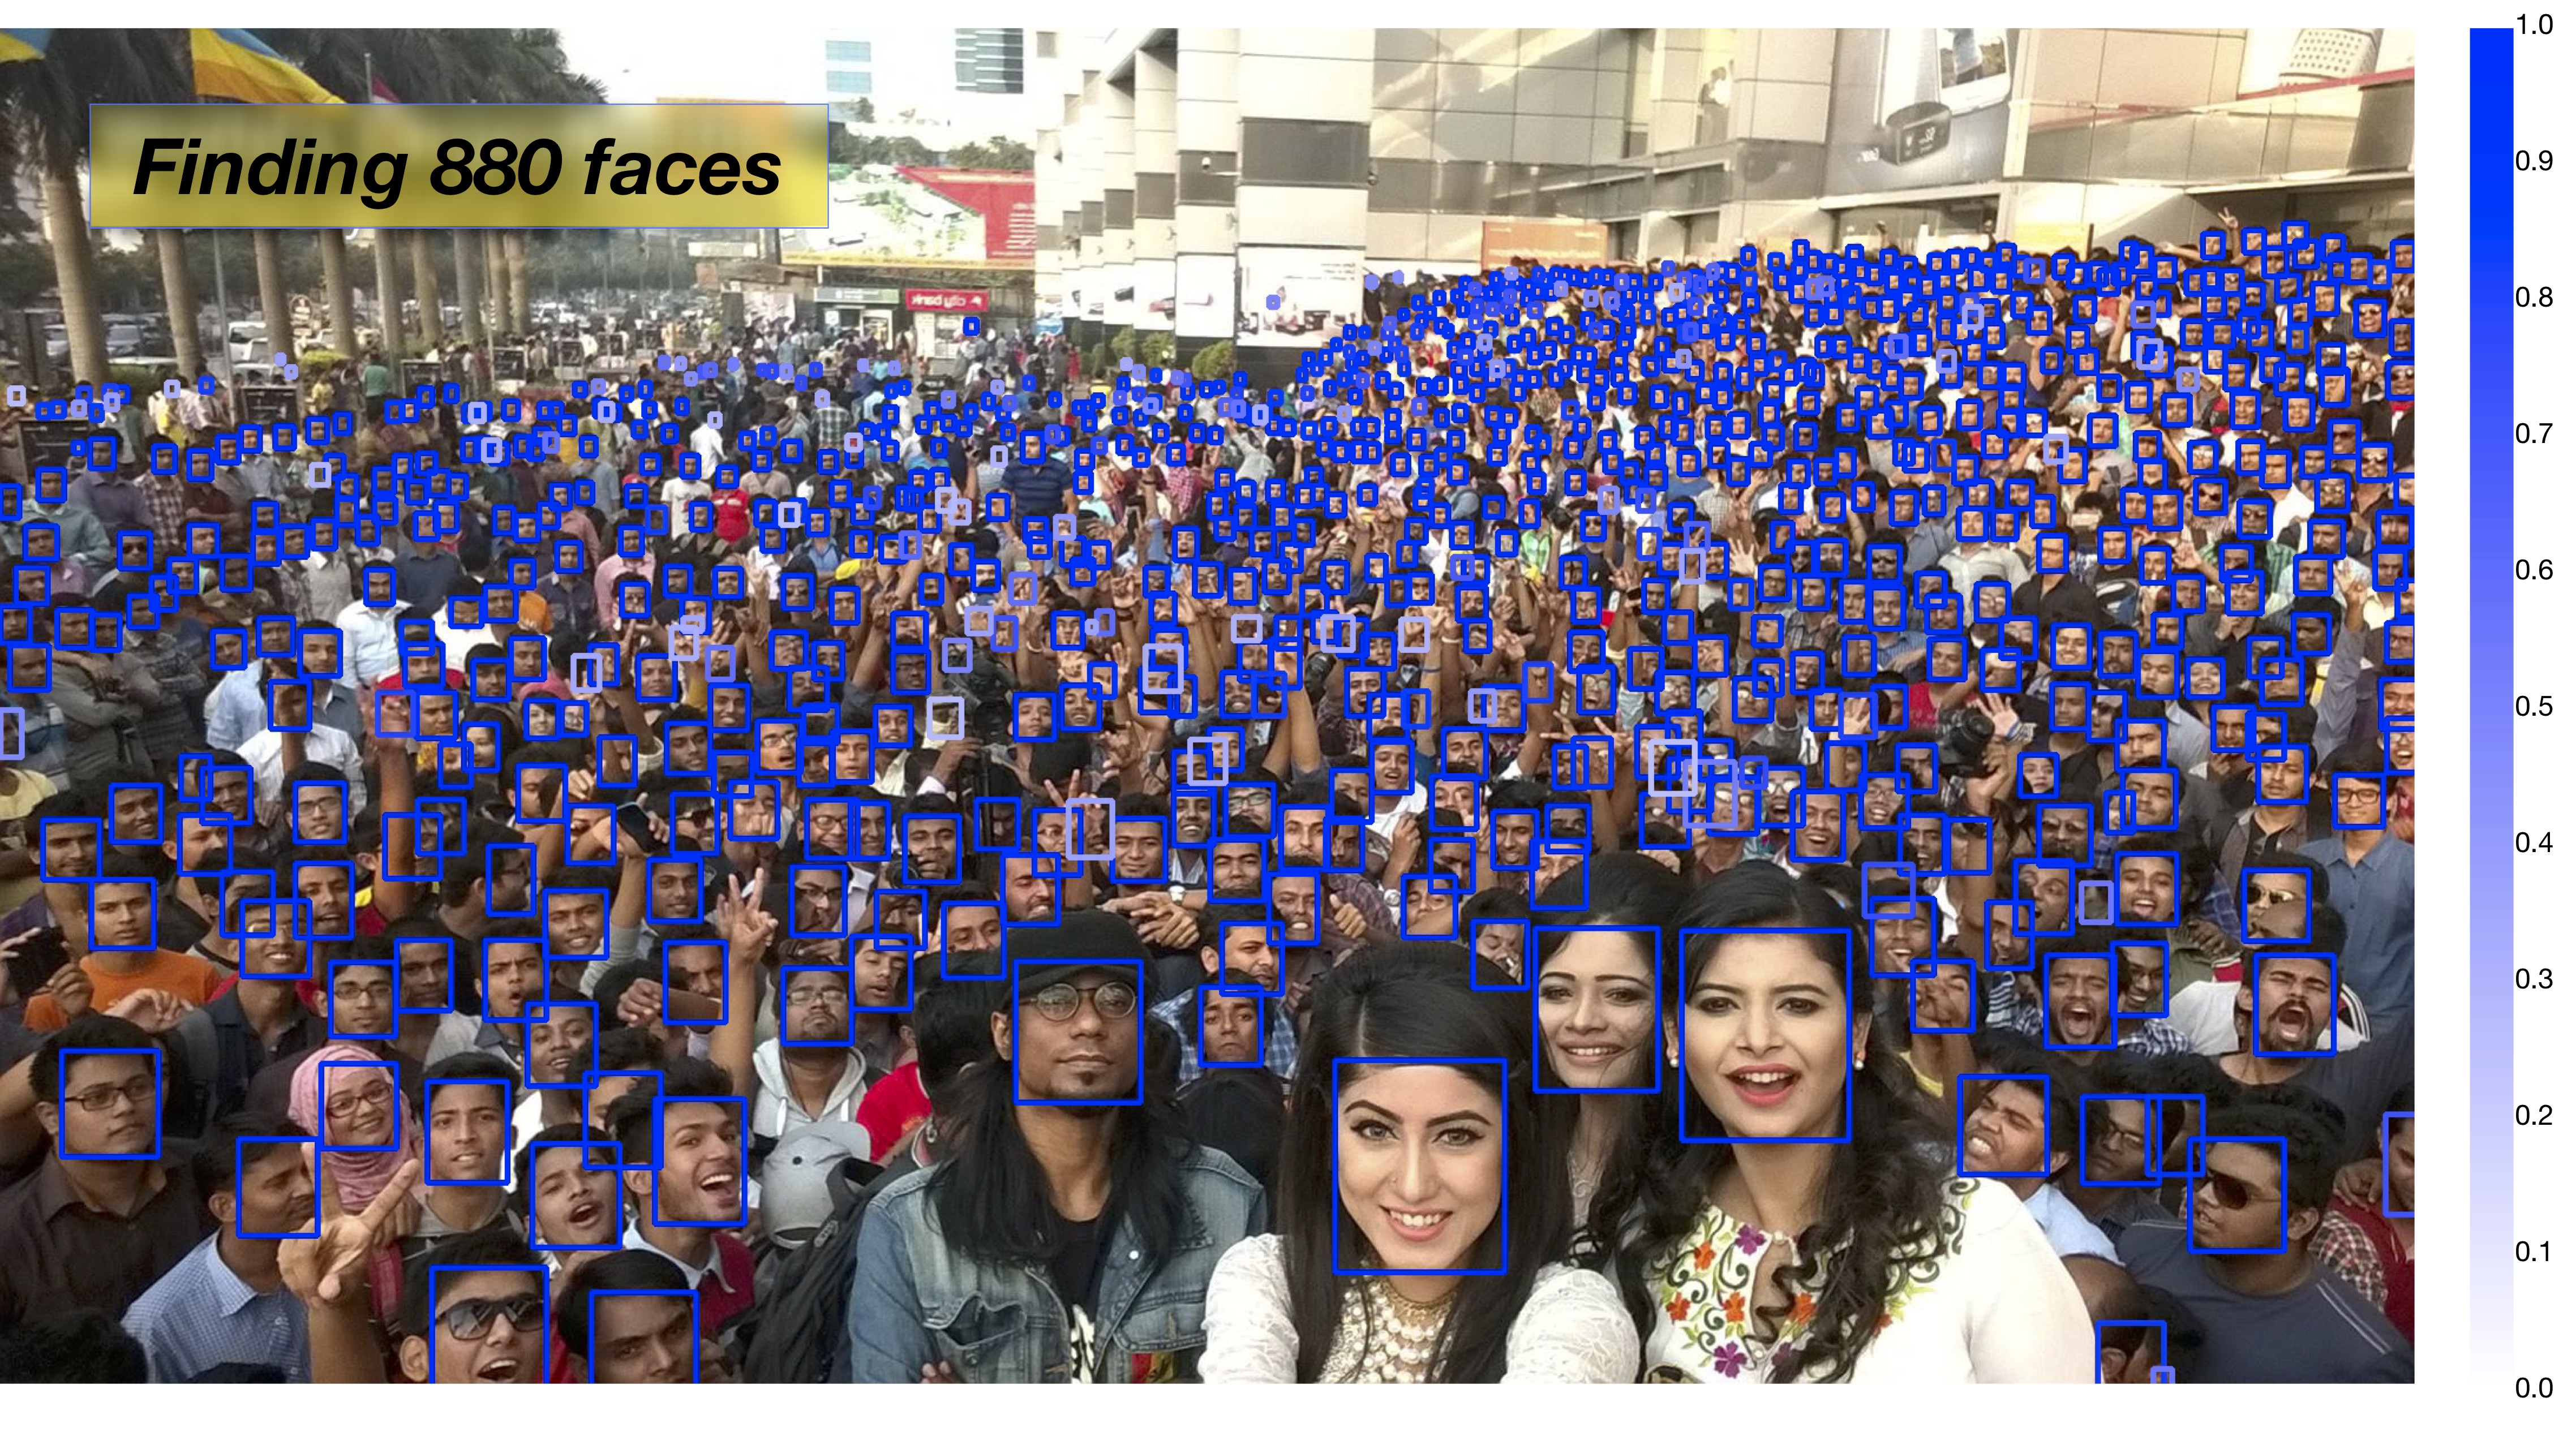
下面這張圖可以體現Pyramidbox在大規模人羣中人臉檢測的強大,不知道你信不信,反正我信了。
訓練
首先下載數據集,下載鏈接如下,把他們下載解壓到項目根目錄下的data目錄中。
https://share.weiyun.com/5WjCBWV
https://share.weiyun.com/5ot9Qv1
https://share.weiyun.com/5vSUomP
http://mmlab.ie.cuhk.edu.hk/projects/WIDERFace/support/bbx_annotation/wider_face_split.zip
該數據集解壓之後的結構是這樣的,檢測你的路徑是否正確了。
data
|-- download.sh
|-- wider_face_split
|   |-- readme.txt
|   |-- wider_face_train_bbx_gt.txt
|   |-- wider_face_val_bbx_gt.txt
|   `-- ...
|-- WIDER_train
|   `-- images
|       |-- 0--Parade
|       ...
|       `-- 9--Press_Conference
`-- WIDER_val
    `-- images
        |-- 0--Parade
        ...
        `-- 9--Press_Conference
然後是下載預訓練模型,下載鏈接如下,把預訓練模型解壓到項目的根目錄下。
http://paddlemodels.bj.bcebos.com/vgg_ilsvrc_16_fc_reduced.tar.gz
最後直接執行train.py就可以了,模型比較大,如何顯存不足,可以設置batch_size小一點。該模型支持多卡訓練,可以通過設置export CUDA_VISIBLE_DEVICES=0,1,2,3指定使用的GPU,並設置參數num_devices想要使用的GPU數量。
多少的讀者應該也是使用Windows訓練的吧,筆者也是,但Windows下PaddlePaddle不支持多線程讀取數據,所以參數use_multiprocess需要設置爲False。
訓練保存的模型存放在output目錄中。
預測
上面訓練保存的或者下載的模型都是是持久化參數,這裏說一下,官方提供的PyramidBox模型下載地址爲:http://paddlemodels.bj.bcebos.com/PyramidBox_WiderFace.tar.gz。這些持久化參數在預測中非常不方便,以下載的模型爲例,解壓下載的模型到根目錄,下面寫一段代碼把這些持久化參數轉換預測模型,預測參數會保存在pyramidbox_model中,只有model和params兩個文件。
import paddle.fluid as fluid
from pyramidbox import PyramidBox

use_gpu = True
model_dir = 'PyramidBox_WiderFace'
save_infer_model_path = 'pyramidbox_model'

place = fluid.CUDAPlace(0) if use_gpu else fluid.CPUPlace()
exe = fluid.Executor(place)
main_program = fluid.Program()
startup_program = fluid.Program()
image_shape = [3, 1024, 1024]
with fluid.program_guard(main_program, startup_program):
    network = PyramidBox(
        data_shape=image_shape,
        sub_network=True,
        is_infer=True)
    infer_program, nmsed_out = network.infer(main_program)
    fetches = [nmsed_out]
    fluid.io.load_persistables(exe, model_dir, main_program=infer_program)
    # save model and program
    fluid.io.save_inference_model(save_infer_model_path,
                                  ['image'], [nmsed_out], exe, main_program=infer_program,
                                  model_filename='model', params_filename='params')
接下來就是預測,編寫infer.py代碼,創建執行器並加載Pyramidbox模型,加載的就是上一步轉換的預測模型。
import time
import cv2
import numpy as np
import paddle.fluid as fluid
from PIL import Image
from PIL import ImageDraw

use_gpu = True
# 創建執行器
place = fluid.CUDAPlace(0) if use_gpu else fluid.CPUPlace()
exe = fluid.Executor(place)
exe.run(fluid.default_startup_program())

# 預測模型路徑
save_path = 'pyramidbox_model/'
[infer_program,
 feeded_var_names,
 target_var] = fluid.io.load_inference_model(dirname=save_path,
                                             executor=exe,
                                             model_filename='model',
                                             params_filename='params')
該函數獲取變換圖片到一定範圍的尺度, 通過這個尺度改變輸入圖片的大小。
def get_shrink(height, width):
    max_shrink_v1 = (0x7fffffff / 577.0 / (height * width)) ** 0.5
    max_shrink_v2 = ((678 * 1024 * 2.0 * 2.0) / (height * width)) ** 0.5

    def get_round(x, loc):
        str_x = str(x)
        if '.' in str_x:
            str_before, str_after = str_x.split('.')
            len_after = len(str_after)
            if len_after >= 3:
                str_final = str_before + '.' + str_after[0:loc]
                return float(str_final)
            else:
                return x

    max_shrink = get_round(min(max_shrink_v1, max_shrink_v2), 2) - 0.3
    if 1.5 <= max_shrink < 2:
        max_shrink = max_shrink - 0.1
    elif 2 <= max_shrink < 3:
        max_shrink = max_shrink - 0.2
    elif 3 <= max_shrink < 4:
        max_shrink = max_shrink - 0.3
    elif 4 <= max_shrink < 5:
        max_shrink = max_shrink - 0.4
    elif max_shrink >= 5:
        max_shrink = max_shrink - 0.5

    shrink = max_shrink if max_shrink < 1 else 1
    return shrink, max_shrink
編寫一個可以顯示預測圖像的函數,在圖像中畫上預測的框,並顯示在桌面。
def draw_image(img_path, bboxes):
    image = Image.open(img_path)
    draw = ImageDraw.Draw(image)
    for i in range(len(bboxes)):
        xmin, ymin, xmax, ymax = bboxes[i]
        (left, right, top, bottom) = (xmin, xmax, ymin, ymax)
        draw.line([(left, top), (left, bottom), (right, bottom), (right, top), (left, top)], width=4, fill='red')

    # 顯示圖像
    cv2.imshow('result image', cv2.cvtColor(np.asarray(image), cv2.COLOR_RGB2BGR))
    cv2.waitKey(1)
該函數爲使用模型檢測人臉,該函數包括了圖像預處理,首先是要把圖片從HWC轉化爲CHW,然後PIL打開圖片是RBG的,但訓練的時候是用的是BGR,所以要轉換爲BGR,最後減去均值和乘縮放值。
def detect_face(image, shrink):
    image_shape = [3, image.size[1], image.size[0]]
    if shrink != 1:
        h, w = int(image_shape[1] * shrink), int(image_shape[2] * shrink)
        image = image.resize((w, h), Image.ANTIALIAS)
        image_shape = [3, h, w]

    img = np.array(image)
    print(img.shape)
    # HWC to CHW
    if len(img.shape) == 3:
        img = np.swapaxes(img, 1, 2)
        img = np.swapaxes(img, 1, 0)
    print(img.shape)
    # RBG to BGR
    img = img[[2, 1, 0], :, :]
    mean = [104., 117., 123.]
    scale = 0.007843
    img = img.astype('float32')
    img -= np.array(mean)[:, np.newaxis, np.newaxis].astype('float32')
    img = img * scale
    img = [img]
    img = np.array(img)

    detection, = exe.run(infer_program,
                         feed={feeded_var_names[0]: img},
                         fetch_list=target_var,
                         return_numpy=False)
    detection = np.array(detection)
    # layout: xmin, ymin, xmax. ymax, score
    if np.prod(detection.shape) == 1:
        print("No face detected")
        return np.array([[0, 0, 0, 0, 0]])
    det_conf = detection[:, 1]
    det_xmin = image_shape[2] * detection[:, 2] / shrink
    det_ymin = image_shape[1] * detection[:, 3] / shrink
    det_xmax = image_shape[2] * detection[:, 4] / shrink
    det_ymax = image_shape[1] * detection[:, 5] / shrink

    det = np.column_stack((det_xmin, det_ymin, det_xmax, det_ymax, det_conf))
    return det
最後傳一張圖片的路徑,預測並展示檢測後的圖像。通過設置閾值confs_threshold過濾掉得分比較低的人臉框。
def infer(image_path, confs_threshold):
    if True:
        image = Image.open(image_path)
        if image.mode == 'L':
            image = image.convert('RGB')
        shrink, max_shrink = get_shrink(image.size[1], image.size[0])

        start = time.time()
        det0 = detect_face(image, shrink)
        dets = det0
        end = time.time()
        print("預測時間: %f" % (end - start))

        keep_index = np.where(dets[:, 4] >= confs_threshold)[0]
        dets = dets[keep_index, :]
        draw_image(image_path, dets[:, 0:4])


if __name__ == '__main__':
    confs_threshold = 0.15
    image_path = 'dataset/images/0acc15e8965111eab2edc8ff285a4318.jpg'
    infer(image_path, confs_threshold)

    cv2.waitKey(0)
    cv2.destroyAllWindows()
以下是本程序執行之後的效果圖:
