深度学习神经网络中正则化的使用

前言
如果训练数据集不够大,由于深度学习模型具有非常大的灵活性和容量,以至于过度拟合可能是一个严重的问题,为了解决这个问题,引入了正则化的这个方法。要在神经网络中加入正则化,除了在激活层中加入正则函数,应该dropout也是可以起到正则的效果。我们来试试吧。
前提工作
在使用之前,我们还要先导入所需的依赖包,和加载数据,其中有些依赖包可以在这里下载。
# coding=utf-8
import matplotlib.pyplot as plt
from reg_utils import compute_cost, predict, forward_propagation, backward_propagation, update_parameters
from reg_utils import sigmoid, relu, initialize_parameters, load_2D_dataset
from testCases import *

# 加载数据
train_X, train_Y, test_X, test_Y = load_2D_dataset()
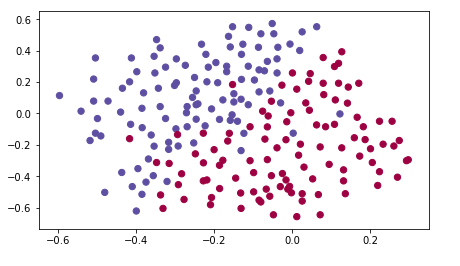
以下就是我们使用到的数据:
模型函数
在这里编写一个model函数,来测试和对比以下三种情况:
- 无正则化的情况
- 使用有正则化的激活激活函数
- 使用dropout
def model(X, Y, learning_rate=0.3, num_iterations=30000, print_cost=True, lambd=0, keep_prob=1):
    """
    实现一个三层神经网络: LINEAR->RELU->LINEAR->RELU->LINEAR->SIGMOID.

    Arguments:
    X -- 输入数据、形状(输入大小、样本数量)
    Y -- 真正的“标签”向量(红点的蓝色点/ 0),形状(输出大小,样本数量)
    learning_rate -- 学习速率的优化
    num_iterations -- 优化循环的迭代次数。
    print_cost -- 如果是真的,打印每10000次迭代的成本。
    lambd -- 正则化超参数,标量
    keep_prob - 在dropout过程中保持神经元活跃的概率。

    Returns:
    parameters -- 由模型学习的参数。他们可以被用来预测。
    """

    grads = {}
    costs = []  # to keep track of the cost
    m = X.shape[1]  # number of examples
    layers_dims = [X.shape[0], 20, 3, 1]

    # Initialize parameters dictionary.
    parameters = initialize_parameters(layers_dims)

    # Loop (gradient descent)
    for i in range(0, num_iterations):

        # 正向传播: LINEAR -> RELU -> LINEAR -> RELU -> LINEAR -> SIGMOID.
        if keep_prob == 1:
            a3, cache = forward_propagation(X, parameters)
        elif keep_prob < 1:
            a3, cache = forward_propagation_with_dropout(X, parameters, keep_prob)

        # Cost function
        if lambd == 0:
            cost = compute_cost(a3, Y)
        else:
            cost = compute_cost_with_regularization(a3, Y, parameters, lambd)

        # Backward propagation.
        assert (lambd == 0 or keep_prob == 1)  # 可以同时使用L2正则化和退出,但是这个任务只会一次探索一个。
        if lambd == 0 and keep_prob == 1:
            grads = backward_propagation(X, Y, cache)
        elif lambd != 0:
            grads = backward_propagation_with_regularization(X, Y, cache, lambd)
        elif keep_prob < 1:
            grads = backward_propagation_with_dropout(X, Y, cache, keep_prob)

        # Update parameters.
        parameters = update_parameters(parameters, grads, learning_rate)

        # 每10000次迭代打印一次损失。
        if print_cost and i % 10000 == 0:
            print("Cost after iteration {}: {}".format(i, cost))
        if print_cost and i % 1000 == 0:
            costs.append(cost)

    # plot the cost
    plt.plot(costs)
    plt.ylabel('cost')
    plt.xlabel('iterations (x1,000)')
    plt.title("Learning rate =" + str(learning_rate))
    plt.show()

    return parameters
无正则化
下面就测试没有正则化的情况,直接运行项目就可以了。
if __name__ == "__main__":
    parameters = model(train_X, train_Y)
    print ("On the training set:")
    predictions_train = predict(train_X, train_Y, parameters)
    print ("On the test set:")
    predictions_test = predict(test_X, test_Y, parameters)
输出的相关日志,从中看到训练的准确率比较高,而测试的准确率比较低,这个是一种过拟合的体现:
Cost after iteration 0: 0.6557412523481002
Cost after iteration 10000: 0.16329987525724216
Cost after iteration 20000: 0.13851642423255986
On the training set:
Accuracy: 0.947867298578
On the test set:
Accuracy: 0.915
以图表显示Cost的情况:
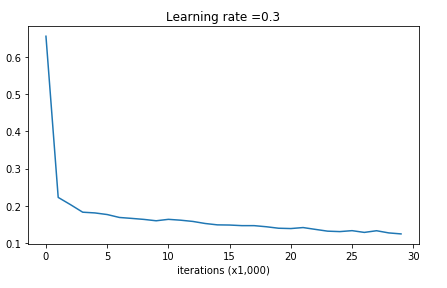
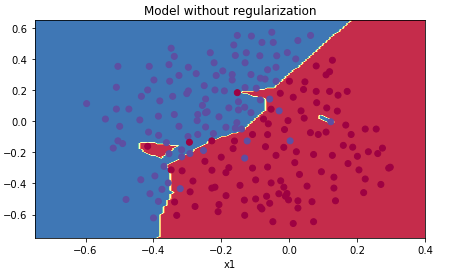
下面是收敛情况,从这个图像中可以很直观看出已经存在过拟合情况了:
带L2正则的激活函数
损失函数
如果L2正则的话,要修改损坏函的计算公式,如下:
损失函数:
$$
J = -\frac{1}{m} \sum\limits_{i = 1}^{m} \large{(}\small y^{(i)}\log\left(a^{L}\right) + (1-y^{(i)})\log\left(1- a^{L}\right) \large{)} \tag{1}
$$
带L2正则的损失函数:
$$
J_{regularized} = \small \underbrace{-\frac{1}{m} \sum\limits_{i = 1}^{m} \large{(}\small y^{(i)}\log\left(a^{L}\right) + (1-y^{(i)})\log\left(1- a^{L}\right) \large{)} }\text{cross-entropy cost} + \underbrace{\frac{1}{m} \frac{\lambda}{2} \sum\limits_l\sum\limits_k\sum\limits_j W{k,j}^{[l]2} }_\text{L2 regularization cost} \tag{2}
$$
损失函数的代码片段如下:
def compute_cost_with_regularization(A3, Y, parameters, lambd):
    """
    用L2正则化实现成本函数。参见上面的公式。

    Arguments:
    A3 -- post-activation,前向传播输出,形状(输出尺寸,样本数量)
    Y -- “true”标签向量,形状(输出大小,样本数量)
    parameters -- 包含模型参数的python字典。

    Returns:
    cost - 正则化损失函数值
    """
    m = Y.shape[1]
    W1 = parameters["W1"]
    W2 = parameters["W2"]
    W3 = parameters["W3"]

    cross_entropy_cost = compute_cost(A3, Y)  # cost的交叉熵。

    L2_regularization_cost = (1 / m) * (lambd / 2) * (
    np.sum(np.square(W1)) + np.sum(np.square(W2)) + np.sum(np.square(W3)))

    cost = cross_entropy_cost + L2_regularization_cost

    return cost
反向传播
反向传播所需的更改以考虑正则化。这些变化只涉及dW1,dW2和dW3。对于每一个添加正则化项的梯度($\frac{d}{dW} ( \frac{1}{2}\frac{\lambda}{m} W^2) = \frac{\lambda}{m} W$)
def backward_propagation_with_regularization(X, Y, cache, lambd):
    """
    实现基线模型的反向传播,我们添加了L2正则化。

    Arguments:
    X -- 输入数据集,形状(输入大小,样本数量)
    Y -- “true”标签向量,形状(输出大小,样本数量)
    cache -- 缓存输出forward_propagation()
    lambd -- 正则化超参数,标量

    Returns:
    gradients -- 一个具有对每个参数、激活和预激活变量的梯度的字典。
    """

    m = X.shape[1]
    (Z1, A1, W1, b1, Z2, A2, W2, b2, Z3, A3, W3, b3) = cache

    dZ3 = A3 - Y

    dW3 = 1. / m * np.dot(dZ3, A2.T) + (lambd / m) * W3
    db3 = 1. / m * np.sum(dZ3, axis=1, keepdims=True)

    dA2 = np.dot(W3.T, dZ3)
    dZ2 = np.multiply(dA2, np.int64(A2 > 0))
    dW2 = 1. / m * np.dot(dZ2, A1.T) + (lambd / m) * W2
    db2 = 1. / m * np.sum(dZ2, axis=1, keepdims=True)

    dA1 = np.dot(W2.T, dZ2)
    dZ1 = np.multiply(dA1, np.int64(A1 > 0))
    dW1 = 1. / m * np.dot(dZ1, X.T) + (lambd / m) * W1
    db1 = 1. / m * np.sum(dZ1, axis=1, keepdims=True)

    gradients = {"dZ3": dZ3, "dW3": dW3, "db3": db3, "dA2": dA2,
                 "dZ2": dZ2, "dW2": dW2, "db2": db2, "dA1": dA1,
                 "dZ1": dZ1, "dW1": dW1, "db1": db1}

    return gradients
然后运行带有L2正则的模型,如下:
if __name__ == "__main__":
    parameters = model(train_X, train_Y, lambd=0.7)
    print ("On the train set:")
    predictions_train = predict(train_X, train_Y, parameters)
    print ("On the test set:")
    predictions_test = predict(test_X, test_Y, parameters)
输出的日志信息如下,从日志信息来看,模型收敛得挺好,没有过拟合的情况:
Cost after iteration 0: 0.6974484493131264
Cost after iteration 10000: 0.2684918873282239
Cost after iteration 20000: 0.2680916337127301
On the train set:
Accuracy: 0.938388625592
On the test set:
Accuracy: 0.93
使用图表来显示Cost的话,如下:
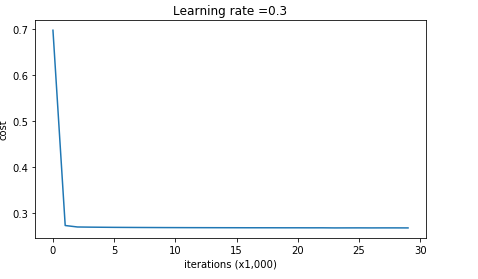
下面是收敛情况,从这个图像来看,没有出现过拟合的情况:
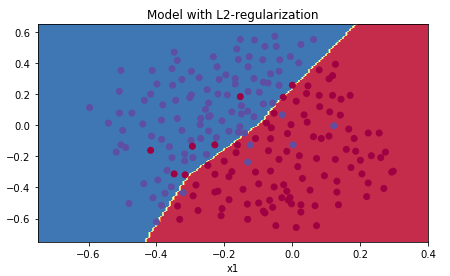
L2正则化实际上在做什么:
L2正则化依赖于这样的假设,即具有较小权重的模型比具有较大权重的模型更简单。因此,通过惩罚成本函数中权重的平方值,可以将所有权重驱动到较小的值。拥有大权重的成本太高了!这导致更平滑的模型,其中输入变化时输出变化更慢。
L2正则化对以下内容的影响:
- 成本计算:
- 在成本中增加了正则化项。
- 反向传播功能:
- 在权重矩阵的梯度上有额外的项。
- 权重变小(“权重衰减”):
- 权重被推到较小的值。
Dropout
Dropout是一种广泛使用的专门针对深度学习的正规化技术。 它在每次迭代中随机关闭一些神经元。具体流程如下:
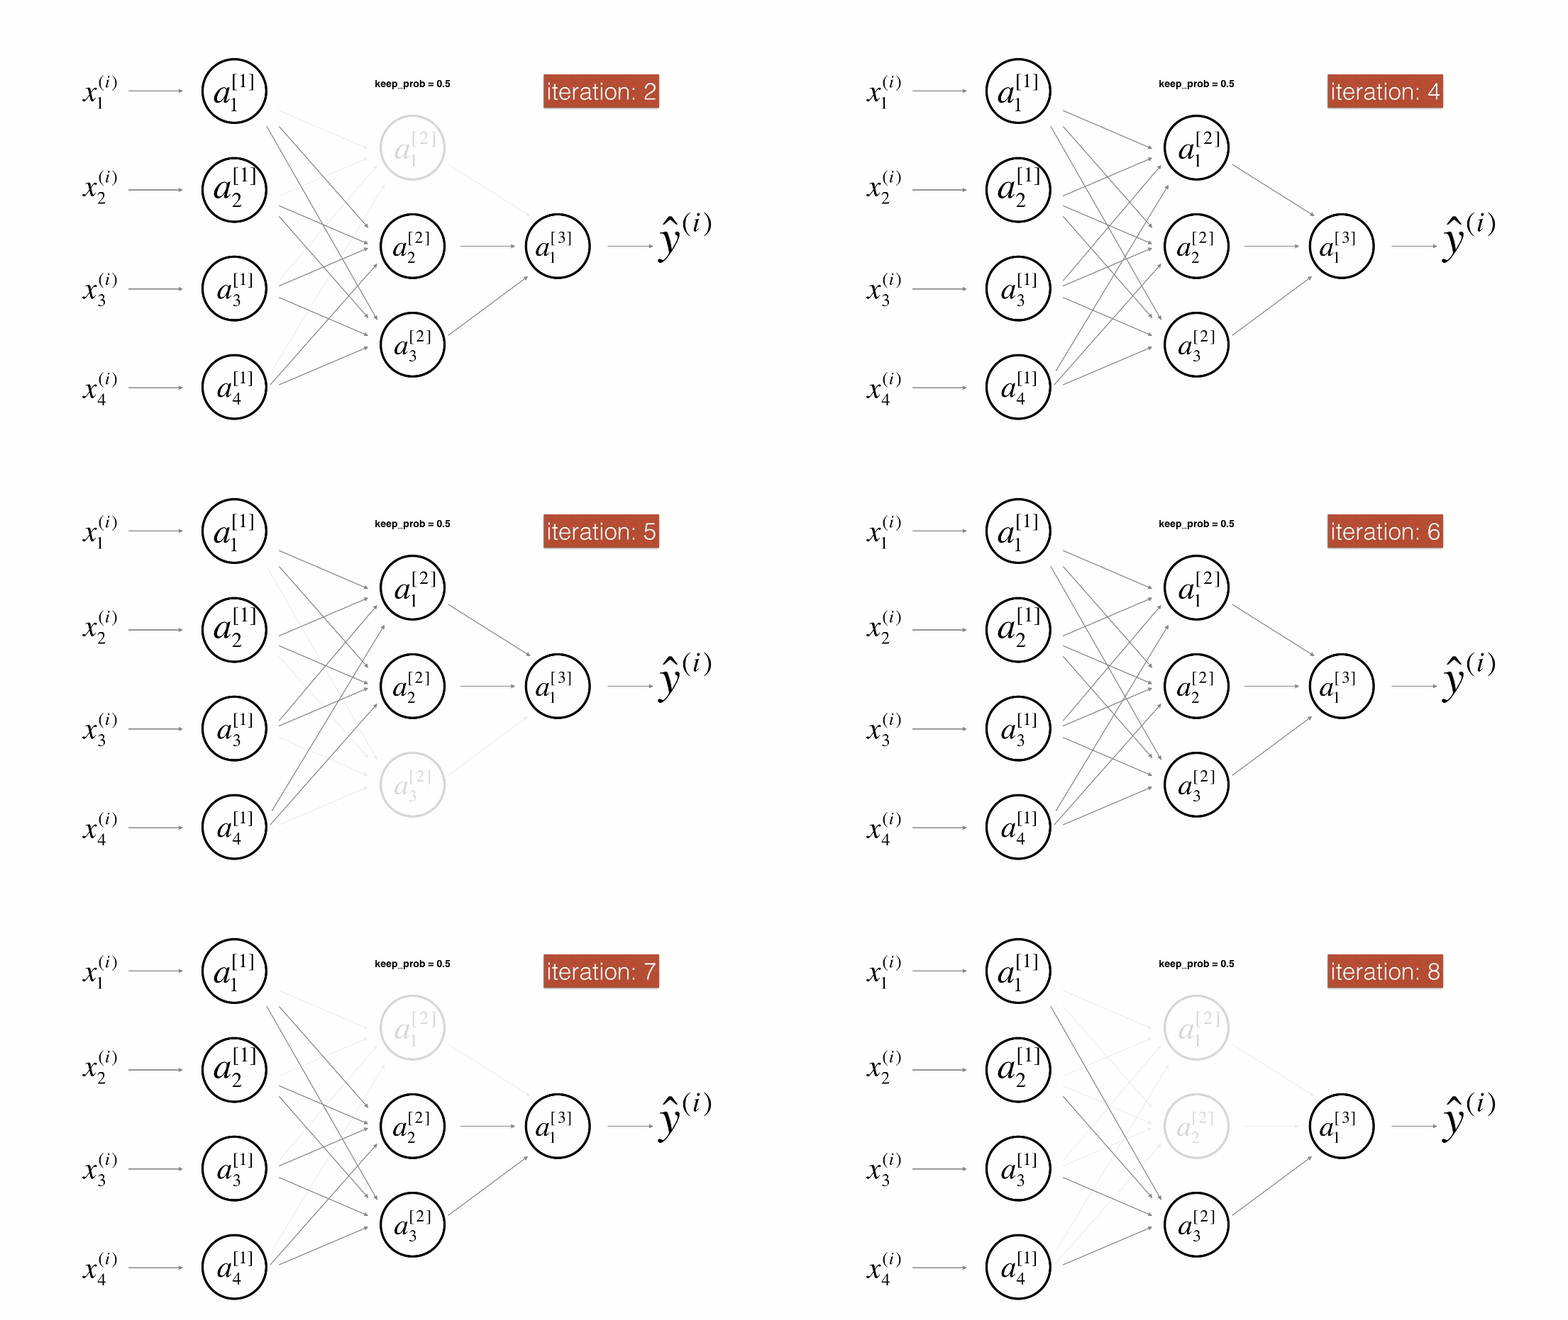
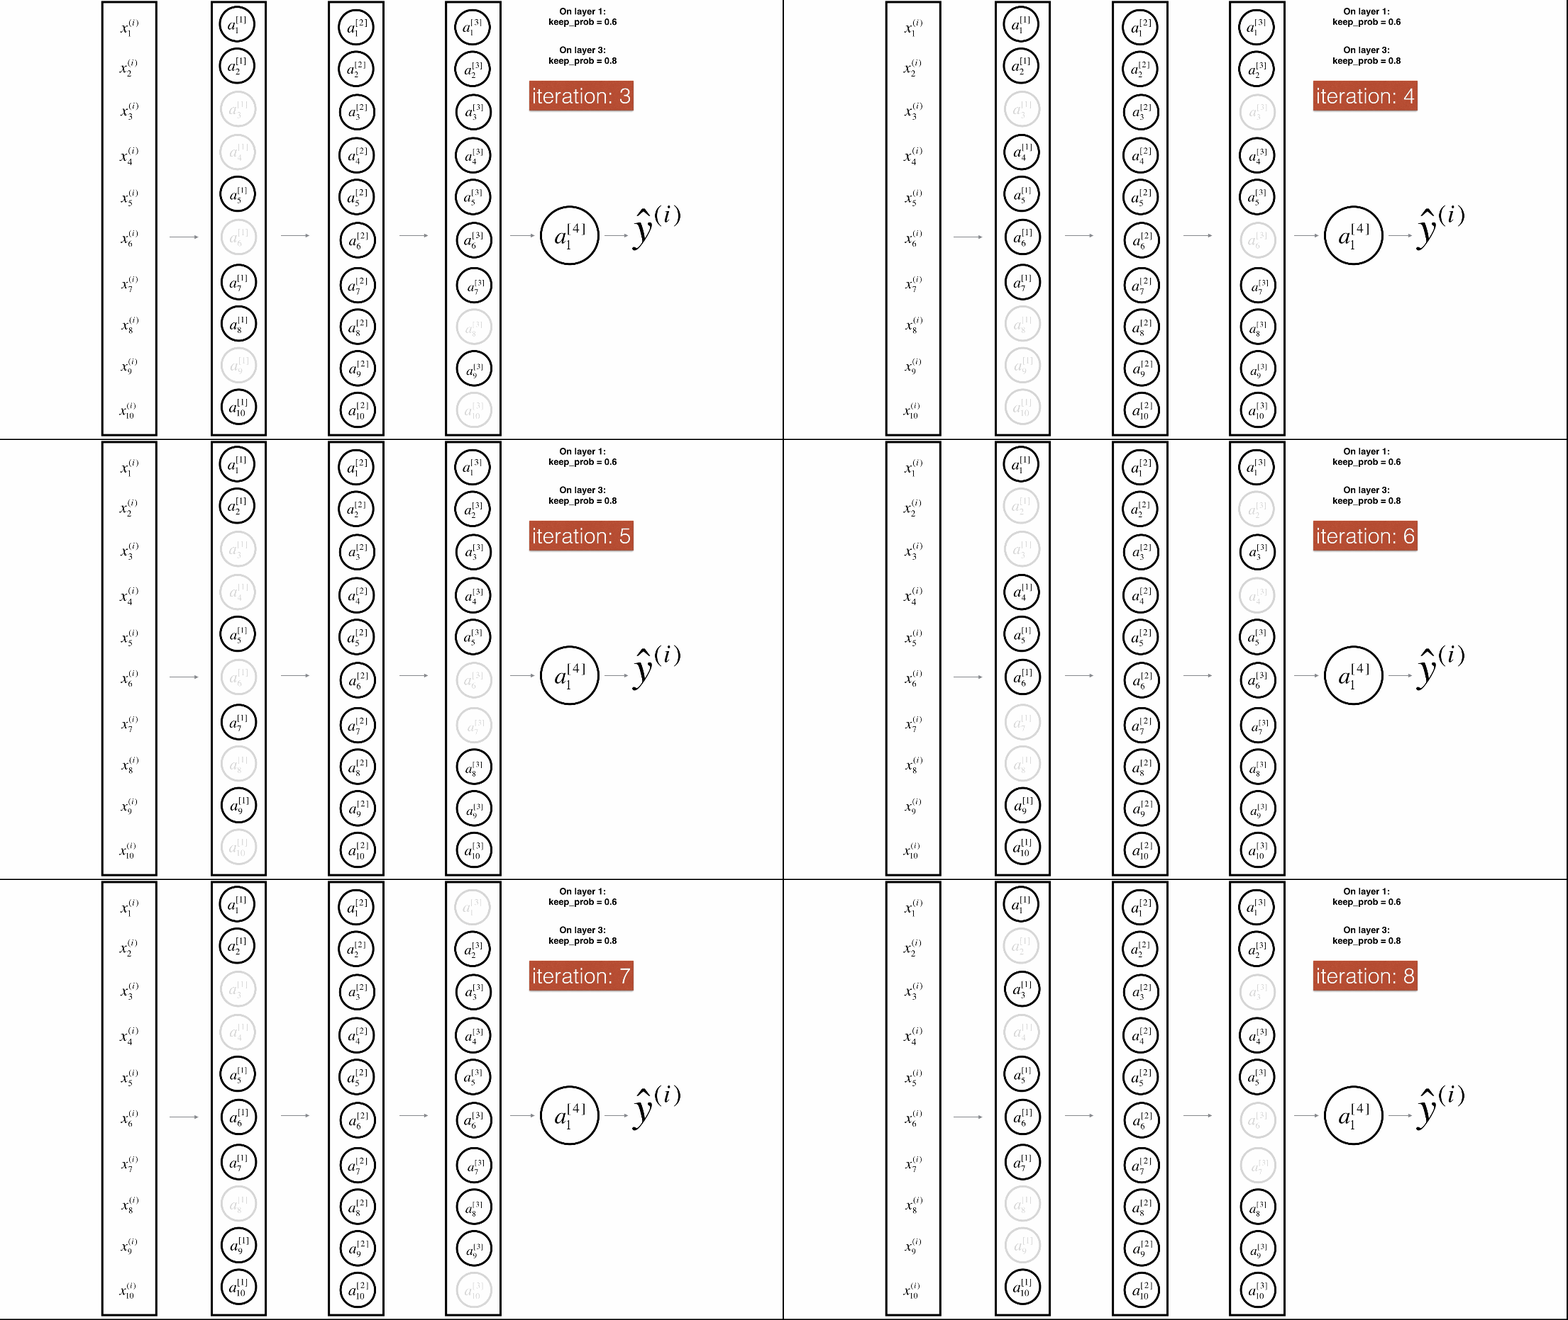
带Dropout的前向传播
实施具有Dropout的前向传播。当正在使用3层神经网络,并将丢弃添加到第一个和第二个隐藏层,模型不会将Dropout应用于输入层或输出层。
def forward_propagation_with_dropout(X, parameters, keep_prob=0.5):
    """
    实现了向前传播: LINEAR -> RELU + DROPOUT -> LINEAR -> RELU + DROPOUT -> LINEAR -> SIGMOID.

    Arguments:
    X -- 输入数据集,形状(2,样本数量)
    parameters -- 包含参数的python字典 "W1", "b1", "W2", "b2", "W3", "b3":
                    W1 -- 形状权重矩阵(20,2)
                    b1 -- 形状偏差向量(20,1)
                    W2 -- 形状权重矩阵(3,20)
                    b2 -- 形状的偏差向量(3,1)
                    W3 -- 形状权重矩阵(1,3)
                    b3 -- 形状的偏差向量(1,1)
    keep_prob - 在dropout过程中保持神经元活跃的概率。

    Returns:
    A3 -- 最后一个激活值,向前传播的输出,形状(1,1)
    cache -- 元组,用于计算反向传播的信息。
    """

    np.random.seed(1)

    # retrieve parameters
    W1 = parameters["W1"]
    b1 = parameters["b1"]
    W2 = parameters["W2"]
    b2 = parameters["b2"]
    W3 = parameters["W3"]
    b3 = parameters["b3"]

    # LINEAR -> RELU -> LINEAR -> RELU -> LINEAR -> SIGMOID
    Z1 = np.dot(W1, X) + b1
    A1 = relu(Z1)
    D1 = np.random.rand(A1.shape[0], A1.shape[1])  # Step 1: 初始化矩阵 D1
    D1 = (D1 < keep_prob)  # Step 2: 将D1的条目转换为0或1(使用keep_prob作为阈值)
    A1 = np.multiply(A1, D1)  # Step 3: 关闭A1的一些神经元。
    A1 = A1 / keep_prob  # Step 4: 测量那些没有被关闭的神经元的价值。
    Z2 = np.dot(W2, A1) + b2
    A2 = relu(Z2)
    D2 = np.random.rand(A2.shape[0], A2.shape[1])  # Step 1: 初始化矩阵D2
    D2 = (D2 < keep_prob)  # Step 2: 将D2的条目转换为0或1(使用keep_prob作为阈值)
    A2 = np.multiply(A2, D2)  # Step 3: 关闭A2的一些神经元。
    A2 = A2 / keep_prob  # Step 4: 测量那些没有被关闭的神经元的价值。
    Z3 = np.dot(W3, A2) + b3
    A3 = sigmoid(Z3)

    cache = (Z1, D1, A1, W1, b1, Z2, D2, A2, W2, b2, Z3, A3, W3, b3)

    return A3, cache
带Dropout的反向传播
实施具有Dropout的反向传播。和上面一样,当正在训练一个3层网络。将dropout添加到第一个和第二个隐藏层$D^{[1]}$ 和$D^{[2]}$存储在缓存中。
def backward_propagation_with_dropout(X, Y, cache, keep_prob):
    """
    实现我们的基线模型的反向传播,我们增加了dropout率。

    Arguments:
    X -- 输入数据集,形状(2,样本数量)
    Y -- “true”标签向量,形状(输出大小,样本数量)
    cache -- 缓存输出forward_propagation_with_dropout()
    keep_prob - 在dropout过程中保持神经元活跃的概率。

    Returns:
    gradients --一个具有对每个参数、激活和预激活变量的梯度的字典。
    """

    m = X.shape[1]
    (Z1, D1, A1, W1, b1, Z2, D2, A2, W2, b2, Z3, A3, W3, b3) = cache

    dZ3 = A3 - Y
    dW3 = 1. / m * np.dot(dZ3, A2.T)
    db3 = 1. / m * np.sum(dZ3, axis=1, keepdims=True)
    dA2 = np.dot(W3.T, dZ3)

    dA2 = np.multiply(dA2, D2)  # Step 1: 在向前传播过程中,应用mask D2关闭相同的神经元。
    dA2 = dA2 / keep_prob  # Step 2: 测量那些没有被关闭的神经元的值。

    dZ2 = np.multiply(dA2, np.int64(A2 > 0))
    dW2 = 1. / m * np.dot(dZ2, A1.T)
    db2 = 1. / m * np.sum(dZ2, axis=1, keepdims=True)

    dA1 = np.dot(W2.T, dZ2)

    dA1 = np.multiply(dA1, D1)  # Step 1: 使用mask D1关闭与转发传播时相同的神经元。
    dA1 = dA1 / keep_prob  # Step 2: 测量那些没有被关闭的神经元的价值。

    dZ1 = np.multiply(dA1, np.int64(A1 > 0))
    dW1 = 1. / m * np.dot(dZ1, X.T)
    db1 = 1. / m * np.sum(dZ1, axis=1, keepdims=True)

    gradients = {"dZ3": dZ3, "dW3": dW3, "db3": db3, "dA2": dA2,
                 "dZ2": dZ2, "dW2": dW2, "db2": db2, "dA1": dA1,
                 "dZ1": dZ1, "dW1": dW1, "db1": db1}

    return gradients
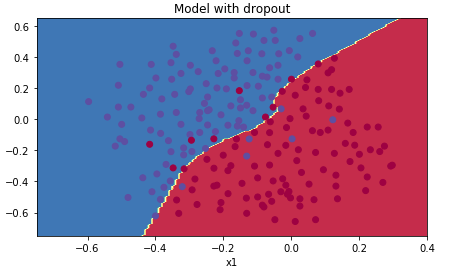
执行带dropout的模型,如下:
if __name__ == "__main__":
    parameters = model(train_X, train_Y, keep_prob=0.86, learning_rate=0.3)
    print ("On the train set:")
    predictions_train = predict(train_X, train_Y, parameters)
    print ("On the test set:")
    predictions_test = predict(test_X, test_Y, parameters)
输出的日志如下:
Cost after iteration 0: 0.6543912405149825
Cost after iteration 10000: 0.06101698657490559
Cost after iteration 20000: 0.060582435798513114
On the train set:
Accuracy: 0.928909952607
On the test set:
Accuracy: 0.95
使用图表显示Cost如下:
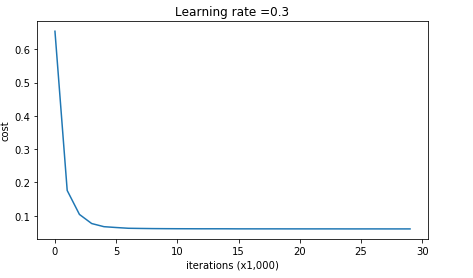
下面是收敛情况,从这个图像来看,也没有出现过拟合的情况:
总结
最后使用一个表格来总结一下我们的模型情况,如表所示,使用了正则化可以提供测试的准确率。
| model | train accuracy | test accuracy |
| 3-layer NN without regularization | 95% | 91.5% |
| 3-layer NN with L2-regularization | 94% | 93% |
| 3-layer NN with dropout | 93% | 95% |
参考资料
该笔记是学习吴恩达老师的课程写的。初学者入门,如有理解有误的,欢迎批评指正!