前言
在上一章我們介紹了《雙目攝像頭測量距離》,在這個基礎上,我們來了解如何在Android上使用雙目測距算法。通過本教程,你不僅掌握如何在Android中使用SBM等雙目測距算法,順便也瞭解到如何在Android Studio配置OpenCV,通過使用OpenCV可以在Android中實現很多圖像處理的功能。
配置OpenCV
下載OpenCV的Android版本源碼,官網下載地址:https://opencv.org/releases/,版本是3.4.1的。
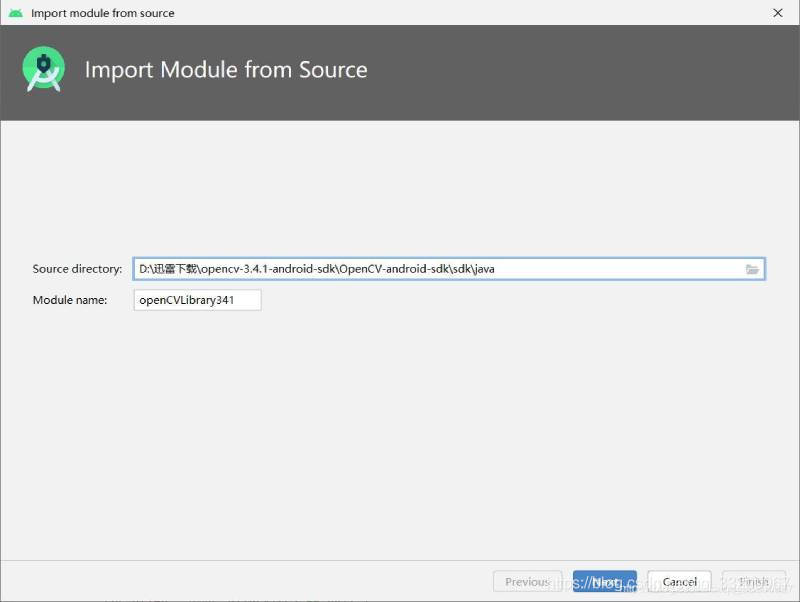
1、創建一個Android項目,解壓源碼壓縮包,在Android Studio中點擊File—>Import Model,然後瀏覽解壓後的sdk/java添加,如下圖所示,如何正常的話會顯示OpenCV的版本。
2、複製OpenCV的動態庫到app/libs目錄下。
3、修改OpenCVLibrary的build.gradle的內容,這些內容全都都是app/build.gradle的內容,主要把applicationId去掉。
apply plugin: 'com.android.library'

android {
    compileSdkVersion 29
    buildToolsVersion "29.0.2"
    defaultConfig {
        minSdkVersion 22
        targetSdkVersion 29
        versionCode 1
        versionName "1.0"
        testInstrumentationRunner "androidx.test.runner.AndroidJUnitRunner"
    }
    buildTypes {
        release {
            minifyEnabled false
            proguardFiles getDefaultProguardFile('proguard-android-optimize.txt'), 'proguard-rules.pro'
        }
    }
}
4、修改OpenCVLibrary的AndroidManifest.xml,內容大概如下,其中版本號對應自己導入的OpenCV的版本。
<?xml version="1.0" encoding="utf-8"?>
<manifest xmlns:android="http://schemas.android.com/apk/res/android"
      package="org.opencv"
      android:versionCode="3410"
      android:versionName="3.4.1">

</manifest>
5、最後修改app/build.gradle的內容。
// 在android下添加以下代碼
sourceSets {
        main {
            jniLibs.srcDirs = ['libs']
        }
    }

// 在dependencies添加一下代碼,根據情況修改版本號
implementation project(path: ':openCVLibrary341')
6、測試OpenCV,在應用中執行以下代碼,如果初始化OpenCv成功,那配置OpenCV就已經成功了。
if (OpenCVLoader.initDebug()) {
    Log.d(TAG, "OpenCVLoader初始化成功");
}
雙目測距
創建一個StereoBMUtil.java的java工具類,通過這類可以方便其他程序調用。在構造方法中配置StereoBM算法的一下參數,有些參數是相機標定的參數,具體用法參考《雙目攝像頭測量距離》這篇文章。 更加這篇教程,完成修改StereoBM算的相機標定的參數。
    public StereoBMUtil() {
        Mat cameraMatrixL = new Mat(3, 3, CvType.CV_64F);
        Mat distCoeffL = new Mat(5, 1, CvType.CV_64F);
        Mat cameraMatrixR = new Mat(3, 3, CvType.CV_64F);
        Mat distCoeffR = new Mat(5, 1, CvType.CV_64F);
        Mat T = new Mat(3, 1, CvType.CV_64F);
        Mat rec = new Mat(3, 1, CvType.CV_64F);
        // 【需要根據攝像頭修改參數】左目相機標定參數 fc_left_x  0  cc_left_x  0  fc_left_y  cc_left_y  0  0  1
        cameraMatrixL.put(0, 0, 849.38718, 0, 720.28472, 0, 850.60613, 373.88887, 0, 0, 1);
        //【需要根據攝像頭修改參數】左目相機標定參數 kc_left_01,  kc_left_02,  kc_left_03,  kc_left_04,   kc_left_05
        distCoeffL.put(0, 0, 0.01053, 0.02881, 0.00144, 0.00192, 0.00000);
        //【需要根據攝像頭修改參數】右目相機標定參數 fc_right_x  0  cc_right_x  0  fc_right_y  cc_right_y  0  0  1
        cameraMatrixR.put(0, 0, 847.54814, 0, 664.36648, 0, 847.75828, 368.46946, 0, 0, 1);
        //【需要根據攝像頭修改參數】右目相機標定參數 kc_right_01,  kc_right_02,  kc_right_03,  kc_right_04,   kc_right_05
        distCoeffR.put(0, 0, 0.00905, 0.02094, 0.00082, 0.00183, 0.00000);
        //【需要根據攝像頭修改參數】T平移向量
        T.put(0, 0, -59.32102, 0.27563, -0.79807);
        // 【需要根據攝像頭修改參數】rec旋轉向量
        rec.put(0, 0, -0.00927, -0.00228, -0.00070);

        Size imageSize = new Size(imageWidth, imageHeight);
        Mat R = new Mat();
        Mat Rl = new Mat();
        Mat Rr = new Mat();
        Mat Pl = new Mat();
        Mat Pr = new Mat();
        Rect validROIL = new Rect();
        Rect validROIR = new Rect();
        Calib3d.Rodrigues(rec, R);                                   //Rodrigues變換
        //圖像校正之後,會對圖像進行裁剪,這裏的validROI就是指裁剪之後的區域
        Calib3d.stereoRectify(cameraMatrixL, distCoeffL, cameraMatrixR, distCoeffR, imageSize, R, T, Rl, Rr, Pl, Pr, Q, Calib3d.CALIB_ZERO_DISPARITY,
                0, imageSize, validROIL, validROIR);
        Imgproc.initUndistortRectifyMap(cameraMatrixL, distCoeffL, Rl, Pl, imageSize, CvType.CV_32FC1, mapLx, mapLy);
        Imgproc.initUndistortRectifyMap(cameraMatrixR, distCoeffR, Rr, Pr, imageSize, CvType.CV_32FC1, mapRx, mapRy);

        int blockSize = 18;
        int numDisparities = 11;
        int uniquenessRatio = 5;
        bm.setBlockSize(2 * blockSize + 5);                           //SAD窗口大小
        bm.setROI1(validROIL);                                        //左右視圖的有效像素區域
        bm.setROI2(validROIR);
        bm.setPreFilterCap(61);                                       //預處理濾波器
        bm.setMinDisparity(32);                                       //最小視差,默認值爲0, 可以是負值,int型
        bm.setNumDisparities(numDisparities * 16);                    //視差窗口,即最大視差值與最小視差值之差,16的整數倍
        bm.setTextureThreshold(10);
        bm.setUniquenessRatio(uniquenessRatio);                       //視差唯一性百分比,uniquenessRatio主要可以防止誤匹配
        bm.setSpeckleWindowSize(100);                                 //檢查視差連通區域變化度的窗口大小
        bm.setSpeckleRange(32);                                       //32視差變化閾值,當窗口內視差變化大於閾值時,該窗口內的視差清零
        bm.setDisp12MaxDiff(-1);
    }
創建一個compute()方法,該方法的參數是Bitmap類型的左右目攝像頭的圖像。compute()方法的返回值是圖像計算圖像結果轉換的圖像,這給圖像可以很直觀顯示圖像的距離。計算結果都存放在xyz矩陣中。
    public Bitmap compute(Bitmap left, Bitmap right) {
        Mat rgbImageL = new Mat();
        Mat rgbImageR = new Mat();
        Mat grayImageL = new Mat();
        Mat rectifyImageL = new Mat();
        Mat rectifyImageR = new Mat();
        Mat grayImageR = new Mat();
        //用於存放每個像素點距離相機鏡頭的三維座標
        xyz = new Mat();
        Mat disp = new Mat();
        bitmapToMat(left, rgbImageL);
        bitmapToMat(right, rgbImageR);
        Imgproc.cvtColor(rgbImageL, grayImageL, Imgproc.COLOR_BGR2GRAY);
        Imgproc.cvtColor(rgbImageR, grayImageR, Imgproc.COLOR_BGR2GRAY);

        Imgproc.remap(grayImageL, rectifyImageL, mapLx, mapLy, Imgproc.INTER_LINEAR);
        Imgproc.remap(grayImageR, rectifyImageR, mapRx, mapRy, Imgproc.INTER_LINEAR);

        bm.compute(rectifyImageL, rectifyImageR, disp);                    //輸入圖像必須爲灰度圖
        Calib3d.reprojectImageTo3D(disp, xyz, Q, true);  //在實際求距離時,ReprojectTo3D出來的X / W, Y / W, Z / W都要乘以16
        Core.multiply(xyz, new Mat(xyz.size(), CvType.CV_32FC3, new Scalar(16, 16, 16)), xyz);

        // 用於顯示處理
        Mat disp8U = new Mat(disp.rows(), disp.cols(), CvType.CV_8UC1);
        disp.convertTo(disp, CvType.CV_32F, 1.0 / 16);               //除以16得到真實視差值
        Core.normalize(disp, disp8U, 0, 255, Core.NORM_MINMAX, CvType.CV_8U);
        Imgproc.medianBlur(disp8U, disp8U, 9);
        Bitmap resultBitmap = Bitmap.createBitmap(disp8U.cols(), disp8U.rows(), Bitmap.Config.ARGB_8888);
        matToBitmap(disp8U, resultBitmap);
        return resultBitmap;
    }
執行上一步計算圖像的距離之後,通過getCoordinate()方法可以獲取圖像中實際的三維座標,結構是x, y, z。
    public double[] getCoordinate(int dstX, int dstY) {
        double x = xyz.get(dstY, dstX)[0];
        double y = xyz.get(dstY, dstX)[1];
        double z = xyz.get(dstY, dstX)[2];
        return new double[]{x, y, z};
    }
又是上面的雙目測距工具類,接下來就可以很方便實現雙目測距。在MainActivity.java中,簡單幾步就完成了雙目測距,在使用OpenCV之前一定要執行OpenCVLoader.initDebug(),然後讀取assets文件夾中的圖像,分別是是左右目拍攝保存的圖像,把他們轉化成Bitmap用於下一步執行距離計算。
//初始化
if (OpenCVLoader.initDebug()) {
      Log.d(TAG, "OpenCVLoader初始化成功");
}

// 加載圖片
try {
    leftBitmap = BitmapFactory.decodeStream(getAssets().open("Left3.bmp"));
    rightBitmap = BitmapFactory.decodeStream(getAssets().open("Right3.bmp"));
    imageViewLeft.setImageBitmap(leftBitmap);
    imageViewRight.setImageBitmap(rightBitmap);
} catch (IOException e) {
    e.printStackTrace();
}
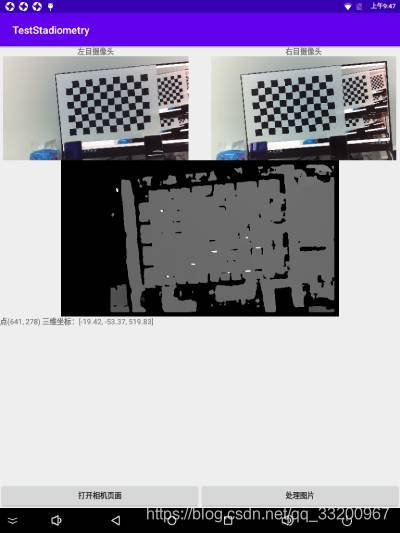
因爲我們已經編寫了一個StereoBMUtil工具類,在這裏就可以直接計算這兩張圖像的物體距離了。計算完成之後,爲了方便查看圖像中的距離,把結果圖在ImageView上顯示,然後爲ImageView添加點擊獲取座標事件。用戶在點擊之後會獲取到圖像中的座標,然後使用這個座標從xyz中獲取拍攝物體的實際三維座標。
// 執行StereoBM算法
button.setOnClickListener(v -> {
    try {
        Bitmap result = stereoBMUtil.compute(leftBitmap, rightBitmap);
        imageViewResult.setImageBitmap(result);
    } catch (Exception e) {
        e.printStackTrace();
    }
});

// 點擊計算後的圖片,獲取三維座標數據
imageViewResult.setOnTouchListener((v, event) -> {
    // 獲取觸摸點的座標 x, y
    float x = event.getX();
    float y = event.getY();
    // 目標點的座標
    float[] dst = new float[2];
    Matrix imageMatrix = imageViewResult.getImageMatrix();
    Matrix inverseMatrix = new Matrix();
    imageMatrix.invert(inverseMatrix);
    inverseMatrix.mapPoints(dst, new float[]{x, y});
    int dstX = (int) dst[0];
    int dstY = (int) dst[1];
    // 獲取該點的三維座標
    double[] c = stereoBMUtil.getCoordinate(dstX, dstY);
    String s = String.format("點(%d, %d) 三維座標:[%.2f, %.2f, %.2f]", dstX, dstY, c[0], c[1], c[2]);
    Log.d(TAG, s);
    textView.setText(s);
    return true;
});
效果圖如下:
使用攝像頭測距
上面的是實現讀取兩張計算物體距離,並沒有使用攝像頭拍攝,那麼接下來我們就通過使用Android設備接的雙目攝像頭,即時拍攝圖像計算物體距離。創建一個新的Activity,命名爲CameraActivity,按照通常的調用攝像頭的方式,這樣獲取到的圖像是左右目攝像頭拍攝的圖片拼接在一起的並且旋轉的,我們需要的是把他們旋轉回來並把他們裁剪分割,這樣就可以獲取到了兩種分別是左右目攝像頭拍攝的圖像。
// 拍照獲取左右攝像頭的圖像
button2.setOnClickListener(v -> {
    bgView.setVisibility(View.VISIBLE);
    ll.setVisibility(View.VISIBLE);
    Bitmap imgBitmap = mTextureView.getBitmap();
    Bitmap b = Utils.rotateBitmap(imgBitmap, 360 - sensorOrientation);
    List<Bitmap> bitmapList = Utils.bisectionBitmap(b);
    // 左右目攝像頭的圖像
    leftBitmap = bitmapList.get(0);
    rightBitmap = bitmapList.get(1);
    imageViewLeft.setImageBitmap(leftBitmap);
    imageViewRight.setImageBitmap(rightBitmap);
});

// 把圖像翻轉回來
public static Bitmap rotateBitmap(Bitmap bitmap, int angle) {
    Matrix matrix = new Matrix();
    matrix.postRotate(angle);
    return Bitmap.createBitmap(bitmap, 0, 0, bitmap.getWidth(), bitmap.getHeight(), matrix, true);
}

// 裁剪分割左右目圖像
public static List<Bitmap> bisectionBitmap(Bitmap bitmap) {
    List<Bitmap> bitmapList = new ArrayList<>();
    Bitmap left = Bitmap.createBitmap(bitmap, 0, 0, bitmap.getWidth() / 2, bitmap.getHeight(), null, true);
    bitmapList.add(left);
    Bitmap right = Bitmap.createBitmap(bitmap, bitmap.getWidth() / 2, 0, bitmap.getWidth() / 2, bitmap.getHeight(), null, true);
    bitmapList.add(right);
    return bitmapList;
}
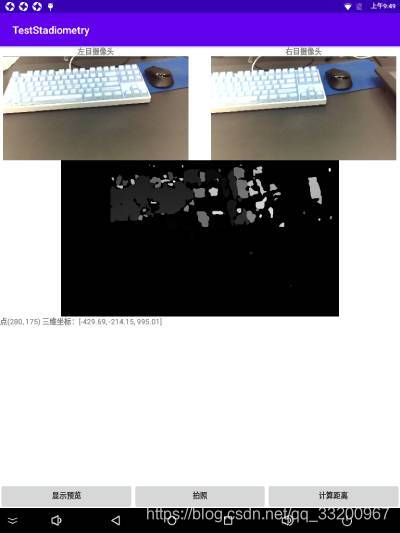
接下來的處理方式就跟之前的一樣了,使用StereoBMUtil工具類讀取分割後的左右目攝像頭的圖像執行計算,把結果圖在ImageView上顯示,然後爲ImageView添加點擊獲取座標事件。用戶在點擊之後會獲取到圖像中的座標,然後使用這個座標從xyz中獲取拍攝物體的實際三維座標。
// 執行StereoBM算法
button4.setOnClickListener(v -> {
    Bitmap result = stereoBMUtil.compute(leftBitmap, rightBitmap);
    imageViewResult.setImageBitmap(result);
});

// 點擊計算後的圖片,獲取三維座標數據
imageViewResult.setOnTouchListener((v, event) -> {
    // 獲取觸摸點的座標 x, y
    float x = event.getX();
    float y = event.getY();
    float[] dst = new float[2];
    Matrix imageMatrix = imageViewResult.getImageMatrix();
    Matrix inverseMatrix = new Matrix();
    imageMatrix.invert(inverseMatrix);
    inverseMatrix.mapPoints(dst, new float[]{x, y});
    int dstX = (int) dst[0];
    int dstY = (int) dst[1];
    // 獲取該點的三維座標
    double[] c = stereoBMUtil.getCoordinate(dstX, dstY);
    String s = String.format("點(%d, %d) 三維座標:[%.2f, %.2f, %.2f]", dstX, dstY, c[0], c[1], c[2]);
    Log.d(TAG, s);
    textView.setText(s);
    return true;
});
效果圖如下:
本項目源碼: 點擊下載