前言
現在越來越多的手機要使用到深度學習了,比如一些圖像分類,目標檢測,風格遷移等等,之前都是把數據提交給服務器完成的。但是提交給服務器有幾點不好,首先是速度問題,圖片上傳到服務器需要時間,客戶端接收結果也需要時間,這一來回就佔用了一大半的時間,會使得整體的預測速度都變慢了,再且現在手機的性能不斷提高,足以做深度學習的預測。其二是隱私問題,如果只是在本地預測,那麼用戶根本就不用上傳圖片,安全性也大大提高了。所以本章我們就來學如何包我們訓練的PaddlePaddle預測模型部署到Android手機上。
編譯paddle-mobile庫
想要把PaddlePaddle訓練好的預測庫部署到Android手機上,還需要藉助paddle-mobile框架。paddle-mobile框架主要是爲了方便PaddlePaddle訓練好的模型部署到移動設備上,比如Android手機,蘋果手機,樹莓派等等這些移動設備,有了paddle-mobile框架大大方便了把PaddlePaddle的預測庫部署到移動設備上,而且paddle-mobile框架針對移動設備做了大量的優化,使用這些預測庫在移動設備上有了更好的預測性能。
想要在Android手機上使用paddle-mobile,就要編譯Android能夠使用的CPP庫,在這一部分中,我們介紹兩種編譯Android的paddle-mobile庫,分別是使用Docker編譯paddle-mobile庫、使用Ubuntu交叉編譯paddle-mobile庫。
使用Docker編譯
爲了方便操作,以下的操作都是在root用戶的執行的:
1、安裝Docker,以下是在Ubuntu下安裝的的方式,只要一條命令就可以了:
apt-get install docker.io
2、克隆paddle-mobile源碼:
git clone https://github.com/PaddlePaddle/paddle-mobile.git
3、進入到paddle-mobile根目錄下編譯docker鏡像:
cd paddle-mobile
# 編譯生成進行,編譯時間可能要很長
docker build -t paddle-mobile:dev - < Dockerfile
編譯完成可以使用docker images命令查看是否已經生成進行:
root@test:/home/test# docker images
REPOSITORY                          TAG                 IMAGE ID            CREATED             SIZE
paddle-mobile                       dev                 fffbd8779c68        20 hours ago        3.76 GB
4、運行鏡像並進入到容器裏面,當前目錄還是在paddle-mobile根目錄下:
docker run -it -v $PWD:/paddle-mobile paddle-mobile:dev
5、在容器裏面執行以下兩條命令:
root@fc6f7e9ebdf1:/# cd paddle-mobile/
root@fc6f7e9ebdf1:/paddle-mobile# cmake -DCMAKE_TOOLCHAIN_FILE=tools/toolchains/arm-android-neon.cmake
6、(可選)可以使用命令ccmake .配置一些信息,比如可以設置NET僅支持googlenet,這樣便於得到的paddle-mobile庫會更小一些,修改完成之後,使用c命令保存,使用g退出。筆者一般跳過這個步驟。
                                                    Page 1 of 1
 CMAKE_ASM_FLAGS
 CMAKE_ASM_FLAGS_DEBUG
 CMAKE_ASM_FLAGS_RELEASE
 CMAKE_BUILD_TYPE
 CMAKE_INSTALL_PREFIX             /usr/local
 CMAKE_TOOLCHAIN_FILE             /paddle-mobile/tools/toolchains/arm-android-neon.cmake
 CPU                              ON
 DEBUGING                         ON
 FPGA                             OFF
 LOG_PROFILE                      ON
 MALI_GPU                         OFF
 NET                              defult
 USE_EXCEPTION                    ON
 USE_OPENMP                       ON
7、最後執行一下make就可以了,到這一步就完成了paddle-mobile的編譯。
root@fc6f7e9ebdf1:/paddle-mobile# make
8、使用exit命令退出容器,回到Ubuntu本地上。
root@fc6f7e9ebdf1:/paddle-mobile# exit
9、在paddle-mobile根目錄下,有一個build目錄,我們編譯好的paddle-mobile庫就在這裏。
root@test:/home/test/paddle-mobile/build# ls
libpaddle-mobile.so
libpaddle-mobile.so就是我們在開發Android項目的時候使用到的paddle-mobile庫。
使用Ubuntu編譯
1、首先要下載和解壓NDK。
wget https://dl.google.com/android/repository/android-ndk-r17b-linux-x86_64.zip
unzip android-ndk-r17b-linux-x86_64.zip
2、設置NDK環境變量,目錄是NDK的解壓目錄。
export NDK_ROOT="/home/test/android-ndk-r17b"
設置好之後,可以使用以下的命令查看配置情況。
root@test:/home/test# echo $NDK_ROOT
/home/test/android-ndk-r17b
3、安裝cmake,需要安裝較高版本的,筆者的cmake版本是3.11.2。
- 下載cmake源碼
wget https://cmake.org/files/v3.11/cmake-3.11.2.tar.gz
- 解壓cmake源碼
tar -zxvf cmake-3.11.2.tar.gz
- 進入到cmake源碼根目錄,並執行
bootstrap。
cd cmake-3.11.2
./bootstrap
- 最後執行以下兩條命令開始安裝cmake。
make
make install
- 安裝完成之後,可以使用
cmake --version是否安裝成功.
root@test:/home/test/paddlepaddle# cmake --version
cmake version 3.11.2

CMake suite maintained and supported by Kitware (kitware.com/cmake).
4、克隆paddle-mobile源碼。
git clone https://github.com/PaddlePaddle/paddle-mobile.git
5、進入到paddle-mobile目錄下,執行編譯。
cd paddle-mobile/
cmake -DCMAKE_TOOLCHAIN_FILE=tools/toolchains/arm-android-neon.cmake
make
6、最後會在paddle-mobile/build目錄下生產paddle-mobile庫。
root@test:/home/test/paddle-mobile/build# ls
libpaddle-mobile.so
libpaddle-mobile.so就是我們在開發Android項目的時候使用到的paddle-mobile庫。
創建Android項目
首先使用Android Studio創建一個普通的Android項目,我們可以不用選擇CPP的支持,因爲我們已經編譯好了CPP。之後按照以下的步驟開始執行:
1、在main目錄下創建兩個assets/infer_model文件夾,這個文件夾我們將會使用它來存放PaddlePaddle訓練好的預測模型,本章我們使用的預測模型是《PaddlePaddle從入門到煉丹》十一——自定義圖像數據集識別訓練得到的預測模型,我們訓練好的模型複製到這個文件夾下。
2、在main目錄下創建一個jniLibs文件夾,這個文件夾是存放CPP編譯庫的,就是編譯paddle-mobile庫部分編譯的libpaddle-mobile.so
3、在Android項目的配置文件夾中加上權限聲明,因爲我們要使用到讀取相冊和使用相機,所以加上以下的權限聲明:
<uses-permission android:name="android.permission.WRITE_EXTERNAL_STORAGE" />
<uses-permission android:name="android.permission.READ_EXTERNAL_STORAGE" />
4、修改activity_main.xml界面,修改成如下:
<?xml version="1.0" encoding="utf-8"?>
<RelativeLayout xmlns:android="http://schemas.android.com/apk/res/android"
    xmlns:app="http://schemas.android.com/apk/res-auto"
    xmlns:tools="http://schemas.android.com/tools"
    android:layout_width="match_parent"
    android:layout_height="match_parent"
    tools:context=".MainActivity">

    <LinearLayout
        android:id="@+id/ll"
        android:orientation="horizontal"
        android:layout_alignParentBottom="true"
        android:layout_width="match_parent"
        android:layout_height="50dp">

        <Button
            android:layout_weight="1"
            android:id="@+id/load"
            android:text="加載模型"
            android:layout_width="0dp"
            android:layout_height="match_parent" />

        <Button
            android:id="@+id/clear"
            android:layout_weight="1"
            android:text="清空模型"
            android:layout_width="0dp"
            android:layout_height="match_parent" />

        <Button
            android:id="@+id/infer"
            android:layout_weight="1"
            android:text="預測圖片"
            android:layout_width="0dp"
            android:layout_height="match_parent" />
    </LinearLayout>

    <TextView
        android:layout_above="@id/ll"
        android:id="@+id/show"
        android:hint="這裏顯示預測結果"
        android:layout_width="match_parent"
        android:layout_height="100dp" />

    <ImageView
        android:id="@+id/image_view"
        android:layout_above="@id/show"
        android:layout_width="match_parent"
        android:layout_height="match_parent" />
</RelativeLayout>
5、創建一個com.baidu.paddle包,在這個包下創建的Java程序,這個Java程序就是用於調用paddle-mobile的CPP動態庫的。它提供了多種方法給我們使用,我們主要使用到加載模型的方法load(String modelDir),清空已加載的方法clear(),還有最最重要的預測方法predictImage(float[] buf, int[]ddims)。
package com.baidu.paddle;

public class PML {
    // set thread num
    public static native void setThread(int threadCount);

    //Load seperated parameters
    public static native boolean load(String modelDir);

    // load qualified model
    public static native boolean loadQualified(String modelDir);

    // Load combined parameters
    public static native boolean loadCombined(String modelPath, String paramPath);

    // load qualified model
    public static native boolean loadCombinedQualified(String modelPath, String paramPath);

    // object detection
    public static native float[] predictImage(float[] buf, int[]ddims);

    // predict yuv image
    public static native float[] predictYuv(byte[] buf, int imgWidth, int imgHeight, int[] ddims, float[]meanValues);

    // clear model
    public static native void clear();
}
6、然後在項目的主要包下創建一個Utils.java的工具類。這個工具類主要編寫一些圖像的處理方法,和一些模型複製方法等,我們下面將一一介紹這些方法。
該方法是用於獲取預測結果中概率最大的標籤,參數是執行預測的結果,這個結果是對應沒有類別的概率,這個方法就判斷哪個類別的概率最大,然後就返回概率最大的標籤。
// 獲取預測值中最大概率的標籤
public static int getMaxResult(float[] result) {
    float probability = result[0];
    int r = 0;
    for (int i = 0; i < result.length; i++) {
        if (probability < result[i]) {
            probability = result[i];
            r = i;
        }
    }
    return r;
}
該方法是把圖片轉換成預測需要用的數據格式浮點數組。在轉換的過程中也對圖像做了預處理,這個預處理需要跟訓練的預處理的方式一樣,否則無法正確預測。還有指定了處理後圖片的大小,根據參數輸入的寬度和高度,把圖片壓縮到這些自定的大小。還有把圖片的通道順序改爲RGB,同時每個像素除以255,這個操作跟訓練的時候一樣。
// 對將要預測的圖片進行預處理
public static float[] getScaledMatrix(Bitmap bitmap, int desWidth, int desHeight) {
    float[] dataBuf = new float[3 * desWidth * desHeight];
    int rIndex;
    int gIndex;
    int bIndex;
    int[] pixels = new int[desWidth * desHeight];
    Bitmap bm = Bitmap.createScaledBitmap(bitmap, desWidth, desHeight, false);
    bm.getPixels(pixels, 0, desWidth, 0, 0, desWidth, desHeight);
    int j = 0;
    int k = 0;
    for (int i = 0; i < pixels.length; i++) {
        int clr = pixels[i];
        j = i / desHeight;
        k = i % desWidth;
        rIndex = j * desWidth + k;
        gIndex = rIndex + desHeight * desWidth;
        bIndex = gIndex + desHeight * desWidth;
        // 轉成RGB通道順序,併除以255,跟訓練的預處理一樣
        dataBuf[rIndex] = (float) (((clr & 0x00ff0000) >> 16) / 255.0);
        dataBuf[gIndex] = (float) (((clr & 0x0000ff00) >> 8) / 255.0);
        dataBuf[bIndex] = (float) (((clr & 0x000000ff)) / 255.0);

    }
    if (bm.isRecycled()) {
        bm.recycle();
    }
    return dataBuf;
}
該方法是對圖片進行壓縮,避免圖片過大,超過內存支出。把圖片的最大長度壓縮到500以內。
// 壓縮圖片,避免圖片過大
public static Bitmap getScaleBitmap(String filePath) {
    BitmapFactory.Options opt = new BitmapFactory.Options();
    opt.inJustDecodeBounds = true;
    BitmapFactory.decodeFile(filePath, opt);

    int bmpWidth = opt.outWidth;
    int bmpHeight = opt.outHeight;

    int maxSize = 500;

    // compress picture with inSampleSize
    opt.inSampleSize = 1;
    while (true) {
        if (bmpWidth / opt.inSampleSize < maxSize || bmpHeight / opt.inSampleSize < maxSize) {
            break;
        }
        opt.inSampleSize *= 2;
    }
    opt.inJustDecodeBounds = false;
    return BitmapFactory.decodeFile(filePath, opt);
}
該方法是根據相冊返回的URI轉換爲圖片的絕對路徑,用於之後使用這個路徑獲取圖片內容。
// 根據相冊返回的URI返回圖片的絕對路徑
public static String getPathFromURI(Context context, Uri uri) {
    String result;
    Cursor cursor = context.getContentResolver().query(uri, null, null, null, null);
    if (cursor == null) {
        result = uri.getPath();
    } else {
        cursor.moveToFirst();
        int idx = cursor.getColumnIndex(MediaStore.Images.ImageColumns.DATA);
        result = cursor.getString(idx);
        cursor.close();
    }
    return result;
}
該方法是把assets資源文件下的預測文件複製到緩存目錄,用於之後加載模型文件。
// 複製莫模型文件到緩存目錄
public static void copyFileFromAsset(Context context, String oldPath, String newPath) {
    try {
        // 預測模型文件在assets中的位置
        String[] fileNames = context.getAssets().list(oldPath);
        if (fileNames.length > 0) {
            // directory
            File file = new File(newPath);
            if (!file.exists()) {
                file.mkdirs();
            }
            // copy recursivelyC
            for (String fileName : fileNames) {
                copyFileFromAsset(context, oldPath + "/" + fileName, newPath + "/" + fileName);
            }
        } else {
            // file
            File file = new File(newPath);
            // if file exists will never copy
            if (file.exists()) {
                return;
            }

            // copy file to new path
            InputStream is = context.getAssets().open(oldPath);
            FileOutputStream fos = new FileOutputStream(file);
            byte[] buffer = new byte[1024];
            int byteCount;
            while ((byteCount = is.read(buffer)) != -1) {
                fos.write(buffer, 0, byteCount);
            }
            fos.flush();
            is.close();
            fos.close();
        }
    } catch (Exception e) {
        e.printStackTrace();
    }
}
7、最後修改MainActivity.java,修改如下:
這裏做一些初始化操作,如加載PaddleMobile的動態庫,指定圖片的形狀。
    private String model_path;
    // 模型文件夾
    private String assets_path = "infer_model";
    private boolean load_result = false;
    // 輸入圖片的形狀,分別是:batch size、通道數、寬度、高度
    private int[] ddims = {1, 3, 224, 224};
    private ImageView imageView;
    private TextView showTv;

    // 加載PaddleMobile的動態庫
    static {
        try {
            System.loadLibrary("paddle-mobile");

        } catch (Exception e) {
            e.printStackTrace();

        }
    }
該方法是初始化控件,和定義按鈕的點擊事件,如加載模型點擊事件,清空模型點擊事件,打開相冊預測圖片點擊事件。
    // 初始化控件
    private void initView(){
        Button loadBtn = findViewById(R.id.load);
        Button clearBtn = findViewById(R.id.clear);
        Button inferBtn = findViewById(R.id.infer);
        showTv = findViewById(R.id.show);
        imageView = findViewById(R.id.image_view);

        // 加載模型點擊事件
        loadBtn.setOnClickListener(new View.OnClickListener() {
            @Override
            public void onClick(View v) {
                load_result = PML.load(model_path);
                if (load_result) {
                    Toast.makeText(MainActivity.this, "模型加載成功", Toast.LENGTH_SHORT).show();
                } else {
                    Toast.makeText(MainActivity.this, "模型加載失敗", Toast.LENGTH_SHORT).show();
                }
            }
        });

        // 清空模型點擊事件
        clearBtn.setOnClickListener(new View.OnClickListener() {
            @Override
            public void onClick(View v) {
                PML.clear();
                load_result = false;
                Toast.makeText(MainActivity.this, "模型已清空", Toast.LENGTH_SHORT).show();
            }
        });

        // 打開相冊選擇圖片預測點擊事件
        inferBtn.setOnClickListener(new View.OnClickListener() {
            @Override
            public void onClick(View v) {
                if (load_result){
                    Intent intent = new Intent(Intent.ACTION_PICK);
                    intent.setType("image/*");
                    startActivityForResult(intent, 1);
                } else {
                    Toast.makeText(MainActivity.this, "模型未加載", Toast.LENGTH_SHORT).show();
                }
            }
        });

    }
該方法是一個回調方法,主要是打開相冊後的回調預測操作。使用返回的URI轉換爲絕對路徑,然後使用這個圖片路徑轉換成Bitmap用於顯示,同時也使用這個路徑執行預測操作。
    // 回調事件
    @Override
    protected void onActivityResult(int requestCode, int resultCode, @Nullable Intent data) {
        String image_path;
        if (resultCode == Activity.RESULT_OK) {
            switch (requestCode) {
                case 1:
                    if (data == null) {
                        return;
                    }
                    // 獲取相冊返回的URI
                    Uri image_uri = data.getData();
                    // 根據圖片的URI獲取絕對路徑
                    image_path = Utils.getPathFromURI(MainActivity.this, image_uri);
                    // 壓縮圖片用於顯示
                    Bitmap bitmap = Utils.getScaleBitmap(image_path);
                    imageView.setImageBitmap(bitmap);
                    // 開始預測圖片
                    predictImage(image_path);
                    break;
            }
        }
    }
該方法是預測操作的方法,參數是圖片的絕對路徑,首先根據圖片獲取已經壓縮過的Bitmap,然後使用這個Bitmap轉換成預處理後的浮點數組,最後執行預測操作。再根據預測結果提取最大概率的標籤,並獲取該標籤的類別名稱。
    // 根據圖片的路徑預測圖片
    private void predictImage(String image_path) {
        // 把圖片進行壓縮
        Bitmap bmp = Utils.getScaleBitmap(image_path);
        // 把圖片轉換成浮點數組,用於預測
        float[] inputData = Utils.getScaledMatrix(bmp, ddims[2], ddims[3]);
        try {
            long start = System.currentTimeMillis();
            // 執行預測,獲取預測結果
            float[] result = PML.predictImage(inputData, ddims);
            long end = System.currentTimeMillis();
            // 獲取概率最大的標籤
            int r = Utils.getMaxResult(result);
            // 獲取標籤對應的類別名稱
            String[] names = {"蘋果", "哈密瓜", "胡蘿蔔", "櫻桃", "黃瓜", "西瓜"};
            String show_text = "標籤:" + r + "\n名稱:" + names[r] + "\n概率:" + result[r] + "\n時間:" + (end - start) + "ms";
            // 顯示預測結果
            showTv.setText(show_text);
        } catch (Exception e) {
            e.printStackTrace();
        }
    }
這主要是用於動態獲取權限,因爲讀取外部文件需要讀取外部文件的權限,又因爲讀取外部文件權限是屬於危險權限,需要動態獲取。
    // 多權限動態申請
    private void requestPermissions() {
        List<String> permissionList = new ArrayList<>();
        if (ContextCompat.checkSelfPermission(this, Manifest.permission.WRITE_EXTERNAL_STORAGE) != PackageManager.PERMISSION_GRANTED) {
            permissionList.add(Manifest.permission.WRITE_EXTERNAL_STORAGE);
        }

        if (ContextCompat.checkSelfPermission(this, Manifest.permission.READ_EXTERNAL_STORAGE) != PackageManager.PERMISSION_GRANTED) {
            permissionList.add(Manifest.permission.READ_EXTERNAL_STORAGE);
        }

        // if list is not empty will request permissions
        if (!permissionList.isEmpty()) {
            ActivityCompat.requestPermissions(this, permissionList.toArray(new String[permissionList.size()]), 1);
        }
    }

    @Override
    public void onRequestPermissionsResult(int requestCode, @NonNull String[] permissions, @NonNull int[] grantResults) {
        super.onRequestPermissionsResult(requestCode, permissions, grantResults);
        switch (requestCode) {
            case 1:
                if (grantResults.length > 0) {
                    for (int i = 0; i < grantResults.length; i++) {

                        int grantResult = grantResults[i];
                        if (grantResult == PackageManager.PERMISSION_DENIED) {
                            String s = permissions[i];
                            Toast.makeText(this, s + " permission was denied", Toast.LENGTH_SHORT).show();
                        }
                    }
                }
                break;
        }
    }
然後修改onCreate,首先獲取緩存文件路徑,然後初始化視圖控件和動態獲取權限,最後把預測模型文件複製到緩存路徑下。
    @Override
    protected void onCreate(Bundle savedInstanceState) {
        super.onCreate(savedInstanceState);
        setContentView(R.layout.activity_main);

        model_path = getCacheDir().getAbsolutePath() + File.separator + "infer_model";
        // 初始化控件
        initView();
        // 動態請求權限
        requestPermissions();
        // 從assets中複製模型文件到緩存目錄下
        Utils.copyFileFromAsset(this, assets_path, model_path);
    }
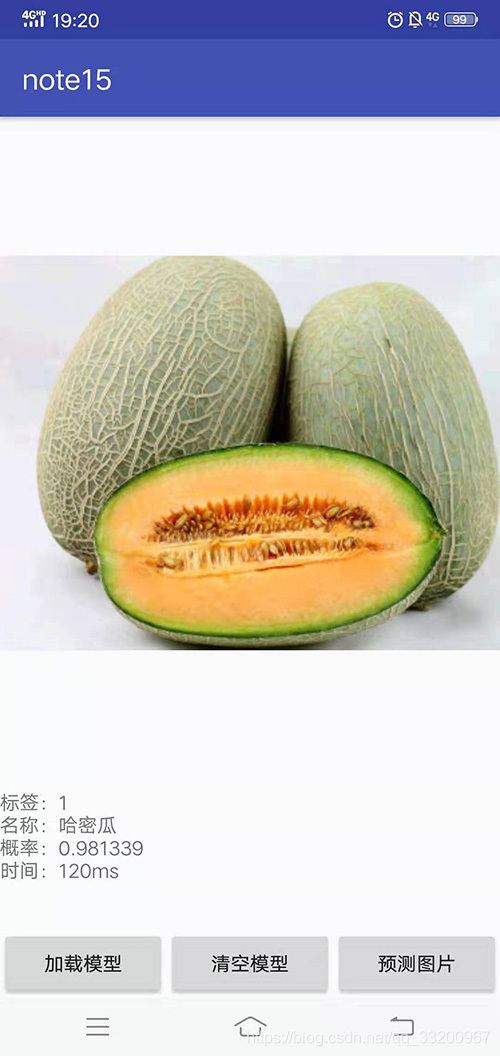
8、最後運行項目,選擇圖片預測會得到以下的效果:
GitHub地址:https://github.com/yeyupiaoling/LearnPaddle2/tree/master/note15
上一章:《PaddlePaddle從入門到煉丹》十四——把預測模型部署在服務器
參考資料
- https://github.com/PaddlePaddle/paddle-mobile
- https://blog.csdn.net/qq_33200967/article/details/81066970