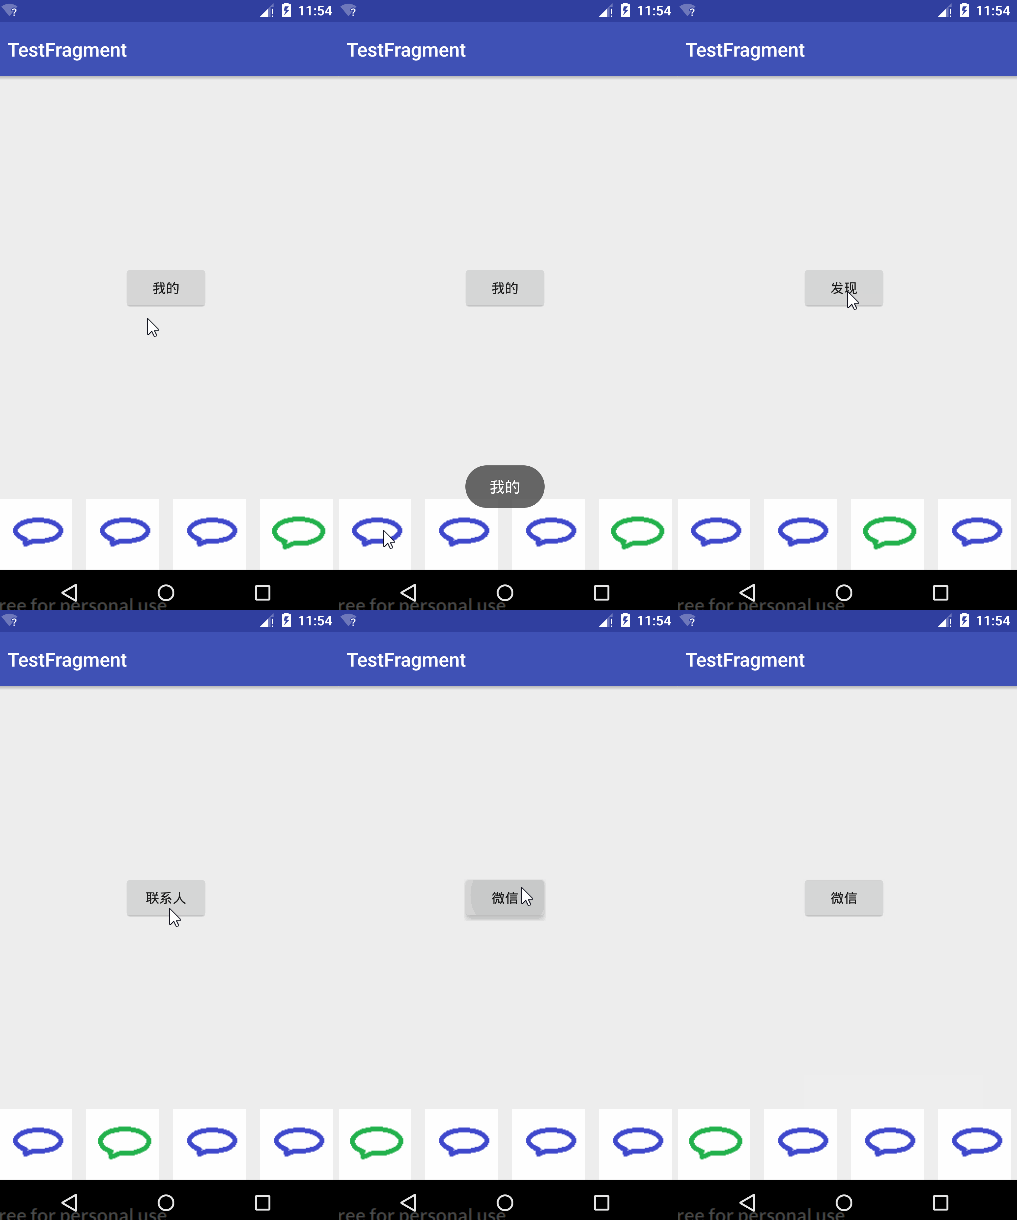
Android使用Fragment仿微信底部导航栏

这是一个使用Fragment做的一个底部导航栏的小demo
MainActivity的代码
package com.example.dell.myapplication;

import android.app.FragmentManager;
import android.app.FragmentTransaction;
import android.os.Bundle;
import android.support.v7.app.AppCompatActivity;
import android.view.View;
import android.widget.ImageButton;

public class MainActivity extends AppCompatActivity implements View.OnClickListener{

    private ImageButton weixin;
    private ImageButton contact;
    private ImageButton find;
    private ImageButton me;
    private ContactFragment contactFragment;
    private WeiXinFragment weiXinFragment;
    private FindFragment findFragment;
    private MeFragment meFragment;

    @Override
    protected void onCreate(Bundle savedInstanceState) {
        super.onCreate(savedInstanceState);
        setContentView(R.layout.activity_main);

        weixin = (ImageButton) findViewById(R.id.weixin1);
        contact = (ImageButton) findViewById(R.id.weixin2);
        find = (ImageButton) findViewById(R.id.weixin3);
        me = (ImageButton) findViewById(R.id.weixin4);

        weixin.setOnClickListener(this);
        contact.setOnClickListener(this);
        find.setOnClickListener(this);
        me.setOnClickListener(this);

        //该按钮点击一次
        weixin.performClick();
    }

    @Override
    public void onClick(View v) {
        cleanIcn();
        FragmentManager fragmentManager = getFragmentManager();
        FragmentTransaction transaction = fragmentManager.beginTransaction();
        switch (v.getId()){
            case R.id.weixin1:
                if (weiXinFragment == null) {
                    weiXinFragment = new WeiXinFragment();
                }
                transaction.replace(R.id.fragment_container,weiXinFragment);
                weixin.setImageResource(R.drawable.weixin2);
                break;
            case R.id.weixin2:
                if (contactFragment == null) {
                    contactFragment = new ContactFragment();
                }
                transaction.replace(R.id.fragment_container,contactFragment);
                contact.setImageResource(R.drawable.weixin2);
                break;
            case R.id.weixin3:
                if (findFragment == null) {
                    findFragment = new FindFragment();
                }
                transaction.replace(R.id.fragment_container,findFragment);
                find.setImageResource(R.drawable.weixin2);
                break;
            case R.id.weixin4:
                if (meFragment== null){
                    meFragment = new MeFragment();
                }
                transaction.replace(R.id.fragment_container,meFragment);
                me.setImageResource(R.drawable.weixin2);
                break;
        }
        transaction.commit();
    }


    private void cleanIcn(){
        weixin.setImageResource(R.drawable.weixin);
        contact.setImageResource(R.drawable.weixin);
        find.setImageResource(R.drawable.weixin);
        me.setImageResource(R.drawable.weixin);
    }
}
对于的activity_main.xml代码
<?xml version="1.0" encoding="utf-8"?>
<RelativeLayout xmlns:android="http://schemas.android.com/apk/res/android"
    xmlns:tools="http://schemas.android.com/tools"
    android:id="@+id/activity_main"
    android:layout_width="match_parent"
    android:layout_height="match_parent"
    tools:context="com.example.dell.myapplication.MainActivity">

    <LinearLayout
        android:id="@+id/ll_button"
        android:gravity="center_vertical"
        android:layout_alignParentBottom="true"
        android:layout_width="match_parent"
        android:layout_height="wrap_content">

        <ImageButton
            android:layout_weight="1"
            android:id="@+id/weixin1"
            android:background="@null"
            android:src="@drawable/weixin"
            android:layout_width="0dp"
            android:layout_height="wrap_content" />
        <ImageButton
            android:layout_weight="1"
            android:id="@+id/weixin2"
            android:background="@null"
            android:src="@drawable/weixin"
            android:layout_width="0dp"
            android:layout_height="wrap_content" />
        <ImageButton
            android:layout_weight="1"
            android:id="@+id/weixin3"
            android:background="@null"
            android:src="@drawable/weixin"
            android:layout_width="0dp"
            android:layout_height="wrap_content" />
        <ImageButton
            android:layout_weight="1"
            android:id="@+id/weixin4"
            android:background="@null"
            android:src="@drawable/weixin"
            android:layout_width="0dp"
            android:layout_height="wrap_content" />

    </LinearLayout>

    <LinearLayout
        android:orientation="vertical"
        android:layout_above="@id/ll_button"
        android:id="@+id/fragment_container"
        android:layout_width="match_parent"
        android:layout_height="match_parent">

    </LinearLayout>
</RelativeLayout>
接下来是Fragment的代码
下面是fragment的Java代码,每个Java代码都对应这一个布局
package com.example.dell.myapplication;

import android.app.Fragment;
import android.os.Bundle;
import android.view.LayoutInflater;
import android.view.View;
import android.view.ViewGroup;
import android.widget.Button;
import android.widget.Toast;

public class WeiXinFragment extends Fragment {

    @Override
    public View onCreateView(LayoutInflater inflater, ViewGroup container,
                             Bundle savedInstanceState) {
        View view = inflater.inflate(R.layout.fragment_wei_xin, container, false);
        Button button = (Button) view.findViewById(R.id.btn_weixin);
        button.setOnClickListener(new View.OnClickListener() {
            @Override
            public void onClick(View v) {
                Toast.makeText(getActivity(),"微信",Toast.LENGTH_SHORT).show();
            }
        });
        return view;
    }

}
package com.example.dell.myapplication;

import android.app.Fragment;
import android.os.Bundle;
import android.view.LayoutInflater;
import android.view.View;
import android.view.ViewGroup;
import android.widget.Button;
import android.widget.Toast;


public class ContactFragment extends Fragment {

    @Override
    public View onCreateView(LayoutInflater inflater, ViewGroup container,
                             Bundle savedInstanceState) {
        View view = inflater.inflate(R.layout.fragment_contact, container, false);
        Button button = (Button) view.findViewById(R.id.btn_contact);
        button.setOnClickListener(new View.OnClickListener() {
            @Override
            public void onClick(View v) {
                Toast.makeText(getActivity(),"联系人",Toast.LENGTH_SHORT).show();
            }
        });
        return view;
    }

}
package com.example.dell.myapplication;

import android.app.Fragment;
import android.os.Bundle;
import android.support.annotation.Nullable;
import android.view.LayoutInflater;
import android.view.View;
import android.view.ViewGroup;
import android.widget.Button;
import android.widget.Toast;

/**
 * Created by dell on 2017/8/3.
 */

public class FindFragment extends Fragment {

    @Nullable
    @Override
    public View onCreateView(LayoutInflater inflater, ViewGroup container, Bundle savedInstanceState) {
        View view = inflater.inflate(R.layout.fragment_find, container, false);
        Button button = (Button) view.findViewById(R.id.btn_find);
        button.setOnClickListener(new View.OnClickListener() {
            @Override
            public void onClick(View v) {
                Toast.makeText(getActivity(),"发现",Toast.LENGTH_SHORT).show();
            }
        });
        return view;
    }
}
package com.example.dell.myapplication;

import android.app.Fragment;
import android.os.Bundle;
import android.view.LayoutInflater;
import android.view.View;
import android.view.ViewGroup;
import android.widget.Button;
import android.widget.Toast;


public class MeFragment extends Fragment {


    @Override
    public View onCreateView(LayoutInflater inflater, ViewGroup container,
                             Bundle savedInstanceState) {
        View view = inflater.inflate(R.layout.fragment_me, container, false);
        Button button = (Button) view.findViewById(R.id.btn_me);
        button.setOnClickListener(new View.OnClickListener() {
            @Override
            public void onClick(View v) {
                Toast.makeText(getActivity(),"我的",Toast.LENGTH_SHORT).show();
            }
        });
        return view;
    }

}
下面就是Java代码相应的布局代码
fragment_wei_xin.xml
<FrameLayout xmlns:android="http://schemas.android.com/apk/res/android"
    xmlns:tools="http://schemas.android.com/tools"
    android:layout_width="match_parent"
    android:layout_height="match_parent"
    tools:context="com.example.dell.myapplication.WeiXinFragment">

    <Button
        android:id="@+id/btn_weixin"
        android:layout_width="wrap_content"
        android:layout_height="wrap_content"
        android:layout_gravity="center"
        android:text="微信" />

</FrameLayout>
fragment_contact.xml
<FrameLayout xmlns:android="http://schemas.android.com/apk/res/android"
    xmlns:tools="http://schemas.android.com/tools"
    android:layout_width="match_parent"
    android:layout_height="match_parent"
    tools:context="com.example.dell.myapplication.WeiXinFragment">

    <Button
        android:id="@+id/btn_contact"
        android:layout_gravity="center"
        android:layout_width="wrap_content"
        android:layout_height="wrap_content"
        android:text="联系人" />

</FrameLayout>
fragment_find.xml
<FrameLayout xmlns:android="http://schemas.android.com/apk/res/android"
    xmlns:tools="http://schemas.android.com/tools"
    android:layout_width="match_parent"
    android:layout_height="match_parent"
    tools:context="com.example.dell.myapplication.WeiXinFragment">

    <Button
        android:id="@+id/btn_find"
        android:layout_width="wrap_content"
        android:layout_height="wrap_content"
        android:layout_gravity="center"
        android:text="发现" />

</FrameLayout>
fragment_me.xml
<FrameLayout xmlns:android="http://schemas.android.com/apk/res/android"
    xmlns:tools="http://schemas.android.com/tools"
    android:layout_width="match_parent"
    android:layout_height="match_parent"
    tools:context="com.example.dell.myapplication.WeiXinFragment">

    <Button
        android:id="@+id/btn_me"
        android:layout_width="wrap_content"
        android:layout_height="wrap_content"
        android:layout_gravity="center"
        android:text="我的" />

</FrameLayout>
下面是给每个Fragment添加按钮的点击事件,值得注意的是,在Fragment的点击事件跟Activity不一完全相同,在获取空间是不是直接findViewById,
而是要通过获得的view,而获取context不能直接this了,要是用getActivity()
@Override
    public View onCreateView(LayoutInflater inflater, ViewGroup container,
                             Bundle savedInstanceState) {
        View view = inflater.inflate(R.layout.fragment_me, container, false);
        //需要通过上面获得的View来findViewById
        Button button = (Button) view.findViewById(R.id.btn_me);
        button.setOnClickListener(new View.OnClickListener() {
            @Override
            public void onClick(View v) {
                //在这里不能使用this关键字了,要使用getActivity()代替
                Toast.makeText(getActivity(),"我的",Toast.LENGTH_SHORT).show();
            }
        });
        return view;
    }
效果图
