Foreword
In the previous chapter, we introduced “Binocular Camera Distance Measurement”. Building on that, we will now explore how to use binocular ranging algorithms on Android. Through this tutorial, you will not only learn to use binocular ranging algorithms like SBM on Android but also understand how to configure OpenCV in Android Studio. OpenCV enables numerous image processing functionalities on Android.
Configuring OpenCV
Download the Android version of OpenCV source code from the official website: https://opencv.org/releases/, version 3.4.1.
-
Create an Android project. Extract the source code zip file, then in Android Studio, click
File—>Import Model, and browse to the extractedsdk/javafolder. If successful, the OpenCV version will be displayed.
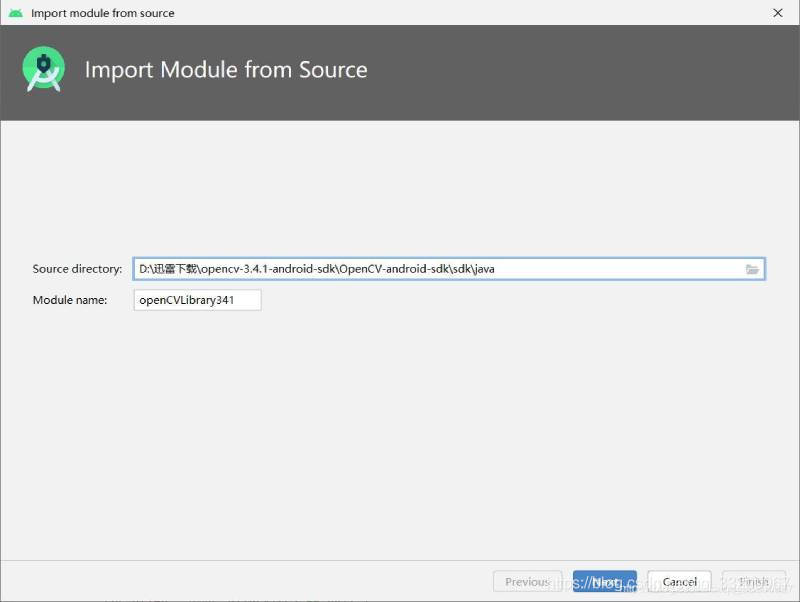
-
Copy OpenCV dynamic libraries to the
app/libsdirectory. -
Modify the
build.gradleofOpenCVLibrary(all content fromapp/build.gradle; removeapplicationId):
   apply plugin: 'com.android.library'

   android {
       compileSdkVersion 29
       buildToolsVersion "29.0.2"
       defaultConfig {
           minSdkVersion 22
           targetSdkVersion 29
           versionCode 1
           versionName "1.0"
           testInstrumentationRunner "androidx.test.runner.AndroidJUnitRunner"
       }
       buildTypes {
           release {
               minifyEnabled false
               proguardFiles getDefaultProguardFile('proguard-android-optimize.txt'), 'proguard-rules.pro'
           }
       }
   }
- Modify
OpenCVLibrary’sAndroidManifest.xml(version code matches your OpenCV version):
   <?xml version="1.0" encoding="utf-8"?>
   <manifest xmlns:android="http://schemas.android.com/apk/res/android"
             package="org.opencv"
             android:versionCode="3410"
             android:versionName="3.4.1">
   </manifest>
- Update
app/build.gradle:
   // Add to the android block
   sourceSets {
       main {
           jniLibs.srcDirs = ['libs']
       }
   }

   // Add to dependencies (adjust version as needed)
   implementation project(path: ':openCVLibrary341')
- Test OpenCV by adding this code. If initialized successfully, configuration is complete:
   if (OpenCVLoader.initDebug()) {
       Log.d(TAG, "OpenCVLoader initialized successfully");
   }
Binocular Ranging
Create a StereoBMUtil.java utility class for easy integration. Configure StereoBM algorithm parameters in the constructor (some require camera calibration data; refer to “Binocular Camera Distance Measurement” for details).
public class StereoBMUtil {
    private StereoBM bm = StereoBM.create();
    private Mat mapLx, mapLy, mapRx, mapRy;
    private Mat xyz;
    private final int imageWidth = 1280;
    private final int imageHeight = 720;

    public StereoBMUtil() {
        Mat cameraMatrixL = new Mat(3, 3, CvType.CV_64F);
        Mat distCoeffL = new Mat(5, 1, CvType.CV_64F);
        Mat cameraMatrixR = new Mat(3, 3, CvType.CV_64F);
        Mat distCoeffR = new Mat(5, 1, CvType.CV_64F);
        Mat T = new Mat(3, 1, CvType.CV_64F);
        Mat rec = new Mat(3, 1, CvType.CV_64F);
        Mat Q = new Mat();

        // Left camera calibration parameters (modify as needed)
        cameraMatrixL.put(0, 0, 849.38718, 0, 720.28472, 0, 850.60613, 373.88887, 0, 0, 1);
        distCoeffL.put(0, 0, 0.01053, 0.02881, 0.00144, 0.00192, 0.00000);

        // Right camera calibration parameters (modify as needed)
        cameraMatrixR.put(0, 0, 847.54814, 0, 664.36648, 0, 847.75828, 368.46946, 0, 0, 1);
        distCoeffR.put(0, 0, 0.00905, 0.02094, 0.00082, 0.00183, 0.00000);

        // Translation vector (modify as needed)
        T.put(0, 0, -59.32102, 0.27563, -0.79807);
        // Rotation vector (modify as needed)
        rec.put(0, 0, -0.00927, -0.00228, -0.00070);

        Size imageSize = new Size(imageWidth, imageHeight);
        Mat R = new Mat();
        Mat Rl = new Mat();
        Mat Rr = new Mat();
        Mat Pl = new Mat();
        Mat Pr = new Mat();
        Rect validROIL = new Rect();
        Rect validROIR = new Rect();

        Calib3d.Rodrigues(rec, R); // Rodrigues transformation
        Calib3d.stereoRectify(cameraMatrixL, distCoeffL, cameraMatrixR, distCoeffR,
                imageSize, R, T, Rl, Rr, Pl, Pr, Q, Calib3d.CALIB_ZERO_DISPARITY,
                0, imageSize, validROIL, validROIR);

        // Undistort maps for image rectification
        mapLx = new Mat();
        mapLy = new Mat();
        mapRx = new Mat();
        mapRy = new Mat();
        Imgproc.initUndistortRectifyMap(cameraMatrixL, distCoeffL, Rl, Pl,
                imageSize, CvType.CV_32FC1, mapLx, mapLy);
        Imgproc.initUndistortRectifyMap(cameraMatrixR, distCoeffR, Rr, Pr,
                imageSize, CvType.CV_32FC1, mapRx, mapRy);

        // Configure StereoBM parameters
        bm.setBlockSize(2 * 18 + 5); // SAD window size
        bm.setROI1(validROIL);
        bm.setROI2(validROIR);
        bm.setPreFilterCap(61);
        bm.setMinDisparity(32);
        bm.setNumDisparities(11 * 16); // Disparity range
        bm.setTextureThreshold(10);
        bm.setUniquenessRatio(5);
        bm.setSpeckleWindowSize(100);
        bm.setSpeckleRange(32);
    }

    // Convert Bitmap to Mat and rectify images
    private void bitmapToMat(Bitmap bmp, Mat mat) {
        Utils.bitmapToMat(bmp, mat);
    }

    // Main computation method
    public Bitmap compute(Bitmap left, Bitmap right) {
        Mat rgbImageL = new Mat();
        Mat rgbImageR = new Mat();
        Mat grayImageL = new Mat();
        Mat grayImageR = new Mat();
        Mat rectifyImageL = new Mat();
        Mat rectifyImageR = new Mat();
        Mat disp = new Mat();
        xyz = new Mat();

        bitmapToMat(left, rgbImageL);
        bitmapToMat(right, rgbImageR);
        Imgproc.cvtColor(rgbImageL, grayImageL, Imgproc.COLOR_BGR2GRAY);
        Imgproc.cvtColor(rgbImageR, grayImageR, Imgproc.COLOR_BGR2GRAY);

        // Rectify images
        Imgproc.remap(grayImageL, rectifyImageL, mapLx, mapLy, Imgproc.INTER_LINEAR);
        Imgproc.remap(grayImageR, rectifyImageR, mapRx, mapRy, Imgproc.INTER_LINEAR);

        // Compute disparity
        bm.compute(rectifyImageL, rectifyImageR, disp);
        Calib3d.reprojectImageTo3D(disp, xyz, Q, true);
        Core.multiply(xyz, new Scalar(16, 16, 16), xyz); // Scale by 16

        // Post-process disparity map for visualization
        Mat disp8U = new Mat();
        disp.convertTo(disp, CvType.CV_32F, 1.0 / 16);
        Core.normalize(disp, disp8U, 0, 255, Core.NORM_MINMAX, CvType.CV_8U);
        Imgproc.medianBlur(disp8U, disp8U, 9);

        // Convert result to Bitmap
        Bitmap result = Bitmap.createBitmap(disp8U.cols(), disp8U.rows(), Bitmap.Config.ARGB_8888);
        Utils.matToBitmap(disp8U, result);
        return result;
    }

    // Get 3D coordinates at (dstX, dstY)
    public double[] getCoordinate(int dstX, int dstY) {
        if (xyz.empty()) return new double[]{0, 0, 0};
        double[] coords = xyz.get(dstY, dstX);
        return new double[]{coords[0], coords[1], coords[2]};
    }
}
To use the utility class in MainActivity.java:
public class MainActivity extends AppCompatActivity {
    private StereoBMUtil stereoBMUtil;
    private Bitmap leftBitmap, rightBitmap;

    @Override
    protected void onCreate(Bundle savedInstanceState) {
        super.onCreate(savedInstanceState);
        setContentView(R.layout.activity_main);

        // Initialize OpenCV
        if (OpenCVLoader.initDebug()) {
            Log.d("MainActivity", "OpenCV initialized successfully");
            stereoBMUtil = new StereoBMUtil();
        }

        // Load images from assets
        try {
            leftBitmap = BitmapFactory.decodeStream(getAssets().open("Left3.bmp"));
            rightBitmap = BitmapFactory.decodeStream(getAssets().open("Right3.bmp"));
            imageViewLeft.setImageBitmap(leftBitmap);
            imageViewRight.setImageBitmap(rightBitmap);
        } catch (IOException e) {
            e.printStackTrace();
        }

        // Button to compute distance
        Button computeBtn = findViewById(R.id.compute_btn);
        computeBtn.setOnClickListener(v -> {
            Bitmap result = stereoBMUtil.compute(leftBitmap, rightBitmap);
            imageViewResult.setImageBitmap(result);
        });

        // Touch event to get coordinates
        imageViewResult.setOnTouchListener((v, event) -> {
            if (event.getAction() == MotionEvent.ACTION_UP) {
                float x = event.getX();
                float y = event.getY();
                float[] dst = new float[2];
                Matrix imageMatrix = imageViewResult.getImageMatrix();
                Matrix inverseMatrix = new Matrix();
                imageMatrix.invert(inverseMatrix);
                inverseMatrix.mapPoints(dst, new float[]{x, y});
                int dstX = (int) dst[0];
                int dstY = (int) dst[1];

                double[] coords = stereoBMUtil.getCoordinate(dstX, dstY);
                String text = String.format("X: %.2f, Y: %.2f, Z: %.2f",
                        coords[0], coords[1], coords[2]);
                Log.d("MainActivity", text);
            }
            return true;
        });
    }
}
Real-Time Camera Ranging
To use a physical dual-camera, create CameraActivity.java and capture frames from the device’s camera. Use image processing to separate left/right eye feeds:
public class CameraActivity extends AppCompatActivity implements TextureView.SurfaceTextureListener {
    private StereoBMUtil stereoBMUtil;
    private TextureView mTextureView;
    private Button captureBtn;

    @Override
    protected void onCreate(Bundle savedInstanceState) {
        super.onCreate(savedInstanceState);
        setContentView(R.layout.activity_camera);

        // Initialize OpenCV and utility
        if (OpenCVLoader.initDebug()) {
            Log.d("CameraActivity", "OpenCV initialized");
            stereoBMUtil = new StereoBMUtil();
        }

        mTextureView = findViewById(R.id.textureView);
        mTextureView.setSurfaceTextureListener(this);
        captureBtn = findViewById(R.id.capture_btn);

        captureBtn.setOnClickListener(v -> {
            Bitmap bitmap = mTextureView.getBitmap();
            List<Bitmap> split = splitBitmap(bitmap); // Separate left/right views
            leftBitmap = split.get(0);
            rightBitmap = split.get(1);

            // Process and display results
            Bitmap result = stereoBMUtil.compute(leftBitmap, rightBitmap);
            imageViewResult.setImageBitmap(result);
        });
    }

    // Camera frame processing
    @Override
    public void onSurfaceTextureAvailable(SurfaceTexture surface, int width, int height) {
        // Initialize camera preview
        CameraManager manager = (CameraManager) getSystemService(Context.CAMERA_SERVICE);
        try {
            String cameraId = manager.getCameraIdList()[0]; // Use front camera
            CameraCharacteristics characteristics = manager.getCameraCharacteristics(cameraId);
            StreamConfigurationMap map = characteristics.get(CameraCharacteristics.SCALER_STREAM_CONFIGURATION_MAP);
            // Start preview...
        } catch (Exception e) {
            e.printStackTrace();
        }
    }

    // Helper to split camera frame into left/right views
    private List<Bitmap> splitBitmap(Bitmap bitmap) {
        List<Bitmap> list = new ArrayList<>();
        int width = bitmap.getWidth();
        int height = bitmap.getHeight();
        Bitmap left = Bitmap.createBitmap(bitmap, 0, 0, width/2, height);
        Bitmap right = Bitmap.createBitmap(bitmap, width/2, 0, width/2, height);
        list.add(left);
        list.add(right);
        return list;
    }
}
Project Source Code: Download