前言
在本篇文章中,我們將會介紹TensorFlow的安裝,TensorFlow是Google公司在2015年11月9日開源的一個深度學習框架。
- 官網文檔地址爲:https://www.tensorflow.org/
- 官方GitHub倉庫:https://github.com/tensorflow/tensorflow
TensorFlow目前支持4種開發語言,分別是Python(包括Python2和Python3)、Java、Go、C。筆者使用的環境如下:
- 開發語言:Python 3.6
- 使用操作系統:Ubuntu 16.04、Windows 10
- 硬件環境:CPU
基於這些環境,我們來安裝TensorFlow吧,筆者將會通過兩種操作系統來安裝,分別是Ubuntu 16.04和Windows 10。
Ubuntu下安裝TensorFlow
在Ubuntu上我們準備兩種安裝方式,分別是原生pip、Virtualenv 環境 和 Docker容器,下面我們就在三個環境下安裝。
原生pip安裝TensorFlow
使用原生的pip安裝時最簡單的,直接安裝使用一條命令就可以安裝完成了。
首先確認Python環境,Ubuntu會自帶Python環境的,不用我們自己安裝,使用python3 -V可以查詢安裝的Python環境,輸出如下:
Python 3.5.2
安裝TensorFlow需要使用pip命令,默認是沒有安裝的,所以我們需要安裝pip命令:
sudo apt-get install python3-pip python3-dev
這裏筆者要說一下,默認的鏡像源太慢了,筆者修改成阿里鏡像源了,修改方式如下:
- 備份源列表文件:
sudo cp /etc/apt/sources.list /etc/apt/sources.list.bak
- 編輯源列表文件:
sudo vi /etc/apt/sources.list
- 清空裏面的內容,添加以下的的信息:
deb http://mirrors.aliyun.com/ubuntu/ xenial main
deb-src http://mirrors.aliyun.com/ubuntu/ xenial main

deb http://mirrors.aliyun.com/ubuntu/ xenial-updates main
deb-src http://mirrors.aliyun.com/ubuntu/ xenial-updates main

deb http://mirrors.aliyun.com/ubuntu/ xenial universe
deb-src http://mirrors.aliyun.com/ubuntu/ xenial universe
deb http://mirrors.aliyun.com/ubuntu/ xenial-updates universe
deb-src http://mirrors.aliyun.com/ubuntu/ xenial-updates universe

deb http://mirrors.aliyun.com/ubuntu/ xenial-security main
deb-src http://mirrors.aliyun.com/ubuntu/ xenial-security main
deb http://mirrors.aliyun.com/ubuntu/ xenial-security universe
deb-src http://mirrors.aliyun.com/ubuntu/ xenial-security universe
- 最後執行更新列表命令:
sudo apt update
安裝完成pip命令之後,可以使用pip3 -V查看是否已經安裝成功及安裝的版本,輸出如下,官方要求pip的版本要不小於8.1:
pip 8.1.1 from /usr/lib/python3/dist-packages (python 3.5)
- 如果覺得版本太低,也可以升級,先要下載一個升級文件,命令如下:
wget https://bootstrap.pypa.io/get-pip.py
- 下載完成之後,可以使用這個文件安裝最新的pip了:
sudo python3 get-pip.py
一切多準備完成,那就可以開始安裝TensorFlow了,只要使用以下一條命令就可以:
sudo pip3 install tensorflow
- 如果使用上面安裝比較慢的話,我們還可指定使用的鏡像源,比如這裏筆者使用的是阿里的鏡像源,之後使用到
pip安裝的同樣的操作:
sudo pip3 install -i https://mirrors.aliyun.com/pypi/simple/ tensorflow
安裝完成之後,可以使用以下命令查看是否完成及安裝的版本:
pip3 list
注意:如果在運行報以下錯誤,多數是電腦的CPU不支持AVX指令集:
非法指令 (核心已轉儲)
如何知道自己的電腦是不是支持AVX指令集呢,可以通用以下的命令查看,輸出Yes就是支持,No就是不支持:
if cat /proc/cpuinfo | grep -i avx; then echo Yes; else echo No; fi
TensorFlow在1.6版本之後都會使用AVX指令集,如果讀者的電腦不支持AVX指令集,就要安裝低版本的,如下是安裝1.5版本的:
pip3 install tensorflow==1.5
安裝完成之後,可以進行測試,測試情閱讀最後的測試部分。
Virtualenv安裝TensorFlow
首先通過以下的命令來安裝 pip 和 Virtualenv:
sudo apt-get install python3-pip python3-dev python-virtualenv
然後通過下面的命令來創建 Virtualenv 環境:
virtualenv --system-site-packages -p python3 ~/tensorflow
最後通過下面的命令激活 Virtualenv 環境:
source ~/tensorflow/bin/activate
這時會發現控制檯已經發生了變化,變成如下狀態,這表明已經進入了 Virtualenv 環境:
(tensorflow) yeyupiaoling@tensorflow:~$
接下來的操作都是在這個Virtualenv 環境下操作,比我們的pip命令也是在這裏的,可以使用pip3 -V查看:
pip 10.0.1 from /home/yeyupiaoling/tensorflow/lib/python3.5/site-packages/pip (python 3.5)
我們在Virtualenv 環境裏通過以下的命令即可完成安裝TensorFlow:
pip3 install tensorflow
不支持AVX的請安裝1.5版本:
pip3 install tensorflow==1.5
使用完成之後,可以通過以下命令退出Virtualenv 環境:
deactivate
Docker下安裝TensorFlow
要使用Docker,就要先安裝Docker,以下命令就是安裝Docker的命令:
sudo apt-get install docker.io
安裝完成之後,可以使用docker --version查看Docker的版本,如果有顯示,就證明安裝成功了。
然後我們可以通過以下的命令拉取TensorFlow的鏡像,我們也可以通過dockerhub獲取更多Docker鏡像:
docker pull tensorflow/tensorflow:1.8.0-py3
如果電腦不支持AVX指令集的,請安裝低版本的TensorFlow鏡像:
docker pull tensorflow/tensorflow:1.5.1-py3
拉取完成鏡像,就可以使用docker images查看已經安裝的鏡像:
REPOSITORY                          TAG                 IMAGE ID            CREATED             SIZE
tensorflow/tensorflow               1.8.0-py3           a83a3dd79ff9        2 months ago        1.33 GB
使用TensorFlow的Docker鏡像有個好處就是自帶了jupyter notebook,啓動鏡像之後可以直接使用jupyter。
sudo docker run -it -p 80:8888 tensorflow/tensorflow:1.8.0-py3
然後終端會輸出以下信息,要注意輸出的token:
[I 07:08:38.160 NotebookApp] Writing notebook server cookie secret to /root/.local/share/jupyter/runtime/notebook_cookie_secret
[W 07:08:38.177 NotebookApp] WARNING: The notebook server is listening on all IP addresses and not using encryption. This is not recommended.
[I 07:08:38.186 NotebookApp] Serving notebooks from local directory: /notebooks
[I 07:08:38.186 NotebookApp] 0 active kernels
[I 07:08:38.187 NotebookApp] The Jupyter Notebook is running at:
[I 07:08:38.187 NotebookApp] http://[all ip addresses on your system]:8888/?token=ab489f0445846cb7f9d5c9613edcf7b9537cd245dbecf2a6
[I 07:08:38.187 NotebookApp] Use Control-C to stop this server and shut down all kernels (twice to skip confirmation).
[C 07:08:38.187 NotebookApp]

    Copy/paste this URL into your browser when you connect for the first time,
    to login with a token:
        http://localhost:8888/?token=ab489f0445846cb7f9d5c9613edcf7b9537cd245dbecf2a6
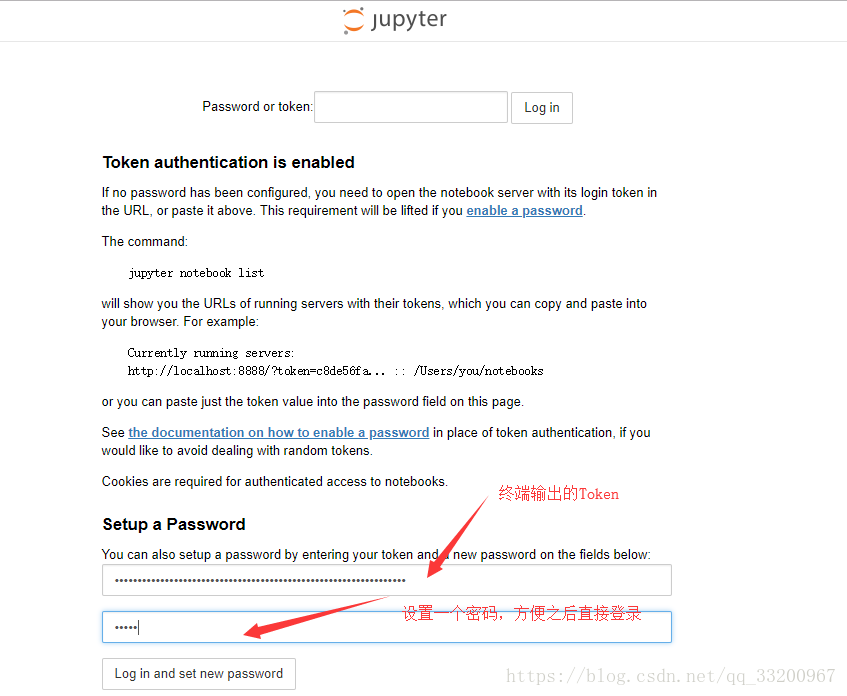
然後我們在瀏覽器上輸入IP地址,如何是在本地,那就就輸入localhost,得到的頁面如下,輸入終端輸出的token和新密碼就可以登錄使用jupyter了:
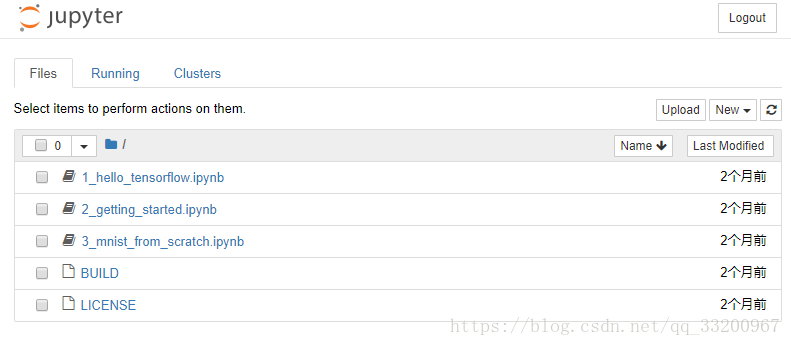
得到的jupyter網頁如下:
如果停止運行鏡像了,可以使用以下的命令找到之前使用這個進行run生成的一個容器:
sudo docker ps -a
會得到以下信息,其中最重要的是CONTAINER ID:
CONTAINER ID        IMAGE                             COMMAND                  CREATED             STATUS                      PORTS               NAMES
44aa680ac51f        tensorflow/tensorflow:1.8.0-py3   "/run_jupyter.sh -..."   14 minutes ago      Exited (0) 21 seconds ago                       cranky_elion
通過這個CONTAINER ID可以再次啓動這個容器,這樣就不用每次都run一個容器出來,佔用磁盤容量,同時也可以保存原來的環境,可以使用以下的命令啓動容器:
sudo docker start 44aa680ac51f
啓動之後是在後臺運行的,那麼如何讓容器有信息輸入的同時會輸出到控制檯呢,可以用使用以下的命令實現:
sudo docker attach 44aa680ac51f
如果要以終端的方式進入到容器中,可以使用以下的命令:
sudo docker exec -it 44aa680ac51f /bin/bash
安裝完成之後,可以進行測試,測試情閱讀最後的測試部分。
Windows下安裝TensorFlow
在Windows上,筆者同樣介紹三種安裝方式,分別是原生pip、Docker容器、Windows的Linux子系統。
原生pip安裝TensorFlow
在Windows上默認是沒有安裝Python的,所以要先安裝Python,這裏筆者安裝Python 3.6.5,首先到Python官網上下載對應的版本,必須是64位的Python。然後安裝Python,安裝過程筆者就不介紹了,主要安裝完成之後,還有配置一下環境變量。在默認的安裝路徑爲:
C:\Python36
首頁我們要在環境變量的Path上添加以下l兩條環境變量:
C:\Python36
C:\Python36\Scripts
如果讀者同時還安裝了Python2,筆者建議修改一下Python3的文件,首先把C:\Python36\Scripts裏面的pip.exe刪除,避免與Python2的衝突,然後把C:\Python36的python.exe和pythonw.exe修改成python.exe和pythonw3.exe。以後在使用Python3的時候,分別是使用pip3和python3命令。
現在就開始安裝TensorFlow,命令如下:
pip3 install tensorflow
如果在使用pip3報以下錯誤:
Fatal error in launcher: Unable to create process using '"'
可以使用以下命令修復:
python3 -m pip install --upgrade pip
注意:如果以下錯誤,是因爲缺少DLL動態庫,可以看到最後提供下載動態庫的鏈接:
Traceback (most recent call last):
  File "C:\Python36\lib\site-packages\tensorflow\python\platform\self_check.py", line 47, in preload_check
    ctypes.WinDLL(build_info.msvcp_dll_name)
  File "C:\Python36\lib\ctypes\__init__.py", line 348, in __init__
    self._handle = _dlopen(self._name, mode)
OSError: [WinError 126] 找不到指定的模塊。

During handling of the above exception, another exception occurred:

Traceback (most recent call last):
  File "test.py", line 1, in <module>
    import tensorflow as tf
  File "C:\Python36\lib\site-packages\tensorflow\__init__.py", line 24, in <module>
    from tensorflow.python import *
  File "C:\Python36\lib\site-packages\tensorflow\python\__init__.py", line 49, in <module>
    from tensorflow.python import pywrap_tensorflow
  File "C:\Python36\lib\site-packages\tensorflow\python\pywrap_tensorflow.py", line 30, in <module>
    self_check.preload_check()
  File "C:\Python36\lib\site-packages\tensorflow\python\platform\self_check.py", line 55, in preload_check
    % build_info.msvcp_dll_name)
ImportError: Could not find 'msvcp140.dll'. TensorFlow requires that this DLL be installed in a directory that is named in your %PATH% environment variable. You may install this DLL by downloading Visual C++ 2015 Redistributable Update 3 from this URL: https://www.microsoft.com/en-us/download/details.aspx?id=53587
我們通過這個鏈接去下載並安裝這個動態庫即可:
https://www.microsoft.com/en-us/download/details.aspx?id=53587
如果在執行TensorFlow程度的是報以下錯誤,多數是CPU不支持AVX指令集:
Traceback (most recent call last):
  File "C:\Python36\lib\site-packages\tensorflow\python\pywrap_tensorflow_internal.py", line 14, in swig_import_helper
    return importlib.import_module(mname)
  File "C:\Python36\lib\importlib\__init__.py", line 126, in import_module
    return _bootstrap._gcd_import(name[level:], package, level)
  File "<frozen importlib._bootstrap>", line 994, in _gcd_import
  File "<frozen importlib._bootstrap>", line 971, in _find_and_load
  File "<frozen importlib._bootstrap>", line 955, in _find_and_load_unlocked
  File "<frozen importlib._bootstrap>", line 658, in _load_unlocked
  File "<frozen importlib._bootstrap>", line 571, in module_from_spec
  File "<frozen importlib._bootstrap_external>", line 922, in create_module
  File "<frozen importlib._bootstrap>", line 219, in _call_with_frames_removed
ImportError: DLL load failed: 動態鏈接庫(DLL)初始化例程失敗。

During handling of the above exception, another exception occurred:

Traceback (most recent call last):
  File "C:\Python36\lib\site-packages\tensorflow\python\pywrap_tensorflow.py", line 58, in <module>
    from tensorflow.python.pywrap_tensorflow_internal import *
  File "C:\Python36\lib\site-packages\tensorflow\python\pywrap_tensorflow_internal.py", line 17, in <module>
    _pywrap_tensorflow_internal = swig_import_helper()
  File "C:\Python36\lib\site-packages\tensorflow\python\pywrap_tensorflow_internal.py", line 16, in swig_import_helper
    return importlib.import_module('_pywrap_tensorflow_internal')
  File "C:\Python36\lib\importlib\__init__.py", line 126, in import_module
    return _bootstrap._gcd_import(name[level:], package, level)
ModuleNotFoundError: No module named '_pywrap_tensorflow_internal'

During handling of the above exception, another exception occurred:

Traceback (most recent call last):
  File "test.py", line 1, in <module>
    import tensorflow as tf
  File "C:\Python36\lib\site-packages\tensorflow\__init__.py", line 24, in <module>
    from tensorflow.python import pywrap_tensorflow  # pylint: disable=unused-import
  File "C:\Python36\lib\site-packages\tensorflow\python\__init__.py", line 49, in <module>
    from tensorflow.python import pywrap_tensorflow
  File "C:\Python36\lib\site-packages\tensorflow\python\pywrap_tensorflow.py", line 74, in <module>
    raise ImportError(msg)
ImportError: Traceback (most recent call last):
  File "C:\Python36\lib\site-packages\tensorflow\python\pywrap_tensorflow_internal.py", line 14, in swig_import_helper
    return importlib.import_module(mname)
  File "C:\Python36\lib\importlib\__init__.py", line 126, in import_module
    return _bootstrap._gcd_import(name[level:], package, level)
  File "<frozen importlib._bootstrap>", line 994, in _gcd_import
  File "<frozen importlib._bootstrap>", line 971, in _find_and_load
  File "<frozen importlib._bootstrap>", line 955, in _find_and_load_unlocked
  File "<frozen importlib._bootstrap>", line 658, in _load_unlocked
  File "<frozen importlib._bootstrap>", line 571, in module_from_spec
  File "<frozen importlib._bootstrap_external>", line 922, in create_module
  File "<frozen importlib._bootstrap>", line 219, in _call_with_frames_removed
ImportError: DLL load failed: 動態鏈接庫(DLL)初始化例程失敗。

During handling of the above exception, another exception occurred:

Traceback (most recent call last):
  File "C:\Python36\lib\site-packages\tensorflow\python\pywrap_tensorflow.py", line 58, in <module>
    from tensorflow.python.pywrap_tensorflow_internal import *
  File "C:\Python36\lib\site-packages\tensorflow\python\pywrap_tensorflow_internal.py", line 17, in <module>
    _pywrap_tensorflow_internal = swig_import_helper()
  File "C:\Python36\lib\site-packages\tensorflow\python\pywrap_tensorflow_internal.py", line 16, in swig_import_helper
    return importlib.import_module('_pywrap_tensorflow_internal')
  File "C:\Python36\lib\importlib\__init__.py", line 126, in import_module
    return _bootstrap._gcd_import(name[level:], package, level)
ModuleNotFoundError: No module named '_pywrap_tensorflow_internal'


Failed to load the native TensorFlow runtime.

See https://www.tensorflow.org/install/install_sources#common_installation_problems

for some common reasons and solutions.  Include the entire stack trace
above this error message when asking for help.
那就要安裝低版本的TensorFlow:
pip3 install tensorflow==1.5
Docker容器安裝TensorFlow
關於如果在Windows上安裝Docker容器,可以參考筆者的《我的PaddlePaddle學習之路》筆記一——PaddlePaddle的安裝》的在Windows上安裝Docker容器部分,這裏就不在展開介紹了。
啓動容器之後,就可以拉取TensorFlow的鏡像了:
docker pull tensorflow/tensorflow:1.8.0-py3
同樣可以使用docker images查看已經安裝的鏡像:
REPOSITORY                          TAG                 IMAGE ID            CREATED             SIZE
tensorflow/tensorflow               1.8.0-py3           a83a3dd79ff9        2 months ago        1.33 GB
Linux子系統安裝TensorFlow
關於如果在Windows上安裝Linux子系統,可以參考筆者之前的文章《Windows10安裝Linux子系統Ubuntu》
安裝完成Linux子系統之後,就可以在PowerShell上輸入bash命令進入到Linux子系統,在這個子系統上安裝TensorFlow請參考Ubuntu使用原生pip安裝TensorFlow的方法,這個筆者就不在重複介紹了。
源碼編譯安裝
在這一部分,我們介紹如何在Ubuntu上使用TensorFlow的源碼編譯安裝。
- 克隆 TensorFlow 代碼庫
git clone https://github.com/tensorflow/tensorflow
- 安裝 TensorFlow Python 依賴項
sudo apt-get install python3-numpy python3-dev python3-pip python3-wheel
- 安裝 Bazel
1、安裝依賴庫
sudo apt-get install pkg-config zip g++ zlib1g-dev unzip python
2、下載bazel-0.15.0-installer-linux-x86_64.sh文件,下載地址如下:
https://github.com/bazelbuild/bazel/releases
3、運行安裝Bazel
chmod +x bazel-0.15.0-installer-linux-x86_64.sh
./bazel-0.15.0-installer-linux-x86_64.sh --user
4、添加到環境變量,編寫vim ~/.bashrc,在最後的加上以下信息:
export PATH="$PATH:$HOME/bin"
- 進入到源碼中:
cd tensorflow
- 如果想編譯其他版本的TensorFlow可以切換到對應的版本,首先可以查看有哪些版本:
git branch -a
輸出的版本信息:
root@tensorflow:/home/yeyupiaoling/test/tensorflow# git branch -a
* master
  remotes/origin/0.6.0
  remotes/origin/HEAD -> origin/master
  remotes/origin/achowdhery-patch-1
  remotes/origin/andrewharp-patch-1
  remotes/origin/martinwicke-patch-1
  remotes/origin/martinwicke-patch-2
  remotes/origin/master
  remotes/origin/r0.10
  remotes/origin/r0.11
  remotes/origin/r0.12
  remotes/origin/r0.7
  remotes/origin/r0.8
  remotes/origin/r0.9
  remotes/origin/r1.0
  remotes/origin/r1.1
  remotes/origin/r1.2
  remotes/origin/r1.3
  remotes/origin/r1.4
  remotes/origin/r1.5
  remotes/origin/r1.6
  remotes/origin/r1.7
  remotes/origin/r1.8
  remotes/origin/r1.9
  remotes/origin/release-notes-1.9-tfdbg
  remotes/origin/yifeif-patch-1
  remotes/origin/yifeif-patch-2
  remotes/origin/yifeif-patch-3
比如筆者想切換到1.5版本,使用以下命令即可切換:
git checkout origin/r1.5
- 執行配置信息文件:
./configure
- 然後會輸出以下信息,這些注意是配置信息,比如我們指定Python的環境路徑
/usr/bin/python3.5,也可以指定是否要編譯GPU版本的,具體讀者可以查看筆者的配置信息,筆者多數是默認的。
Extracting Bazel installation...
WARNING: --batch mode is deprecated. Please instead explicitly shut down your Bazel server using the command "bazel shutdown".
You have bazel 0.15.0 installed.
Please specify the location of python. [Default is /usr/bin/python]: /usr/bin/python3.5


Found possible Python library paths:
  /usr/local/lib/python3.5/dist-packages
  /usr/lib/python3/dist-packages
Please input the desired Python library path to use.  Default is [/usr/local/lib/python3.5/dist-packages]

Do you wish to build TensorFlow with jemalloc as malloc support? [Y/n]:
jemalloc as malloc support will be enabled for TensorFlow.

Do you wish to build TensorFlow with Google Cloud Platform support? [Y/n]: n
No Google Cloud Platform support will be enabled for TensorFlow.

Do you wish to build TensorFlow with Hadoop File System support? [Y/n]:
Hadoop File System support will be enabled for TensorFlow.

Do you wish to build TensorFlow with Amazon AWS Platform support? [Y/n]:
Amazon AWS Platform support will be enabled for TensorFlow.

Do you wish to build TensorFlow with Apache Kafka Platform support? [Y/n]:
Apache Kafka Platform support will be enabled for TensorFlow.

Do you wish to build TensorFlow with XLA JIT support? [y/N]:
No XLA JIT support will be enabled for TensorFlow.

Do you wish to build TensorFlow with GDR support? [y/N]:
No GDR support will be enabled for TensorFlow.

Do you wish to build TensorFlow with VERBS support? [y/N]:
No VERBS support will be enabled for TensorFlow.

Do you wish to build TensorFlow with OpenCL SYCL support? [y/N]:
No OpenCL SYCL support will be enabled for TensorFlow.

Do you wish to build TensorFlow with CUDA support? [y/N]: N
No CUDA support will be enabled for TensorFlow.

Do you wish to download a fresh release of clang? (Experimental) [y/N]:
Clang will not be downloaded.

Do you wish to build TensorFlow with MPI support? [y/N]:
No MPI support will be enabled for TensorFlow.

Please specify optimization flags to use during compilation when bazel option "--config=opt" is specified [Default is -march=native]:


Would you like to interactively configure ./WORKSPACE for Android builds? [y/N]:
Not configuring the WORKSPACE for Android builds.

Preconfigured Bazel build configs. You can use any of the below by adding "--config=<>" to your build command. See tools/bazel.rc for more details.
    --config=mkl            # Build with MKL support.
    --config=monolithic     # Config for mostly static monolithic build.
Configuration finished
- 配置好之後,就要編譯 pip 軟件包:
bazel build --config=opt //tensorflow/tools/pip_package:build_pip_package
- 然後在執行這一條命令生成pip軟件包:·
bazel-bin/tensorflow/tools/pip_package/build_pip_package /tmp/tensorflow_pkg
- 通過上一步編譯獲得的pip軟件包,我們就可以安裝這個 pip 軟件包,它的路徑在
/tmp/tensorflow_pkg/tensorflow-1.5.1-cp35-cp35m-linux_x86_64.whl,可能讀者的版本會跟筆者的不一樣,根據實際的版本信息安裝:
sudo pip install /tmp/tensorflow_pkg/tensorflow-1.5.1-cp35-cp35m-linux_x86_64.whl
到這裏就完成了TensorFlow的編譯安裝,安裝完成之後,可以參考文章的最後一部分進行測試環境。
測試
安裝完成之後,我們要測試一下環境是不是已經成功安裝並且可以正常使用了。
首先編譯一個測試test1.py文件:
import tensorflow as tf
hello = tf.constant('Hello, TensorFlow!')
sess = tf.Session()
print(sess.run(hello))
然後我們執行這個文件python3 test1.py就可以運行它了,正常情況下會輸出以下內容:
2018-07-08 15:11:05.240607: I tensorflow/core/platform/cpu_feature_guard.cc:140] Your CPU supports instructions that this TensorFlow binary was not compiled to use: AVX2 FMA
b'Hello, TensorFlow!'
我們也可以編寫一個稍微有訓練效果的程序test2.py:
import tensorflow as tf
import numpy as np

# 使用 NumPy 生成假數據(phony data), 總共 100 個點.
x_data = np.float32(np.random.rand(2, 100)) # 隨機輸入
y_data = np.dot([0.100, 0.200], x_data) + 0.300

# 構造一個線性模型
#
b = tf.Variable(tf.zeros([1]))
W = tf.Variable(tf.random_uniform([1, 2], -1.0, 1.0))
y = tf.matmul(W, x_data) + b

# 最小化方差
loss = tf.reduce_mean(tf.square(y - y_data))
optimizer = tf.train.GradientDescentOptimizer(0.5)
train = optimizer.minimize(loss)

# 初始化變量
init = tf.initialize_all_variables()

# 啓動圖 (graph)
sess = tf.Session()
sess.run(init)

# 擬合平面
for step in range(0, 201):
    sess.run(train)
    if step % 20 == 0:
        print (step, sess.run(W), sess.run(b))

# 得到最佳擬合結果 W: [[0.100  0.200]], b: [0.300]
同樣我們執行它python3 test1.py可以得到以下信息:
WARNING:tensorflow:From /usr/local/lib/python3.5/dist-packages/tensorflow/python/util/tf_should_use.py:118: initialize_all_variables (from tensorflow.python.ops.variables) is deprecated and will be removed after 2017-03-02.
Instructions for updating:
Use `tf.global_variables_initializer` instead.
2018-07-08 15:14:15.455774: I tensorflow/core/platform/cpu_feature_guard.cc:140] Your CPU supports instructions that this TensorFlow binary was not compiled to use: AVX2 FMA
0 [[0.260745 0.56325 ]] [-0.00149411]
20 [[0.15775657 0.30871654]] [0.20844586]
40 [[0.11969341 0.23245212]] [0.27153042]
60 [[0.10656733 0.20975856]] [0.29113895]
80 [[0.10215606 0.2029533 ]] [0.29723996]
100 [[0.10069981 0.20089868]] [0.2991398]
120 [[0.10022521 0.20027474]] [0.2997318]
140 [[0.10007201 0.20008431]] [0.29991636]
160 [[0.10002291 0.20002596]] [0.2999739]
180 [[0.10000726 0.20000802]] [0.29999185]
200 [[0.1000023  0.20000248]] [0.29999745]
以上是在終端上操作的,那麼使用Docker應該如何執行這些文件呢。有兩種方法,一種就是以命令終端的方式進入到TensorFlow鏡像中,之後的操作就跟在Ubuntu操作差不多了:
docker run -it -v $PWD:/work tensorflow/tensorflow:1.8.0-py3 /bin/bash
另一種就是掛載目錄到鏡像上,然後直接通過命令執行代碼文件:
docker run -it -v $PWD:/work -w /work tensorflow/tensorflow:1.8.0-py3 python3 /work/test1.py
使用模型預測圖片
這裏筆者使用官方提供的模型,這裏官方提供的豐富的模型。這次筆者使用的是mobilenet_v1_1.0_224.tgz模型,我們下載這個模型之後解壓可以以下文件:
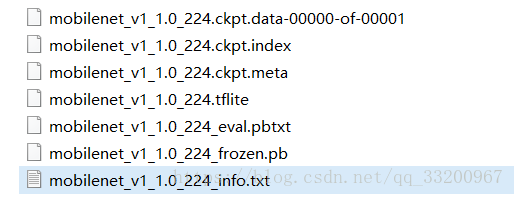
我們使用到的模型文件是mobilenet_v1_1.0_224_frozen.pb,其中mobilenet_v1_1.0_224_info.txt是說明網絡輸入輸出的字段,該文件的內容如下:
Model: mobilenet_v1_1.0_224
Input: input
Output: MobilenetV1/Predictions/Reshape_1
有了上面的模型,我們就來編寫預測代碼,全部的代碼如下:
import numpy as np
import tensorflow as tf
from PIL import Image

# 數據預處理
def load_image(file):
    im = Image.open(file)
    im = im.resize((224, 224), Image.ANTIALIAS)
    im = np.array(im).astype(np.float32)
    # 減去均值
    im -= 128.0
    im /= 128.0
    im = np.expand_dims(im, axis=0)
    return im

def infer(image_path, pd_path):
    # 將(frozen)TensorFlow模型載入內存
    detection_graph = tf.Graph()
    with detection_graph.as_default():
        od_graph_def = tf.GraphDef()
        with tf.gfile.GFile(pd_path, 'rb') as fid:
            serialized_graph = fid.read()
            od_graph_def.ParseFromString(serialized_graph)
            tf.import_graph_def(od_graph_def, name='')

    with detection_graph.as_default():
        with tf.Session(graph=detection_graph) as sess:
            # 設置探測圖的輸入和輸出張量
            image_tensor = detection_graph.get_tensor_by_name('input:0')
            detection_classes = detection_graph.get_tensor_by_name('MobilenetV1/Predictions/Reshape_1:0')

            # infer image
            image_np = load_image(image_path)
            # Actual detection.
            result = sess.run([detection_classes], feed_dict={image_tensor: image_np})
            result = np.squeeze(result)
            idx = np.argsort(-result)
            label = idx[0] - 1
            print("result label is :", label)

if __name__ == '__main__':
    image_path = "0b77aba2-9557-11e8-a47a-c8ff285a4317.jpg"
    pd_path = 'models/mobilenet_v1_1.0_224_frozen.pb'
    infer(image_path, pd_path)
其中以下這個函數是數據預處理,處理方式要跟訓練的時候一樣:
# 數據預處理
def load_image(file):
    im = Image.open(file)
    im = im.resize((224, 224), Image.ANTIALIAS)
    im = np.array(im).astype(np.float32)
    # 減去均值
    im -= 128.0
    im /= 128.0
    im = np.expand_dims(im, axis=0)
    return im
以下的代碼片段是把模型加載到內存中,這個模型就是我們使用的mobilenet_v1_1.0_224_frozen.pb模型。
    detection_graph = tf.Graph()
    with detection_graph.as_default():
        od_graph_def = tf.GraphDef()
        with tf.gfile.GFile(pd_path, 'rb') as fid:
            serialized_graph = fid.read()
            od_graph_def.ParseFromString(serialized_graph)
            tf.import_graph_def(od_graph_def, name='')
設置模型的輸出輸出,這字段就是來自剛纔的mobilenet_v1_1.0_224_info.txt文件中。
            image_tensor = detection_graph.get_tensor_by_name('input:0')
            detection_classes = detection_graph.get_tensor_by_name('MobilenetV1/Predictions/Reshape_1:0')
以下的代碼片段就是輸入圖片得到預測結果的,如果需要預測多張圖片,可以把該代碼片段放在循環中。要注意的是,輸出的大小是1001,包括的第一個label是background。
            image_np = load_image(image_path)
            result = sess.run([detection_classes], feed_dict={image_tensor: image_np})
            result = np.squeeze(result)
            idx = np.argsort(-result)
            label = idx[0]
            print("result label is :", label)
參考資料
- https://opsx.alibaba.com/mirror
- https://www.tensorflow.org/install/install_linux
- https://www.tensorflow.org/install/install_windows
- https://www.tensorflow.org/install/install_sources
- https://blog.csdn.net/u014132659/article/details/51544754
- http://www.tensorfly.cn/tfdoc/get_started/introduction.html
- https://blog.csdn.net/u010099080/article/details/53418159
- https://blog.csdn.net/u010397369/article/details/41045251
- https://github.com/tensorflow/models/tree/master/research/slim#pre-trained-models