Introduction
In the article “Building a High-Availability and High-Concurrency Website with Nginx and Tomcat on CentOS”, we used a single MySQL database.
- From a security perspective, this is extremely unsafe. For example, if the database server’s disk suddenly fails, all data will be lost. If we initially deploy only one database, this situation is very dangerous, meaning we would lose all data. Since data is crucial for a website, we must ensure data security.
- From a performance perspective, in the article “Installing and Using Mycat to Implement Distributed Databases on CentOS”, we introduced distributed databases, which perform better than a single database. However, when using a distributed database, the data volume is still large. When querying data, it may become very slow, leading to table locks. Once a table is locked, data cannot be written, affecting other users’ write operations. Therefore, read-write separation is needed: the master database handles data writing, and the slave database handles data querying. Even if the slave database experiences a table lock during querying, it will not affect the master database’s write operations. At worst, the slave database’s data updates will be slower. Based on this, the master-slave replication technology emerged.
Master-Slave Replication: This involves two database servers: one master database server and one slave database server. When the master database has data writes (including insertions, deletions, and modifications), these operations are replicated to the slave database. As a result, the data in the master and slave databases are identical, which is equivalent to continuous data backup. Even if all data in the master database is lost, the slave database still retains the data, and we can export the slave database’s data for recovery.
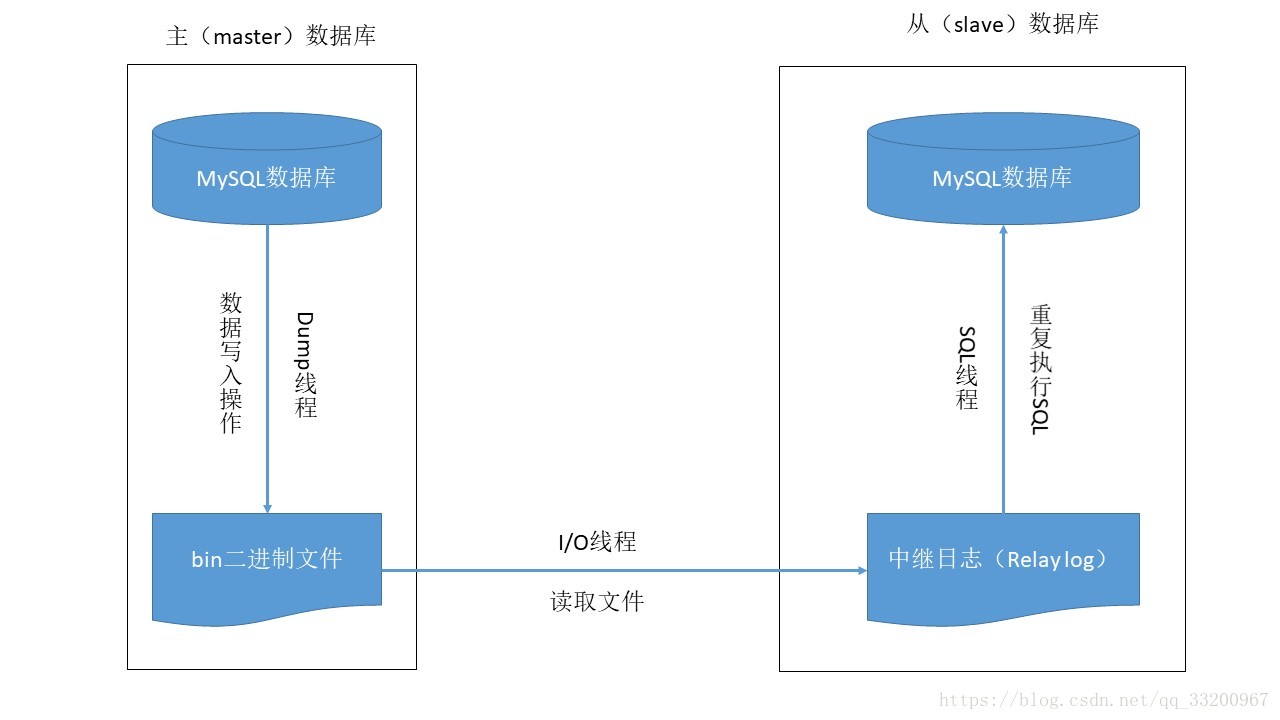
The master-slave replication principle mainly involves three threads working continuously:
- The master database starts the binary log (binlog), which has a Dump thread. This thread records all write operations of the master database into the binary log file.
- The slave database then starts an I/O thread. This thread reads the binary log file from the master database and writes it to the relay log (Relay log) file.
- Finally, the slave database’s SQL thread executes the events in the relay log file again to update the slave database’s data, ensuring data consistency between the master and slave.
Installing MySQL
To implement master-slave replication, two database servers are required. Refer to the article “Building a High-Availability and High-Concurrency Website with Nginx and Tomcat on CentOS” to install two CentOS virtual machines. Their information is as follows:
| Hostname | IP Address | Task Role | Database |
|---|---|---|---|
| node2 | 192.168.204.122 | master | MySQL |
| node3 | 192.168.204.123 | slave | MySQL |
Next, install the MySQL database on both node2 and node3 machines. The operations are as follows:
First, stop the firewall for easier subsequent operations:
service iptables stop
Check if MySQL is installed using the following command:
rpm -qa | grep mysql
It should output the following log:
[root@localhost ~]# rpm -qa | grep mysql
mysql-libs-5.1.71-1.el6.x86_64
Then, remove the existing MySQL and reinstall:
yum -y remove mysql-libs-5.1.71-1.el6.x86_64
After removing the previous MySQL, reinstall MySQL:
yum -y install mysql-server mysql mysql-devel
Finally, check the installation status:
rpm -qa | grep mysql
Normally, the following information should be output:
mysql-5.1.73-8.el6_8.x86_64
mysql-libs-5.1.73-8.el6_8.x86_64
mysql-server-5.1.73-8.el6_8.x86_64
mysql-devel-5.1.73-8.el6_8.x86_64
After installation, configure the MySQL database:
vim /etc/my.cnf
Add the following two lines under [mysqld] to set the encoding and case-insensitive table names:
default-character-set=utf8    # Set encoding
lower_case_table_names=1      # Case-insensitive for table names
The modified configuration file should look like this:
[mysqld]
datadir=/var/lib/mysql
socket=/var/lib/mysql/mysql.sock
user=mysql
# Disabling symbolic-links is recommended to prevent security risks
symbolic-links=0

default-character-set=utf8    # Set encoding
lower_case_table_names=1      # Case-insensitive for table names

[mysqld_safe]
log-error=/var/log/mysqld.log
pid-file=/var/run/mysqld/mysqld.pid
After configuration, start MySQL:
service mysqld start
Add MySQL to the boot startup to avoid manual startup each time:
chkconfig mysqld on
Verify if it was successfully added to the boot services:
chkconfig --list | grep mysqld
Set the MySQL root password:
mysqladmin -u root password 'root'
Log in to the database. After executing the command, enter the password (the root password set above):
mysql -u root -p
To allow Mycat to connect to the MySQL database, set up remote access. After logging in, execute the following two commands:
mysql> GRANT ALL PRIVILEGES ON *.* TO 'root'@'%' IDENTIFIED BY 'root' WITH GRANT OPTION;
mysql> FLUSH PRIVILEGES;
Configuring Master-Slave Replication
The master database needs to perform the following:
- Enable binary logging (binlog);
- Configure a unique server-id;
- Obtain the master database’s binary log filename and position;
- Create a user account for communication between the slave and master (can use the remote access account set earlier).
Enabling binary logging and configuring server-id are done in the configuration file /etc/my.cnf. Add the following two lines under [mysqld]:
log-bin=mysql-bin  # Enable binary logging
server-id=1        # Set server-id
In addition to these critical settings, you can configure other options, such as excluding certain databases from replication:
# Databases not to replicate
binlog-ignore-db = mysql
binlog-ignore-db = test
binlog-ignore-db = information_schema

# Databases to replicate (uncomment if needed)
# binlog-do-db = game
The complete configuration file should look like this:
[mysqld]
datadir=/var/lib/mysql
socket=/var/lib/mysql/mysql.sock
user=mysql
# Disabling symbolic-links is recommended to prevent security risks
symbolic-links=0

default-character-set=utf8   # Set encoding
lower_case_table_names=1     # Case-insensitive for table names

log-bin=mysql-bin  # Enable binary logging
server-id=1        # Set server-id

# Databases not to replicate
binlog-ignore-db = mysql
binlog-ignore-db = test
binlog-ignore-db = information_schema

# Databases to replicate (uncomment if needed)
# binlog-do-db = game


[mysqld_safe]
log-error=/var/log/mysqld.log
pid-file=/var/run/mysqld/mysqld.pid
After configuration, restart the database:
service mysqld restart
Next, obtain the master database’s binary log filename and position. Log in to the database first:
[root@node2 ~]# mysql -u root -p
Execute the command to get the information:
mysql> show master status;
Normally, the output should be:
+------------------+----------+--------------+-------------------------------+
| File             | Position | Binlog_Do_DB | Binlog_Ignore_DB              |
+------------------+----------+--------------+-------------------------------+
| mysql-bin.000003 |      106 |              | mysql,test,information_schema |
+------------------+----------+--------------+-------------------------------+
1 row in set (0.00 sec)
Slave Database configuration:
- Configure a unique server-id;
- Use the user account set in the master database to read the master’s binary log;
- Enable the slave service.
First, configure the server-id by editing the /etc/my.cnf file. Add the following line under [mysqld] (ensure it is unique and different from the master’s server-id):
server-id=2 # Set server-id (must be unique)
Restart the database:
service mysqld restart
Log in to the database and configure the connection to the master:
mysql> change master to
    -> master_host='192.168.204.122',
    -> master_user='root',
    -> master_password='root',
    -> master_log_file='mysql-bin.000003',
    -> master_log_pos=106;
After configuration, start the slave service:
mysql> start slave;
Check the configuration result using:
mysql> show slave status\G;
The expected output should include:
...
Slave_IO_Running: Yes
Slave_SQL_Running: Yes
...
Both Slave_IO_Running and Slave_SQL_Running must be Yes for the replication to work. These indicate the slave’s I/O and SQL threads are running.
Testing the Configuration
For testing, use NavicatForMySQL to connect to the databases (or your preferred tool).
- Connect to the master database.
- Create a database
yeyupiaolingand ausertable within it. - Insert sample data into the
usertable.
Then connect to the slave database. Verify that the yeyupiaoling database and user table exist with the same data.
If the data is consistent between the master and slave, the configuration is successful. Writes to the master will be replicated to the slave, but writes to the slave will not affect the master (not recommended in practice).
References
- https://www.cnblogs.com/gl-developer/p/6170423.html
- https://blog.csdn.net/daicooper/article/details/79905660
- https://blog.csdn.net/darkangel1228/article/details/80004222
- https://blog.csdn.net/darkangel1228/article/details/80003967