目錄
@[toc]
前言
最近在學習PaddlePaddle在各個顯卡驅動版本的安裝和使用,所以同時也學習如何在Ubuntu安裝和卸載CUDA和CUDNN,在學習過程中,順便記錄學習過程。在供大家學習的同時,也在加強自己的記憶。本文章以卸載CUDA 11.8 和 CUDNN 8.9.6 爲例,以安裝CUDA 11.8 和 CUDNN 8.9.6 爲例。
安裝顯卡驅動
禁用nouveau驅動
sudo vim /etc/modprobe.d/blacklist.conf
在文本最後添加:
blacklist nouveau
options nouveau modeset=0
然後執行:
sudo update-initramfs -u
重啓後,執行以下命令,如果沒有屏幕輸出,說明禁用nouveau成功:
lsmod | grep nouveau
下載驅動
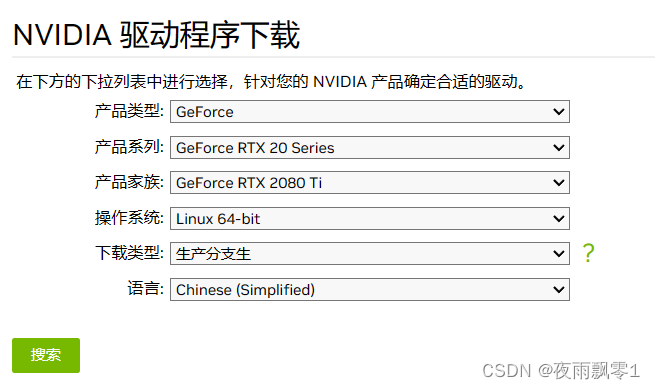
官網下載地址:https://www.nvidia.cn/Download/index.aspx?lang=cn ,根據自己顯卡的情況下載對應版本的顯卡驅動,比如筆者的顯卡是RTX2080ti:
下載完成之後會得到一個安裝包,不同版本文件名可能不一樣:
NVIDIA-Linux-x86_64-535.113.01.run
卸載舊驅動
以下操作都需要在命令界面操作,執行以下快捷鍵進入命令界面,並登錄(注意:如果是桌面,操作這個會黑屏,如果是遠程登錄,不需要執行這條命令):
Ctrl-Alt+F1
執行以下命令禁用X-Window服務,否則無法安裝顯卡驅動:
sudo service lightdm stop
執行以下三條命令卸載原有顯卡驅動:
sudo apt-get remove --purge nvidia*
sudo chmod +x NVIDIA-Linux-x86_64-410.93.run
sudo ./NVIDIA-Linux-x86_64-535.113.01.run --uninstall
安裝新驅動
直接執行驅動文件即可安裝新驅動,一直默認即可:
sudo ./NVIDIA-Linux-x86_64-410.93.run
執行以下命令啓動X-Window服務
sudo service lightdm start
最後執行重啓命令,重啓系統即可:
reboot
注意: 如果系統重啓之後出現重複登錄的情況,多數情況下都是安裝了錯誤版本的顯卡驅動。需要下載對應本身機器安裝的顯卡版本。
卸載CUDA
卸載CUDA很簡單,一條命令就可以了,主要執行的是CUDA自帶的卸載腳本,讀者要根據自己的cuda版本找到卸載腳本:
sudo //usr/local/cuda-11.8/bin/cuda-uninstaller
卸載之後,還有一些殘留的文件夾,之前安裝的是CUDA 11.8。可以一併刪除:
sudo rm -rf /usr/local/cuda-11.8/
這樣就算卸載完了CUDA。
安裝CUDA
安裝的CUDA和CUDNN版本:
- CUDA 11.8
- CUDNN 8.9.6
接下來的安裝步驟都是在root用戶下操作的。
下載和安裝CUDA
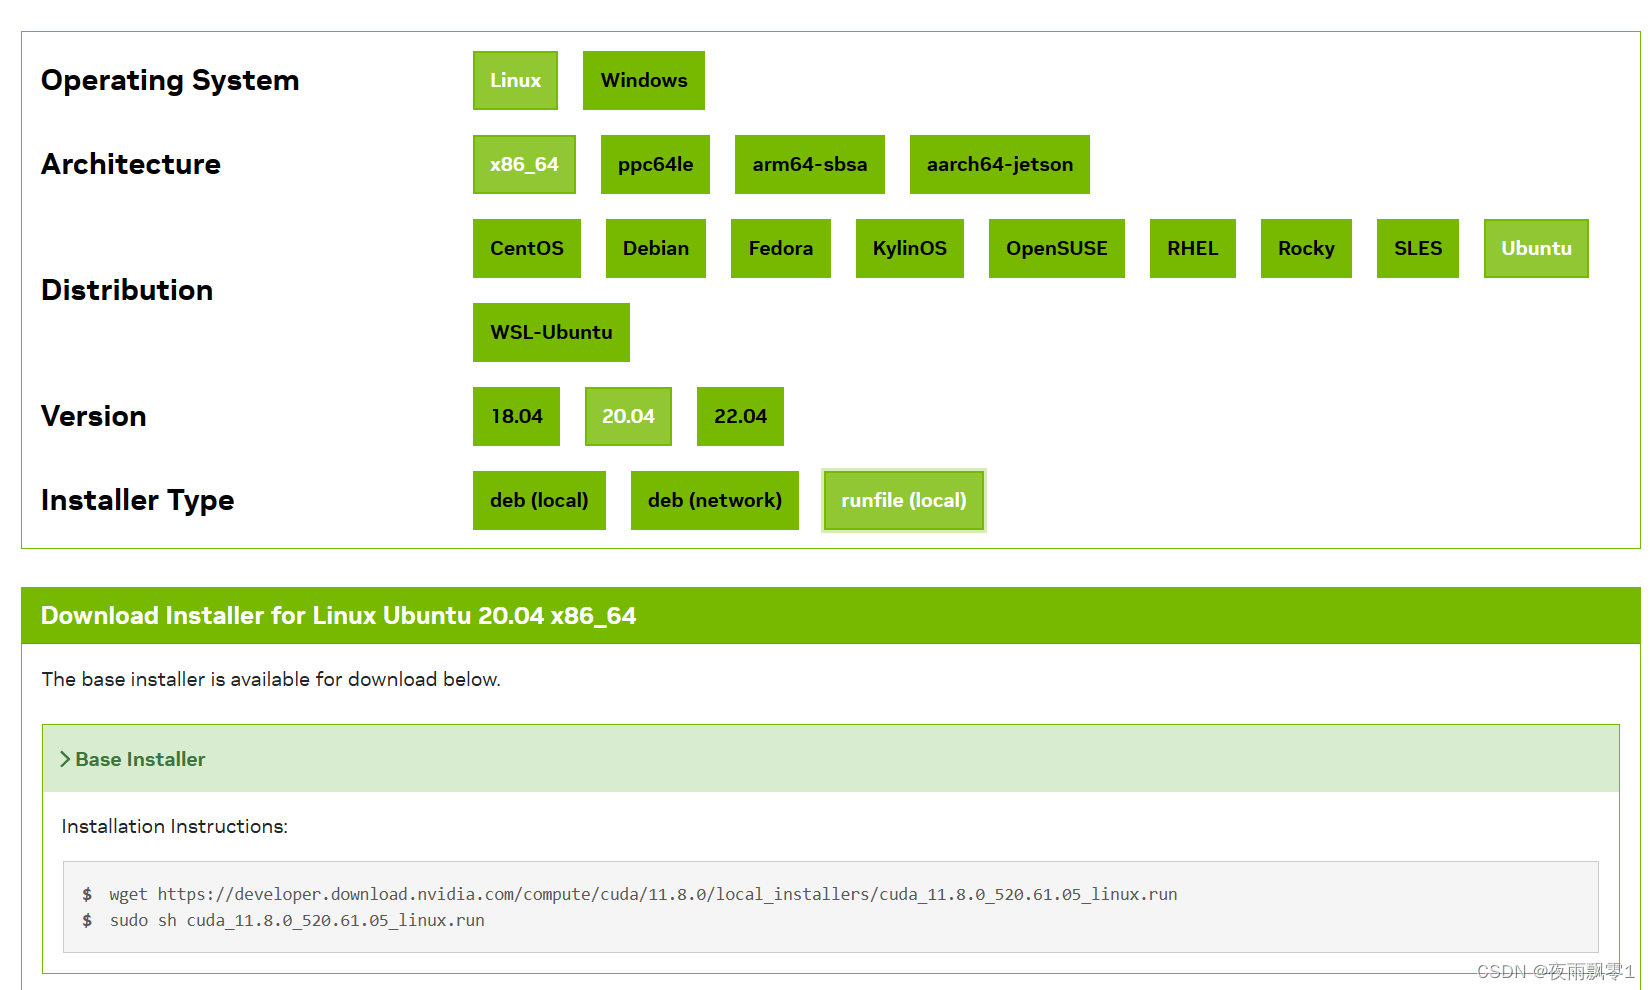
我們可以在官網:CUDA下載頁面,
下載符合自己系統版本的CUDA。頁面如下:
下載完成之後,給文件賦予執行權限:
chmod +x cuda_11.8.0_520.61.05_linux.run
執行安裝包,開始安裝:
./cuda_11.8.0_520.61.05_linux.run
開始安裝之後,需要閱讀說明,可以直接輸入accept同意:
┌──────────────────────────────────────────────────────────────────────────────┐
│  End User License Agreement                                                  │
│  --------------------------                                                  │
│                                                                              │
│  NVIDIA Software License Agreement and CUDA Supplement to                    │
│  Software License Agreement. Last updated: October 8, 2021                   │
│                                                                              │
│  The CUDA Toolkit End User License Agreement applies to the                  │
│  NVIDIA CUDA Toolkit, the NVIDIA CUDA Samples, the NVIDIA                    │
│  Display Driver, NVIDIA Nsight tools (Visual Studio Edition),                │
│  and the associated documentation on CUDA APIs, programming                  │
│  model and development tools. If you do not agree with the                   │
│  terms and conditions of the license agreement, then do not                  │
│  download or use the software.                                               │
│                                                                              │
│  Last updated: October 8, 2021.                                              │
│                                                                              │
│                                                                              │
│  Preface                                                                     │
│  -------                                                                     │
│                                                                              │
│──────────────────────────────────────────────────────────────────────────────│
│ Do you accept the above EULA? (accept/decline/quit):                         │
│ accept                                                                       │
└──────────────────────────────────────────────────────────────────────────────┘
同意說明之後,可以開始安裝,可以通過上下鍵移動,回車鍵選擇和取消。這裏要注意取消勾選安裝驅動,因爲我們已經安裝過驅動了。然後移動到Install回車開始安裝即可。
┌──────────────────────────────────────────────────────────────────────────────┐
│ CUDA Installer                                                               │
│ - [ ] Driver                                                                 │
│      [ ] 520.61.05                                                           │
│ + [X] CUDA Toolkit 11.8                                                      │
│   [X] CUDA Demo Suite 11.8                                                   │
│   [X] CUDA Documentation 11.8                                                │
│ - [ ] Kernel Objects                                                         │
│      [ ] nvidia-fs                                                           │
│   Options                                                                    │
│   Install                                                                    │
│                                                                              │
│                                                                              │
│                                                                              │
│                                                                              │
│                                                                              │
│                                                                              │
│                                                                              │
│                                                                              │
│                                                                              │
│                                                                              │
│                                                                              │
│                                                                              │
│ Up/Down: Move | Left/Right: Expand | 'Enter': Select | 'A': Advanced options │
└──────────────────────────────────────────────────────────────────────────────┘
安裝完成之後,可以配置他們的環境變量,在vim ~/.bashrc的最後加上以下配置信息:
export LD_LIBRARY_PATH=/usr/local/cuda-11.8/lib64:/usr/local/cuda/extras/CPUTI/lib64
export CUDA_HOME=/usr/local/cuda-11.8
export PATH=$PATH:$LD_LIBRARY_PATH:$CUDA_HOME/bin
最後使用命令source ~/.bashrc使它生效。
可以使用命令nvcc -V查看安裝的版本信息:
test@test:~$ nvcc -V
nvcc: NVIDIA (R) Cuda compiler driver
Copyright (c) 2005-2022 NVIDIA Corporation
Built on Wed_Sep_21_10:33:58_PDT_2022
Cuda compilation tools, release 11.8, V11.8.89
Build cuda_11.8.r11.8/compiler.31833905_0
測試安裝是否成功
執行以下幾條命令:
/usr/local/cuda-11.8/extras/demo_suite/
./deviceQuery
正常情況下輸出:
./deviceQuery Starting...

 CUDA Device Query (Runtime API) version (CUDART static linking)

Detected 2 CUDA Capable device(s)

Device 0: "NVIDIA GeForce RTX 2080 Ti"
  CUDA Driver Version / Runtime Version          12.2 / 11.8
  CUDA Capability Major/Minor version number:    7.5
  Total amount of global memory:                 22189 MBytes (23267246080 bytes)
  (68) Multiprocessors, ( 64) CUDA Cores/MP:     4352 CUDA Cores
  GPU Max Clock rate:                            1545 MHz (1.54 GHz)
  Memory Clock rate:                             7000 Mhz
  Memory Bus Width:                              352-bit
  L2 Cache Size:                                 5767168 bytes
  Maximum Texture Dimension Size (x,y,z)         1D=(131072), 2D=(131072, 65536), 3D=(16384, 16384, 16384)
  Maximum Layered 1D Texture Size, (num) layers  1D=(32768), 2048 layers
  Maximum Layered 2D Texture Size, (num) layers  2D=(32768, 32768), 2048 layers
  Total amount of constant memory:               65536 bytes
  Total amount of shared memory per block:       49152 bytes
  Total number of registers available per block: 65536
  Warp size:                                     32
  Maximum number of threads per multiprocessor:  1024
  Maximum number of threads per block:           1024
  Max dimension size of a thread block (x,y,z): (1024, 1024, 64)
  Max dimension size of a grid size    (x,y,z): (2147483647, 65535, 65535)
  Maximum memory pitch:                          2147483647 bytes
  Texture alignment:                             512 bytes
  Concurrent copy and kernel execution:          Yes with 3 copy engine(s)
  Run time limit on kernels:                     No
  Integrated GPU sharing Host Memory:            No
  Support host page-locked memory mapping:       Yes
  Alignment requirement for Surfaces:            Yes
  Device has ECC support:                        Disabled
  Device supports Unified Addressing (UVA):      Yes
  Device supports Compute Preemption:            Yes
  Supports Cooperative Kernel Launch:            Yes
  Supports MultiDevice Co-op Kernel Launch:      Yes
  Device PCI Domain ID / Bus ID / location ID:   0 / 1 / 0
  Compute Mode:
     < Default (multiple host threads can use ::cudaSetDevice() with device simultaneously) >
················································
deviceQuery, CUDA Driver = CUDART, CUDA Driver Version = 12.2, CUDA Runtime Version = 11.8, NumDevs = 2, Device0 = NVIDIA GeForce RTX 2080 Ti, Device1 = NVIDIA GeForce RTX 2080 Ti
Result = PASS
下載和安裝CUDNN
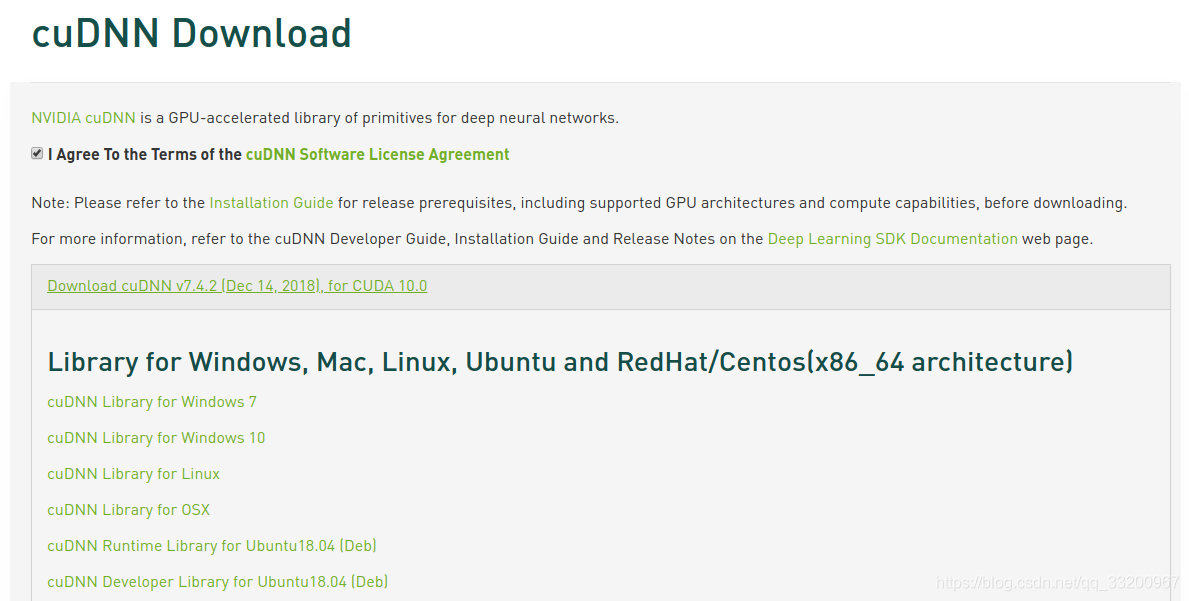
進入到CUDNN的下載官網:https://developer.nvidia.com/rdp/cudnn-download ,然點擊Download開始選擇下載版本,當然在下載之前還有登錄,選擇版本界面如下,我們選擇cuDNN Library for Linux:
下載之後是一個壓縮包,如下:
cudnn-linux-x86_64-8.9.6.50_cuda11-archive.tar.xz
然後對它進行解壓,命令如下:
tar -xf cudnn-linux-x86_64-8.9.6.50_cuda11-archive.tar.xz
解壓之後可以得到兩個文件夾:
cudnn-linux-x86_64-8.9.6.50_cuda11-archive/include/
cudnn-linux-x86_64-8.9.6.50_cuda11-archive/lib/
cudnn-linux-x86_64-8.9.6.50_cuda11-archive/LICENSE
使用以下兩條命令複製這些文件到CUDA目錄下:
cp cudnn-linux-x86_64-8.9.6.50_cuda11-archive/lib/* /usr/local/cuda-11.8/lib64/
cp cudnn-linux-x86_64-8.9.6.50_cuda11-archive/include/* /usr/local/cuda-11.8/include/
拷貝完成之後,可以使用以下命令查看CUDNN的版本信息:
cat /usr/local/cuda-11.8/include/cudnn_version.h | grep CUDNN_MAJOR -A 2
測試安裝結果
到這裏就已經完成了CUDA 11.8 和 CUDNN 8.9.6 的安裝。可以安裝對應的Pytorch的GPU版本測試是否可以正常使用了。安裝如下:
pip install torch==2.0.1 torchvision==0.15.2 torchaudio==2.0.2 --index-url https://download.pytorch.org/whl/cu118
然後使用以下的程序測試安裝情況:
import torch
import torch.nn as nn
import torch.nn.functional as F
import torch.optim as optim
import torch.backends.cudnn as cudnn
from torchvision import datasets, transforms


class Net(nn.Module):
    def __init__(self):
        super(Net, self).__init__()
        self.conv1 = nn.Conv2d(1, 10, kernel_size=5)
        self.conv2 = nn.Conv2d(10, 20, kernel_size=5)
        self.conv2_drop = nn.Dropout2d()
        self.fc1 = nn.Linear(320, 50)
        self.fc2 = nn.Linear(50, 10)

    def forward(self, x):
        x = F.relu(F.max_pool2d(self.conv1(x), 2))
        x = F.relu(F.max_pool2d(self.conv2_drop(self.conv2(x)), 2))
        x = x.view(-1, 320)
        x = F.relu(self.fc1(x))
        x = F.dropout(x, training=self.training)
        x = self.fc2(x)
        return F.log_softmax(x, dim=1)


def train(model, device, train_loader, optimizer, epoch):
    model.train()
    for batch_idx, (data, target) in enumerate(train_loader):
        data, target = data.to(device), target.to(device)
        optimizer.zero_grad()
        output = model(data)
        loss = F.nll_loss(output, target)
        loss.backward()
        optimizer.step()
        if batch_idx % 10 == 0:
            print('Train Epoch: {} [{}/{} ({:.0f}%)]\tLoss: {:.6f}'.format(
                epoch, batch_idx * len(data), len(train_loader.dataset),
                       100. * batch_idx / len(train_loader), loss.item()))

def main():
    cudnn.benchmark = True
    torch.manual_seed(1)
    device = torch.device("cuda")
    kwargs = {'num_workers': 1, 'pin_memory': True}
    train_loader = torch.utils.data.DataLoader(
        datasets.MNIST('../data', train=True, download=True,
                       transform=transforms.Compose([
                           transforms.ToTensor(),
                           transforms.Normalize((0.1307,), (0.3081,))
                       ])),
        batch_size=64, shuffle=True, **kwargs)

    model = Net().to(device)
    optimizer = optim.SGD(model.parameters(), lr=0.01, momentum=0.5)

    for epoch in range(1, 11):
        train(model, device, train_loader, optimizer, epoch)


if __name__ == '__main__':
    main()
如果正常輸出一下以下信息,證明已經安裝成了:
Train Epoch: 1 [0/60000 (0%)]   Loss: 2.365850
Train Epoch: 1 [640/60000 (1%)] Loss: 2.305295
Train Epoch: 1 [1280/60000 (2%)]    Loss: 2.301407
Train Epoch: 1 [1920/60000 (3%)]    Loss: 2.316538
Train Epoch: 1 [2560/60000 (4%)]    Loss: 2.255809
Train Epoch: 1 [3200/60000 (5%)]    Loss: 2.224511
Train Epoch: 1 [3840/60000 (6%)]    Loss: 2.216569
Train Epoch: 1 [4480/60000 (7%)]    Loss: 2.181396
參考資料
- https://developer.nvidia.com
- https://www.cnblogs.com/luofeel/p/8654964.html
]